Table of Contents
In this guide, you will see how to add extra fee at checkout instead of raising your price in WooCommerce, without killing conversion. (Step-by-step)
Key Takeaways
- Using one pricing method for all orders leads to overcharging some customers and under-recovering costs on others.
- Raise product prices only when the cost applies to every order. When the cost is conditional, it’s better to add extra fee at checkout so pricing stays accurate.
- Conditional fees help you add extra fee at checkout only when needed, based on payment method, cart value, product type, or location.
- When you add extra fee at checkout, it should be clearly labeled, visible early, and applied only when conditions are met.
Adding a WooCommerce extra fee at checkout is smarter than raising product prices — but most stores get it wrong. Here’s why, and how to fix it.
Some orders cost more due to payment method, product type, packaging, or order value. But most stores apply one pricing approach across all orders by adding extra fee at checkout.
This creates a mismatch. Some customers pay for costs that do not apply to them. Other orders still fail to recover the actual cost.
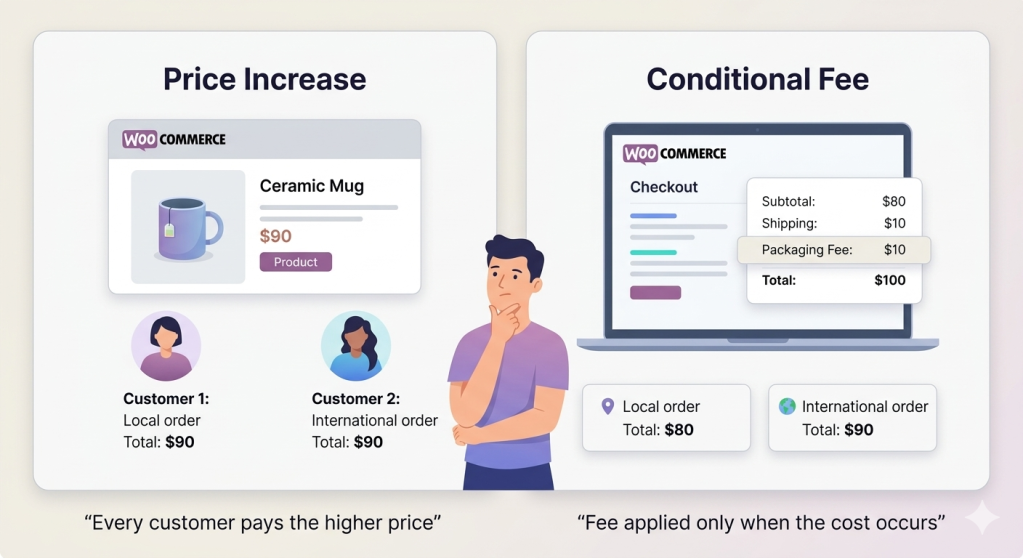
Example: A product costs $20. Fragile packaging costs $3, but only for certain orders.
Price increase → $23 for all customers
Fee → $20 + $3 only when needed
The problem is simple. One pricing method is being used for different cost conditions.
So, lets learn how to add extra fee at checkout in WooCommerce instead of raising product prices, without hurting conversions.
WooCommerce additional fees on checkout: when to use them instead of raising prices
The answer depends on how the cost appears.
When to increase product prices in WooCommerce
Use a product price increase when the cost applies to every order.
- Manufacturing cost increases
- Standard packaging changes for all products
- Product quality or materials improve
In these cases, every unit carries the same additional cost.
When to add extra checkout fee in WooCommerce
Use a checkout fee when the cost applies only in certain conditions:
- Cash on Delivery handling
- Fragile or special packaging
- Small order processing
- Remote delivery locations
In these cases, the cost appears only for specific orders.
Example: Price increase vs checkout fee
A mug costs $20. Fragile packaging costs $3, but only for some orders.
- Price increase → $23 for all customers
- Fee → $20 + $3 only when needed
| Universal Cost → adjust product price |
| Conditional cost → apply a fee |
If you apply the wrong method, pricing becomes inaccurate or inconsistent.
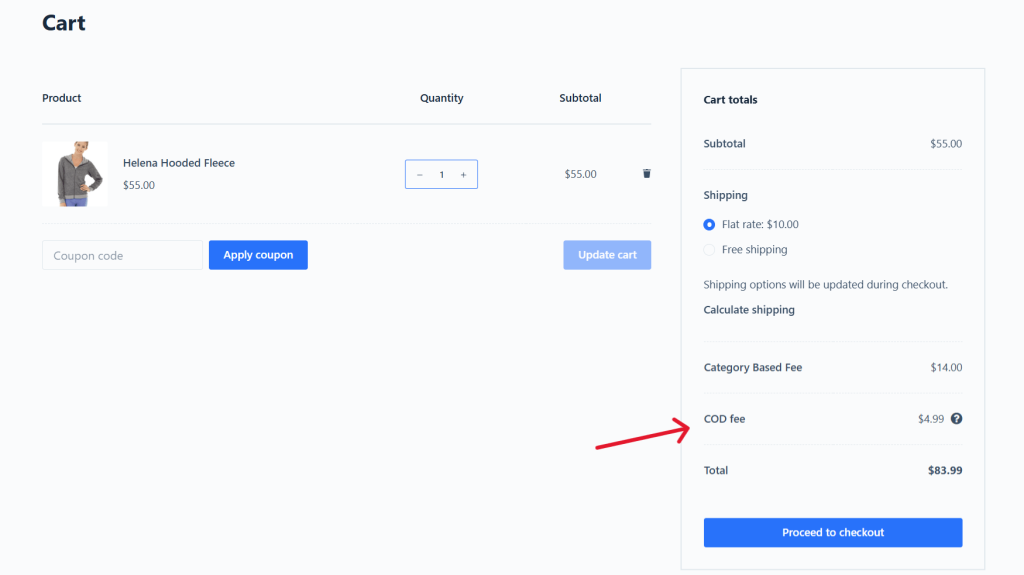
Why does the checkout total increase in WooCommerce at the last step?
Choosing between price and fee is only the first step. But more problems can arise during execution.
A customer adds a product and reaches checkout. The price looks final until the last step. Then the total increases.
| Baymard Institute tested 4,400+ real checkout sessions across 25 rounds of usability research and found one consistent pattern: unexpected fees at the final step are the single biggest reason shoppers abandon checkout, accounting for 48% of all abandonments among shoppers who actually intended to buy. The fee amount was rarely the problem. The timing was. Stores that apply fees conditionally, only when a customer selects COD or adds a fragile item to their cart, remove the element of surprise entirely. The fee stops being a shock and becomes an explanation. That distinction is what separates a checkout that converts from one that loses nearly half its buyers at the final step. |
What causes unexpected fees at checkout
- Fee appears only at checkout
- No earlier signal of the charge
- Label does not explain the reason
A mug costs $20. You apply a $3 fragile packaging fee only when required. At checkout, the total changes to $23.
The fee is correct. But the timing creates doubt.
How to make checkout fees clear and predictable
- Show or hint the fee before checkout
- Use clear labels that explain the charge
- Apply the fee only when the condition is met
When the price feels predictable, customers move forward.
Setting up the fee correctly is step one. But if the timing or label is off, even a valid fee will cost you the sale. Read this to understand exactly why customers abandon checkout when fees appear the wrong way: Why Customers Abandon Carts When Stores Add Extra Fees at Checkout
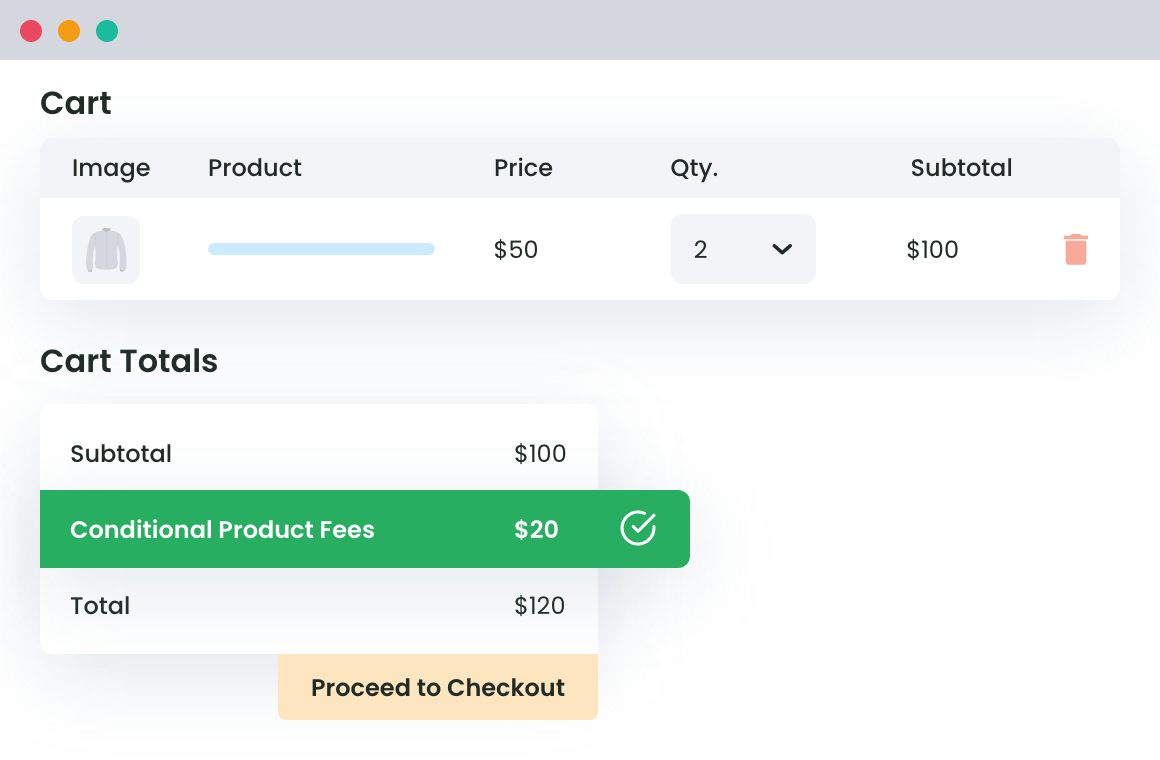
How to add extra fee in WooCommerce using a conditional fee plugin (step-by-step)
You can apply your first conditional fee in under 5 minutes. Start with one rule and test it in your checkout.
Step 1: Choose the right fee to apply
Choose a fee that applies only in specific cases.
- Cash on Delivery fee
- Small order fee
- Special packaging fee
Step 2: Set conditions for the fee
Do not apply the fee to all orders. Set a clear condition.
Example: Order total is less than $50 → Apply $5 small order fee
Step 3: Use clear fee labels
Do not use generic labels like “Extra Fee”. Say exactly why the fee exists.
Better labels:
- “Cash on Delivery Handling Fee”
- “Small Order Processing Fee”
- “Fragile Packaging Fee”
Step 4: Test the fee in checkout
Go to your checkout page. Test the scenario like a customer.
- Does the fee appear only when expected?
- Is the label easy to understand?
- Does the total feel predictable?
Quick setup example: Customer selects Cash on Delivery → $4 fee appears. Customer switches to online payment → Fee disappears. This keeps pricing consistent. The customer understands what changed and why.
Where to set this up:
WooCommerce does not handle conditional fees well by default. You can add flat fees. But you cannot control when and why they appear. This is where most stores struggle.
They either apply fees to all orders or fail to control when fees should apply.
Use conditional fee logic instead: You need a setup where fees respond to real conditions. For example:
- Apply fee only for specific products
- Apply fee only for Cash on Delivery
The right WooCommerce checkout fee plugin like Dotstore WooCommerce Extra Fees Plugin lets you do this directly at checkout without code.
- Create rules based on payment method, cart value, or products
- Show fees only when conditions match
- Add clear labels for each fee
WooCommerce Extra Fees
Make profits from every confirmed sale through smart, conditional fees.
14-day, no-questions-asked money-back guarantee.
This keeps the total consistent. The customer sees the reason behind the change. Start with one rule and then test how it behaves at checkout.
With over 11,548+ happy customers and over 120 satisfied reviews, the plugin is a must in your repository,
How to add a cash on delivery fee in WooCommerce
Cash on Delivery adds extra cost due to handling and return risk. Apply a fee only when this payment method is selected.
- Go to Dotstore → WooCommerce Extra Fees → Manage Fees
- Click Add New Fee
- Enter fee title (e.g., “COD Handling Fee”)
- Select Fee Type → Fixed
- Enter amount (e.g., $5)
- Under Conditions, select Payment Gateway
- Choose Cash on Delivery
- Save changes
Test:
- Select COD → fee appears
- Select another payment method → fee disappears
This ensures only high-risk orders carry the extra cost, while other customers see no change.
Also read: How to add cash on delivery fees in WooCommerce
How to add a small order fee in WooCommerce
Low-value orders reduce margin due to fixed processing costs. Apply a fee only when the cart total is below a set threshold.
- Go to Dotstore → WooCommerce Extra Fees → Manage Fees
- Click Add New Fee
- Enter fee title (e.g., “Small Order Fee”)
- Select Fee Type → Fixed
- Enter amount (e.g., $4)
- Under Conditions, select Cart Total
- Set condition → Less than $50
- Save changes
Test:
- Cart total $30 → fee appears
- Cart total $60 → fee disappears
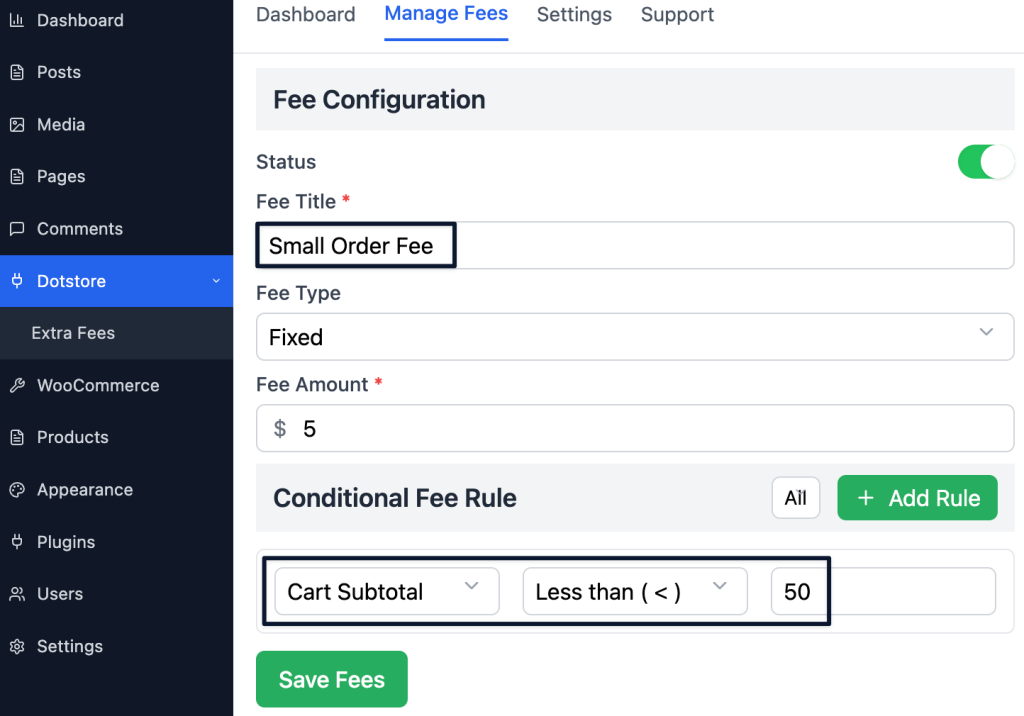
This protects margin on low-value orders without affecting higher-value purchases.
How to add product-based fees in WooCommerce
Some products cost more to handle due to size or packaging. You can easily add extra fee based on the category of products in the cart.
- Go to Dotstore → WooCommerce Extra Fees → Manage Fees
- Click Add New Fee
- Enter fee title (e.g., “Fragile Item Fee”)
- Select Fee Type → Fixed or Percentage
- Enter amount (e.g., $3 or 2%)
- Under Conditions, select Product Category
- Choose the category (e.g., Fragile Items)
- Save changes
Test:
- Add product from category → fee appears
- Remove product → fee disappears
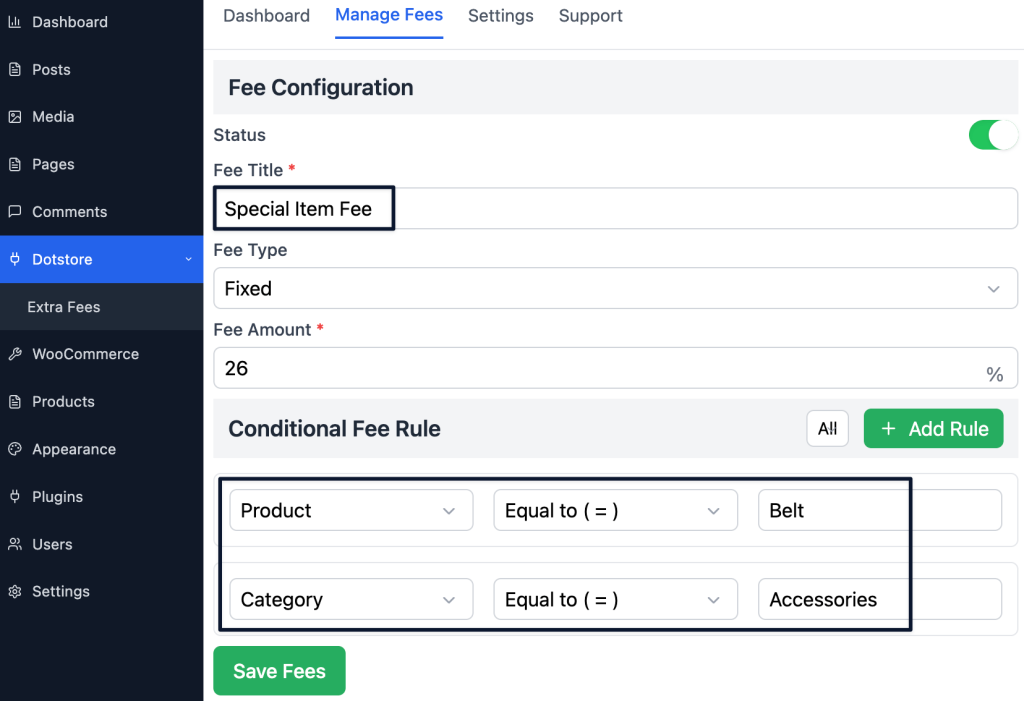
This keeps pricing accurate by charging only when additional handling is required.
How to add location-based fees in WooCommerce
Delivery costs vary by location, especially for remote areas. Apply a fee only where the extra cost exists.
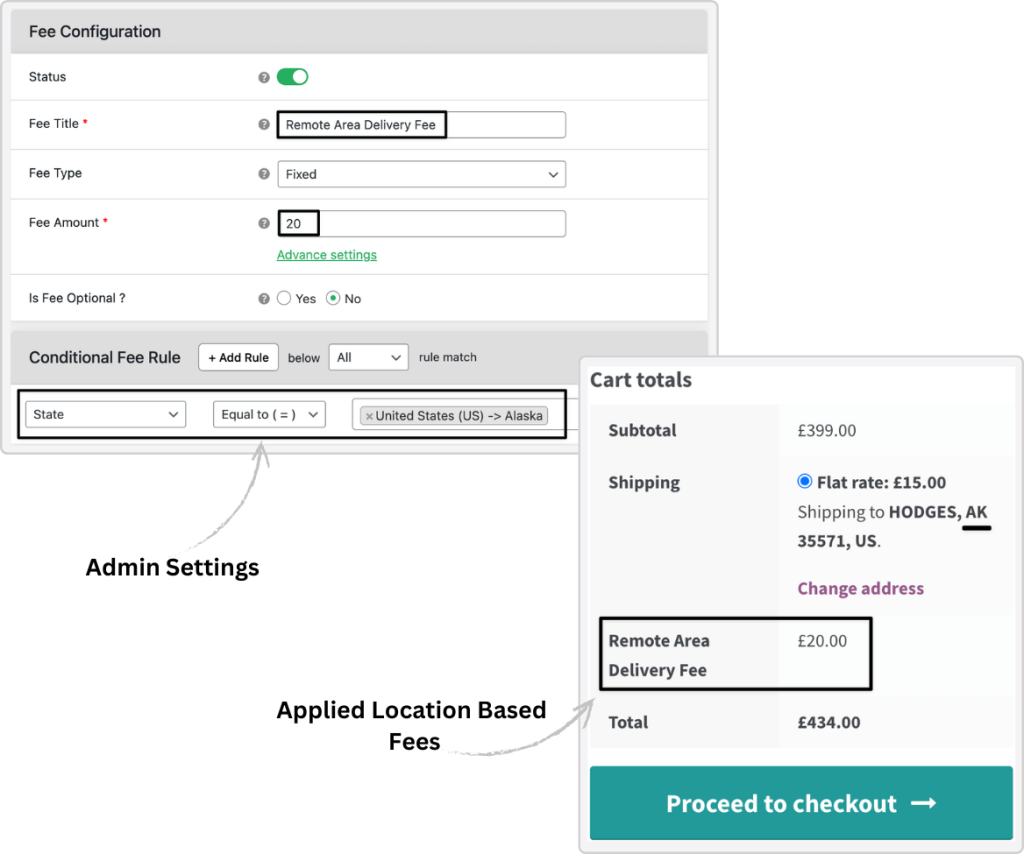
- Go to Dotstore → WooCommerce Extra Fees → Manage Fees
- Click Add New Fee
- Enter fee title (e.g., “Remote Area Fee”)
- Select Fee Type → Fixed
- Enter amount (e.g., $6)
- Under Conditions, select Location (Country/State/Zip)
- Define the target region
- Save changes
Test:
- Enter address in target region → fee appears
- Change location → fee disappears
This recovers delivery cost differences without increasing prices for all customers.
You can also add extra fees based on the payment method.
WooCommerce checkout fee checklist (fix pricing mistakes fast)
Use this to check if your current setup is helping or hurting conversions.
1. Is the fee clearly labeled?
Example: “Fragile Packaging Fee” vs “Service Fee”
2. Does the fee appear only when the cost exists?
Example: Packaging fee only for fragile items
3. Can customers see or expect the fee before checkout?
Example: Mentioned on product or cart page
4. Are multiple fees applied to the same order?
Example: Packaging + service + processing fees
5. Is the fee proportional to the actual cost?
Example: $3 packaging vs $15 unexplained charge
6. Does the total update clearly when conditions change?
Example: Switching payment method updates fee instantly
7. Are you using a fee only when the cost is conditional?
Example: COD fee, fragile packaging, small order fee
8. Are you increasing product prices for costs that don’t apply to all orders?
Example: Adding $3 to all products for packaging
9. Does your pricing method match how the cost occurs?
→ Universal cost = product price
→ Conditional cost = checkout fee
If you answered “No” to even one question, your checkout is likely leaking margin or hurting conversions. Fix one condition today and test the impact.
Also read: Effective WooCommerce conditional discounts for first-time buyers, B2B clients, and loyal customers
Fix your WooCommerce checkout pricing today
You now know when to raise prices and when to apply a checkout fee. You’ve seen how to set up fees for COD, small orders, products, and locations so costs are applied only when they occur.
Next step: Apply one conditional fee in your store and test it in checkout.
If you want to do this without custom code, use the Dotstore WooCommerce Extra Fees Plugin to create and control these rules directly.
WooCommerce Extra Fees
Make profits from every confirmed sale through smart, conditional fees.
14-day, no-questions-asked money-back guarantee.
FAQ: WooCommerce extra fee at checkout
Q1: How do I add a WooCommerce extra fee at checkout without code?
You can add a WooCommerce extra fee at checkout without writing any code by using a plugin like the Dotstore WooCommerce Extra Fees Plugin. Simply go to Dotstore → WooCommerce Extra Fees → Manage Fees, click Add New Fee, set your fee title, type (fixed or percentage), amount, and define a condition (such as cart total, payment method, or product category). Save and test at checkout. No coding required at any step.
Q2: How do I add a fee based on payment method in WooCommerce?
To add a fee based on payment method in WooCommerce, create a new fee in the Extra Fees Plugin and set the condition to “Payment Gateway.” Then select the specific method — for example, Cash on Delivery. The fee will appear only when that payment method is selected at checkout, and disappear automatically when the customer switches to another method like card or online payment.
Q3: Can I add WooCommerce additional fees on checkout for specific products?
Yes. You can add WooCommerce additional fees on checkout for specific products or product categories. In the Extra Fees Plugin, set the condition to “Product Category” and choose the relevant category (for example, Fragile Items). The fee will only appear when a product from that category is in the cart — other orders are not affected.
Q4: What is the best WooCommerce checkout fee plugin?
The Dotstore WooCommerce Extra Fees Plugin is one of the most flexible WooCommerce checkout fee plugins available. It lets you create conditional fees based on payment method, cart value, product category, and customer location — all without code. You can also label each fee clearly, schedule fees for specific dates, and track fee income from the dashboard.
Q5: How do I add a COD fee in WooCommerce?
To add a Cash on Delivery fee in WooCommerce, go to Dotstore → WooCommerce Extra Fees → Manage Fees and create a new fee. Set the fee title to something like “COD Handling Fee,” choose Fixed as the fee type, enter your amount (e.g. $5), and under Conditions select Payment Gateway → Cash on Delivery. Save and test: the fee should appear when COD is selected and disappear when another payment method is chosen.