Table of Contents
Online stores have altered the way people shop. Gone are the days when one had to step out of their house to make a purchase.
Imagine all that pain a customer experienced, walking out in those scorching summer days, and then waiting in a long queue to pay bills. But today, all they need to do is swipe through an app, select the products, pay, and get them delivered right to their doorstep.
Fascinating, isn’t it?
And why won’t it be? When someone is getting all the comfort of purchasing goods at a nominal price, the concept has to achieve success. But all of this is beneficial from the customer’s point of view. What about you, the owner of the store?
Right from hosting your website to promoting products, packaging, shipment, and delivery, everything is billed against your company. How do you earn a profit?
While there isn’t much that can be done about the pricing of the product as they have to be market-competitive, one thing that can be customized is the fees added during the checkout process.
And, in this article, we will describe how to do it. Overall, you will learn…
- Why Do You Need Additional WooCommerce Checkout Fees?
- WooCommerce Extra Fees Plugin – Installing, configuring, and using the plugin.
- Examples of how to add Conditional Fees during Checkout
Why Do You Need Additional Fees On Checkout?
There are thousands of products added to a WooCommerce store – Ranging from $5 to $5000 and beyond. It means, keeping a flat rate of shipping isn’t the best way to charge the customers.
For instance, consider two customers, Ray and Andrew.
Ray is based out of New York and has placed an order of $245. On the other hand, Andrew is from LA and has placed an order of $199. Considering that the shipment and delivery charges incurred in sending the package to Andrew is much higher than that of Ray, your store would need to implement the notion of conditional fees during checkout.
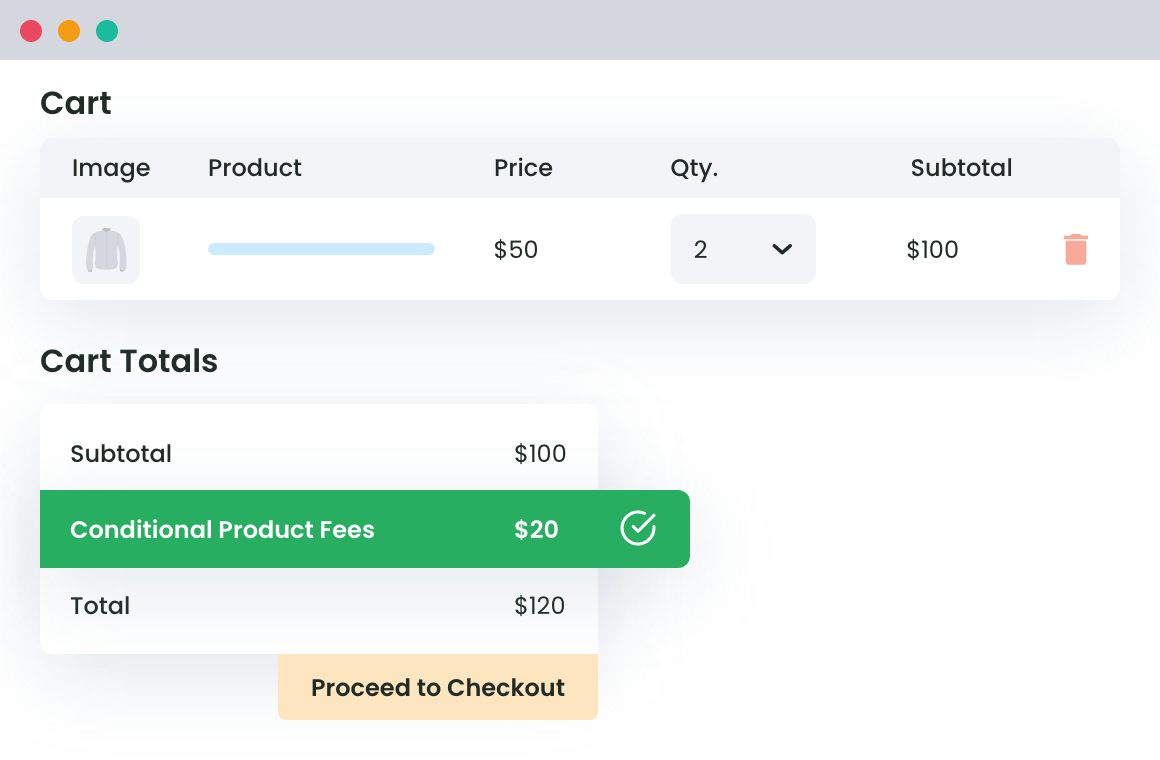
What this does is, charge additional fees to the buyer in case the cart maps a given condition. Here, it could have been an additional $40 if the city is LA or if the cart value is less than 200. This helps the store owner be specific in the earnings and not pay from his pockets.
Another reason why your WooCommerce store needs conditional fees is to cover up the charges incurred in accepting card payments or shipping products to a different region is huge and requires additional costs.
But how do you set up additional fees during checkout in WooCommerce? By default, WooCommerce allows flat-rate shipping and is the same for all products and all customers. So how can you customize the above and allow conditional rates for customers?
WooCommerce Extra Fees
Make profits from every confirmed sale through smart, conditional fees.
14-day, no-questions-asked money-back guarantee.
And here is where we introduce you to the WooCommerce Extra Fees Plugin.
WooCommerce Extra Fees Plugin: Adding Conditional Fees during Checkout
The WooCommerce Extra Fees Plugin is one that has a multitude of rules and conditions that can be imposed on the store to add additional fees during the checkout process. It could be anything from the cart value to the weight, based on the country to the product and payment method.
In case you are not sure how to proceed with the plugin, here is a detailed guide on using WooCommerce checkout extra fees Plugin for your online store.
Getting Started
- The first thing to do is to download and install the plugin.
- Login to the WordPress dashboard using your credentials and validating your identity.
- Move to the plugins in the dashboard and click on Add New.
- Here, in the search bar, type WooCommerce Extra Fees Plugin
- As soon as the page opens, click on download.
- Once done, install the plugin and activate it.
Configuring the Plugin
- After you have completed the first step, now we move ahead to see how to set up the plugin that builds an automated system for conditional fees during checkout.
- Once again, log in to the dashboard and move down to the plugin.
- Here, select the name of the plugin and click on it.
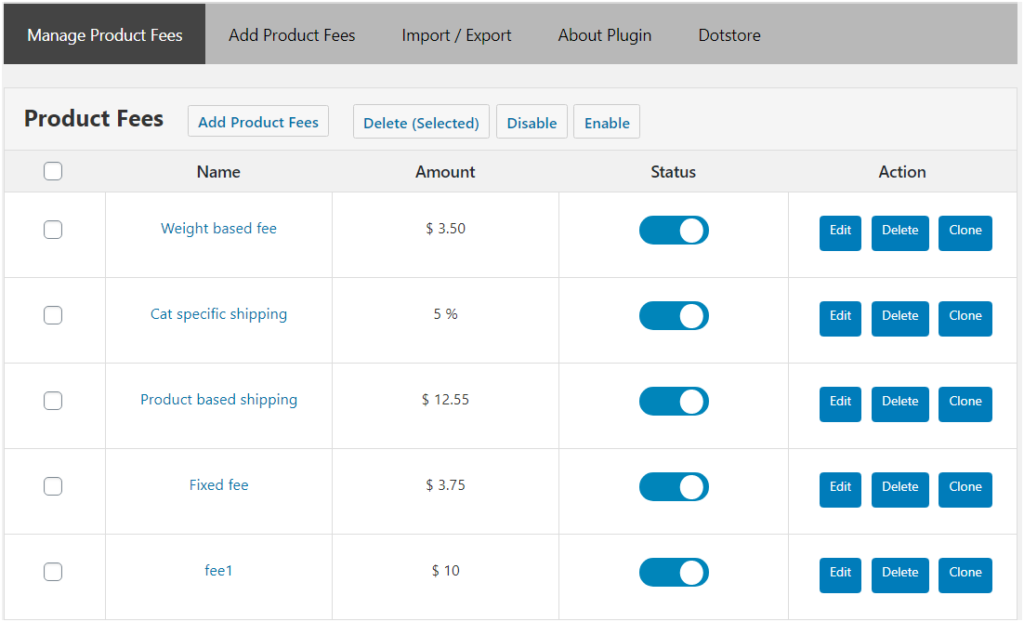
- The new page that opens will have multiple tabs. The first one says manage plugin. Since we are using it for the first time, the tab will have no columns.
- Move to the next tab that says Add Product Fees.
- Follow the settings given below to configure your plugin.
- Status: To activate the condition, toggle this option. In case, you wish to discontinue the same, you can switch it off anytime later.
- Product Fee Title: Add a title to the rule that you wish to use it and differentiate from the others.
- Select Fee Type: The WooCommerce Extra Fees Plugin allows you to set up conditional fees in two ways. You can either go with a fixed or percentage-based model.
- Tooltip Description: Here, you can provide a description of the rule and how will it charge customers once the rule is activated.
- Start Date/End Date: At times, it so happens that you wish to apply a rule only for a specific period. Maybe, you are performing A/B testing or running on offer—you can set a start date as well as an end date for the same.
- Is The Amount Taxable: You can choose whether or not the amount would be taxable.
The aforementioned are the basic things you need to add when configuring the plugin. What’s missing here is how to apply the condition or where.
Also, how can you set up different conditions in the said plugin? Just below the settings option, you will find a tab that says Conditional Fee Rule.
The plugin allows you to add rules based on:
- Address
- Product
- User Specific
- Cart Specific
- Payment Specific
- Shipment Specific
To help you understand better, we outline a few examples that reflect the way you can add conditional fees during the checkout.
Case 1: Based On the Address
Consider Matt, a customer from New Orleans, ordering a Bose Headphone from your online store. The fact that shipping costs vary from region to region and product to product, you would want to add fee during the checkout process and ensure that you are not experiencing loss.
To do so, you would need to visit the plugin page. Here:
- Status: Since we are creating the rule, toggle the bar to activate the condition.
- Product Fee Title: Under this section, add a product fee title as Based on Location.
- Select Fee Type: Here, enter whether you wish to go for a standard and fixed fee or would wish to charge it based on the percentage of the final cart value.
- Tooltip Description: Provide details related to the fee title.
- Start Date/End Date: If the rule is for a specific period, enter the start date and the end date of the fee. Else, you can keep this as it is.
- Is The Amount Taxable: You can choose whether or not the amount would be taxable.
Applying the Rule
- Below the settings, move down and select the country.
- Since we are targeting the country, select equal to.
- In the last field, type in the name of the country. If you need to apply the rule to more than one country, the same can be added in the same box.
Note: The rule can be applied specifically to the country, state, zone, and postcode.
Do not forget to save the changes made in the settings. Once done, you can now go ahead to make the changes live.
Case 2: Based on the Product
Creating custom-fit product fee rules based on the product. Suppose the cart has products that are sensitive and require premiums or that the cart has a combination of products. Under such a situation, you would want to add additional fees during the checkout process.
Keep the settings related to the product fee the same. We move to see how we can create a rule based on the above.
Let’s take an example: Create a product fee rule for a blue, large-sized hoodie.
Now doing this or adding the rule here is pretty simple. Fill in the details about the product fee rule and then move down to the section where we create rules. Since we are here to create a rule of additional fees based on the products added in the cart which is here a hoodie being blue in color and large in size, we need to go select the equals to tab and finally, pick the product in reference.
Now, if you want to add more than one product under the same rule, say a red hoodie with a small size, you can select multiple products added in the same, save the changes and we are done.
But that is not it, if you wish to add multiple rules taking into consideration more than one factor, the plugin allows you to do the same as well.
Set additional fees for a blue, large-sized hoodie for customers in New Orleans.
Adding a second rule is as the above. All you need to do is click on the plus icon after you have created the first rule.
Once you do this, you will now need to select the country, click on equal to, and then select the name of the country for which the rule is applicable. Here, select a country like New Orleans. Finally, click on Save to apply the settings.
You can add as many rules as needed and also choose whether you want all of this to stand valid or what anyone would do when applying the additional fee during checkout.
WooCommerce Extra Fees
Make profits from every confirmed sale through smart, conditional fees.
14-day, no-questions-asked money-back guarantee.
Case 3: Based On Cart Value
For orders of cart value $300 or more, shipping charges are more than the fixed value. So, a customer named Beckett has added items to the cart worth $530. You would want to charge 15% of the cart value as the additional fee.
To do this, we make changes in the plugin settings first. Remember, the Select Fee Type field. Here, select percentage-based. Under the box given below, enter 15%. This will charge the customers 15% extra for all products. But that’s not what we want. We aim to apply this when the cart value exceeds $300. For this, we need to set a rule.
Now move down to the rules section. Here, under the first drop-down, select cart subtotal. Next, select greater than equal to and in the final box, enter the value as $300.
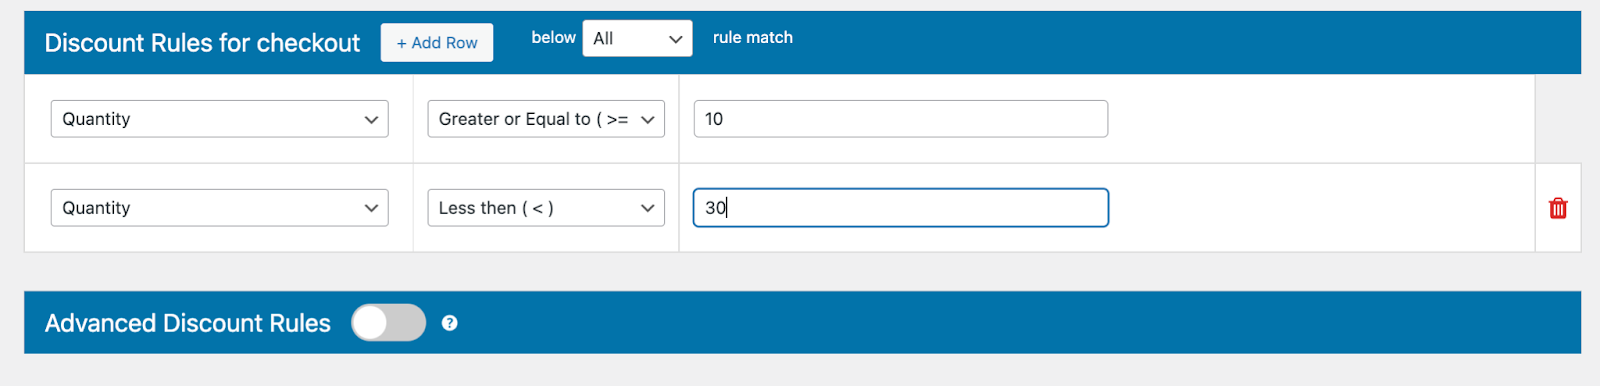
Note: A similar method is adopted if the fees are to be charged based on the cart weight or the overall quantity.
Here also, we can have more than one rule created to apply the additional fees during checkout.
Set additional fees for non-premium users when the cart value exceeds $300
Now suppose that you want to add the fees only when the user is not a premium customer. Here, what we need to do is add multiple rules for the additional fee during the checkout process. First, we would need to configure the plugin with the basic information. Now, under the rules section:
- Create a rule that specifies a cart value greater than $300.
- For the second rule, click on the plus add to add another column. Here, click on the drop-down and select the user role.
- Next, click on not equal to and finally select non-premium.
- Click on save settings to apply the changes.
Edit the Product Fees
Apart from creating a new product fee every time you find it right, the plugin gives you the ease to edit an existing product fee by making the desired changes.
To do so,
- Move to the plugin dashboard.
- Click on the plugin name and then select the same.
- The page that opens will have the list of the product fee created by you. To edit, all you need to do is simply click on the name.
- The next page would have all the information.
- Say, you wish to change the price from $10 to $13.
- Move down to the product fee price, make the changes, and click on save settings.
Once done, you are now set to use the website as a dynamically operating online store.
Final Words!
Online stores that deal in more than just selling products, for example, customizing, special packaging, etc., sometimes need to charge extra money from customers.
Getting such services with the product itself reduces the extra hassles for the buyers, and hence, they feel happy to pay extra while shopping.
So, if your WooCommerce store has similar products and you want to charge extra, do it using the WooCommerce Extra Fees Plugin and make things better for all.
WooCommerce Extra Fees
Make profits from every confirmed sale through smart, conditional fees.
14-day, no-questions-asked money-back guarantee.