Table of Contents
We’ll show you 3 different ways to add custom fees in Shopify: with a free, simple-to-use Shopify custom fee app (Dotstore Extra Fees Manager), Shopify’s native 3rd party shipping carrier rates, and Shopify POS’s custom fee option (for retail sales).
![How to add custom fees in Shopify [3 Methods] - featured image](https://www.thedotstore.com/wp-content/uploads/sites/1417/2026/03/How-to-add-custom-fees-in-Shopify-3-Methods-featured-image.png?w=1000)
Key Takeaways
- There are 3 no-code methods to add custom fees to Shopify: apps like Dotstore Extra Fees Manager, Shopify’s built-in 3rd party shipping handling carrier rate feature, and Shopify POS’s custom fee option for retail sales.
- The easiest and most flexible custom fee option is using a Shopify app like Dotstore Extra Fees Manager. It lets you apply conditional fees to the online checkout based on products, variants, cart totals, customer groups, locations, shipping methods, and more. Custom fees show up as separate charges, so customers know exactly what the extra fee is for.
- Shopify’s built-in carrier shipping handling fees can help merchants recover order fulfilment costs. But this method is fairly limited as it only applies to third-party shipping carrier rates. Also, the charges get folded into shipping rates, which makes shipping cost more, and shoppers won’t clearly see what the fee is for.
- Shopify POS’s custom fee option lets you add an extra charge to in-store orders to bill customers for gift wrapping, rush processing, etc. However, it only works for physical retail transactions, not orders received via your online store.
Do you want to add a custom fee in Shopify?
Adding custom fees to Shopify orders helps businesses recover extra costs, protect profits, and offer add-on services like gift wrapping, fragile packaging protection, rush delivery, etc.
Depending on your sales channels and the purpose of the extra charge, there are three main methods you can use to set up custom fees in Shopify:
- Add custom fees to your online checkout using a Shopify app. With an app like Dotstore Extra Fees Manager, you can charge custom fees conditionally, e.g. for specific products, locations, customer types, etc. The custom fee is transparently shown as a standalone fee, separate from the product price, shipping fee, taxes, and other charges during the checkout process, so customers are abundantly clear about what the charge is for.
- Add custom fees to online orders using Shopify’s native 3rd party shipping rates. Merchants can add custom shipping handling fees to 3rd party carrier shipping rates. While this can help recoup costs related to order processing, this extra charge isn’t shown separately. Instead, it’s bundled into the total shipping rate shown on the cart and checkout pages.
- Add in-person custom fees to retail orders using Shopify POS. Do you sell products from a physical store or a pop-up? Shopify POS lets staff manually add a percentage-based or fixed custom fee during in-person checkout. Important: this fee only applies to orders processed through POS, not the online checkout.
In this detailed tutorial, I’ll show you step by step how to add custom fees in Shopify using all three methods, along with their benefits and limitations.
A quick note: Hello, and welcome to The Dotstore’s blog! We’ve been creating ecommerce software since 2009, and our tools are now used by over 100K websites across various niches. Our team built the Extra Fees Manager app to help merchants easily create various types of fixed and percentage-based custom fees. It’s a simple-to-use app and is available in both free and pro versions. Want to find out if it works for your use case? Learn more or download the free version here.
But first, let’s get clear on the basics:
What are custom fees in Shopify?
Custom fees in Shopify are additional charges merchants add to customer orders beyond the base product price, standard shipping costs, and taxes. Custom fees help you recover specific business costs, comply with regional regulations, or offer optional services that enhance the customer experience.

Types of custom fees Shopify merchants can add
Merchants across various niches need to charge various types of custom fees, including:
- Regulatory and compliance fees that businesses are legally required to collect. For instance, in Michigan, California, and various other states, stores that sell beverages in reusable containers must collect a deposit fee that customers get back when they return the container. Similarly, many European countries mandate environmental fees on electronics or packaging materials. Examples: bottle deposits and Pfand (environmental fees), bag fees, etc.
- Service-based fees that give customers extra options they can choose during checkout. Examples: Gift wrapping, rush delivery, special packaging fees, shipping protection and insurance, eco and carbon-neutral shipping, etc.
- Location-specific fees, such as tariffs that cover the costs of shipping to certain locations.
- Operational cost recovery fees that cover expenses related to order processing. Examples: credit card surcharges, order processing fees, etc.
How to set up custom fees in Shopify with an app
Shopify’s native features for adding custom fees are pretty limited (more on this in the following sections). As such, many merchants prefer to set up extra charges using a dedicated custom fee app.
The Dotstore’s Extra Fees Manager app (available in both free and pro versions) lets you create virtually any kind of custom fee for any type of product, whether that’s handling, packaging, rush processing, or other fee types.
With this app, you can set up flat or percentage-based fees, apply them to specific products or the entire cart, and define conditions that trigger them, such as cart total, total quantity of items, customer type, orders from specific countries, etc.
This custom fee app’s in-built scheduling feature enables you to set start and end dates that automatically apply extra charges based on dates, without manually turning it off and on. And it supports multi-currency conversion that automatically converts the custom fee to each customer’s own currency.
Best of all, the Dotstore’s Extra Fees Manager app is incredibly simple to use, even if you’re not tech-savvy.
Tutorial: How to add custom fees in Shopify with an app
In this section, I’ll walk you through step-by-step instructions to set up custom fees in Shopify with The Dotstore Extra Fees Manager.
Note: This process works for setting up various types of surcharges, such as gift wrapping fees, rush delivery, tariffs, etc.
- From your Shopify admin, head to Apps → Shopify App Store. Search for “Dotstore Extra Fees Manager” and install it on your site.
- Next, navigate to Apps → Extra Fees Manager → Billing, and activate the free or pro plan to enable the app’s features.
- Now, go to Apps → Extra Fees Manager → Fees. Tap “Create Fee” or use the built-in wizard to add a custom fee.

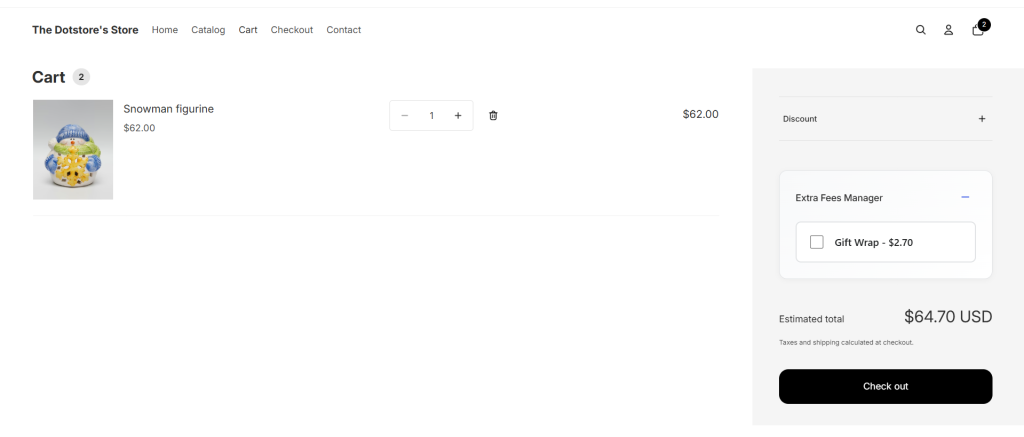
- Give your custom fee a clear name, e.g., “Gift Wrapping” (customers will see this during checkout).
- Select whether your custom fee should be fixed or percentage-based, and enter the custom fee amount.
- Define whether the custom fee should be taxable.
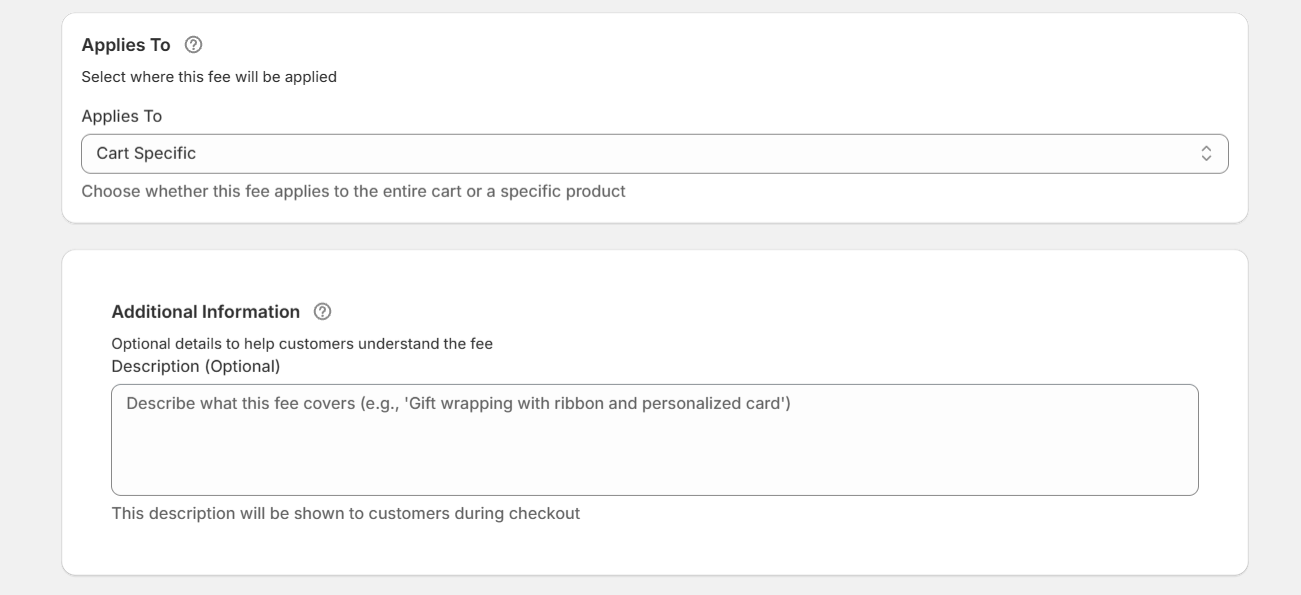
- Decide if the custom fee applies to individual products or to the entire cart.
- Optional customization settings for the custom fee:
- Description: A brief note that clarifies the purpose of the extra charge.
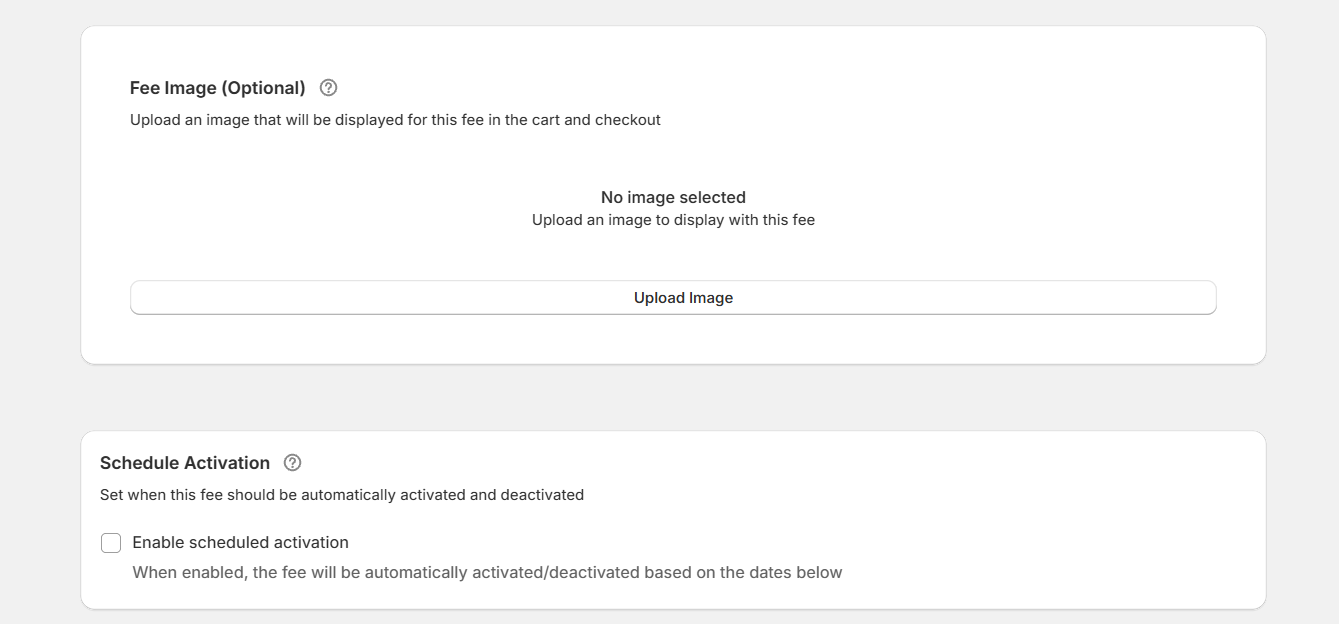
- Image: Upload a small graphic or icon to display next to the custom fee in the cart and checkout.
- Schedule: Add a start and end date.
- Description: A brief note that clarifies the purpose of the extra charge.
- If needed, activate the “Conditional Rules” panel that triggers the custom fee only under certain conditions. You can apply custom fees based on cart value, number of items in the cart, specific products, specific collections, customer type, etc.
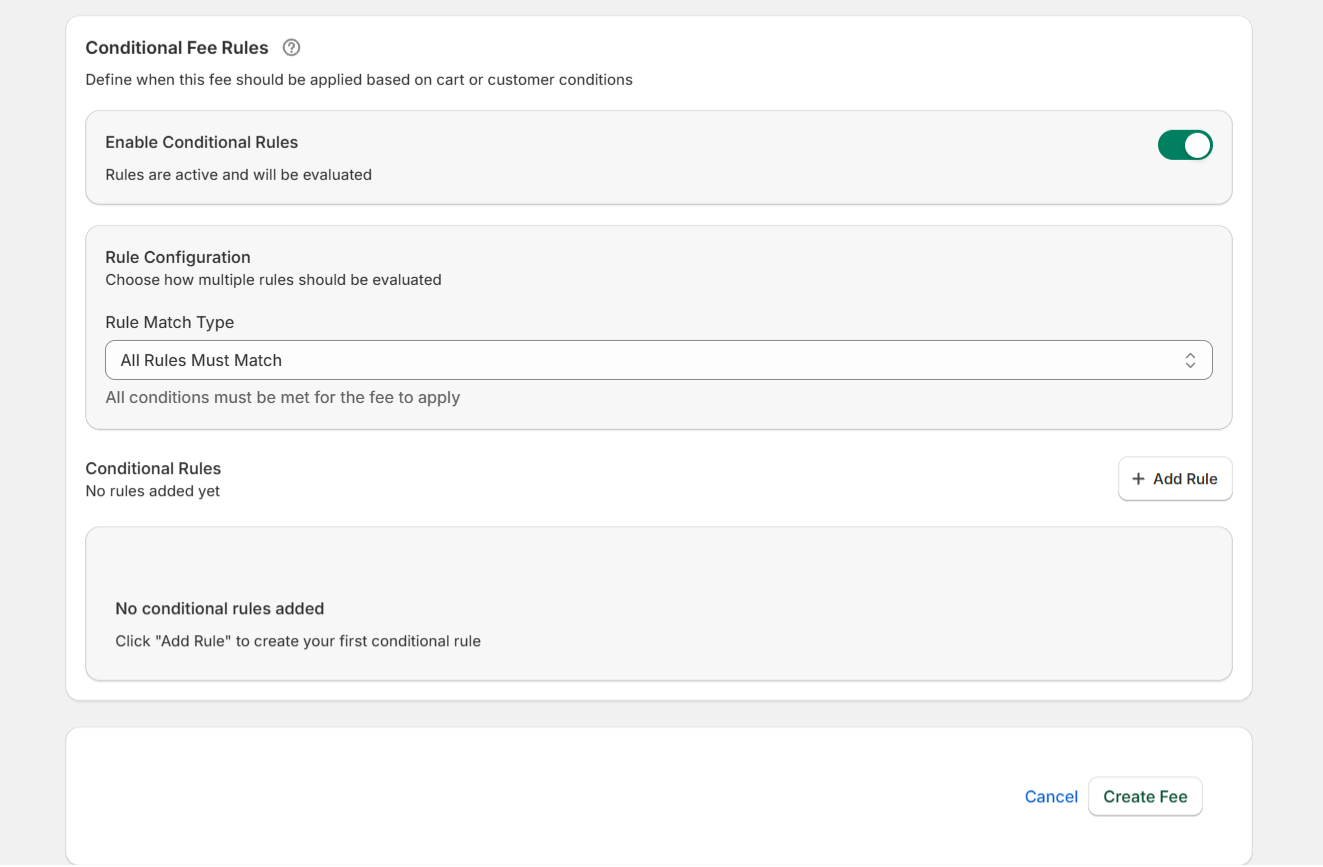
- Press “Save Fee” to apply the custom fee to your Shopify store.
Important: Embed the handling fee calculator on your Shopify cart page
These step-by-step instructions will help you add the handling fee calculator modal to your store’s cart page so customers can select the custom fee during the checkout process.
- From your Shopify admin panel, head to Apps → Extra Fees Manager.
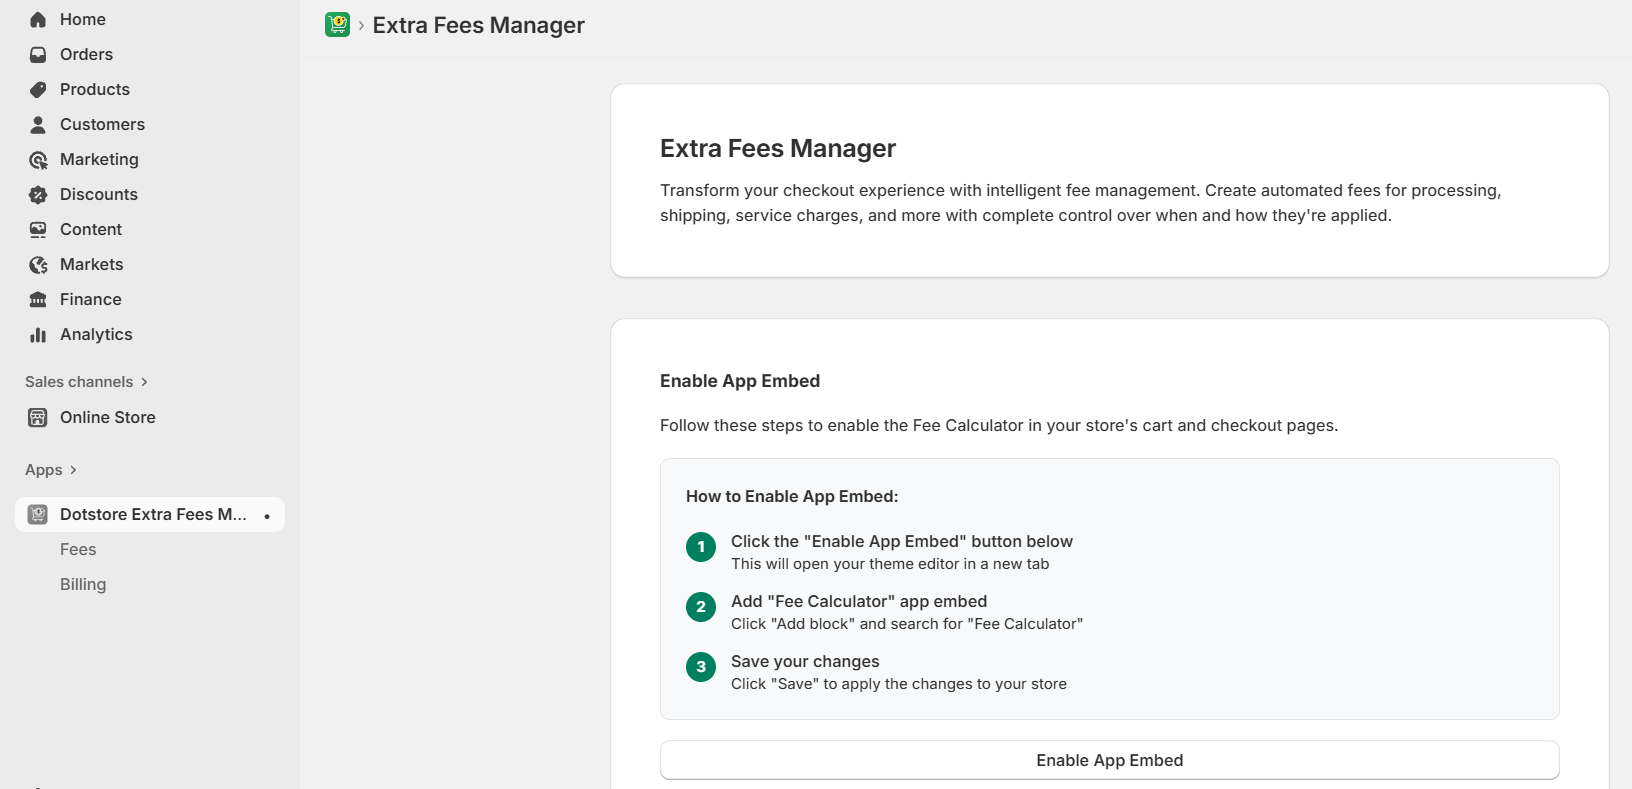
- In the “Enable App Embed” panel, press the “Enable App Embed” button to access your theme editor.
- From within your theme editor, head to the “Apps” tab, and toggle on the Dotstore Extra Fees Manager button.
- Save your settings.
That’s it. Add products that trigger the fee, proceed through the checkout process, and place a test order to verify that the custom fee appears as expected.
How to add a shipping handling custom fee in Shopify with the native settings
Shopify’s native features let you add a custom handling charge to third-party carrier shipping rates. However, this approach doesn’t separate the handling fee from the shipping rate on your site’s front end.
For example, customers will be shown “$10 shipping” instead of “$8 shipping + $2 handling fee” during the checkout process. This lack of transparency can make your shipping options seem more expensive than they are (compared to your competitors) and result in lower conversion rates for your store.
Another limitation to be aware of is that this method doesn’t include the option to apply custom fees conditionally based on products in the cart, specific locations, cart value, etc. The shipping handling fee will only apply in situations where customers choose specific shipping methods.
Tutorial: How to add a shipping handling custom fee in Shopify with the native settings
- From your Shopify dashboard, open Settings → Shipping and delivery.
- Go to the “Shipping profiles” area, locate the profile you want to modify, and select “Manage rates”.
- Scroll to the “Shipping zones” section, click on the (⋯) button for the carrier rate you want to adjust, then choose “Edit rate”.
- In the rate setup screen, find the “Handling fee” section. From here, you can decide the type of fee and its value: a percentage, a flat fee, or a combination of both.
- Press “Done”, then save your changes to update the shipping profile.
How to add a custom fee to Shopify POS
Retail stores that need a quick way to charge for things like gift wrap, rush service, special packaging, etc, can use Shopify POS’s native option.
Limitations of custom fees in Shopify POS:
- They only apply to physical, in-person orders, not to your store’s online checkout.
- Merchants can only apply one custom fee per order. Also, you can’t pre-program them to apply conditionally, e.g., a surcharge for orders under $20 or a fee for certain product categories online.
Here’s a step-by-step walkthrough of how to add a custom fee in Shopify with POS settings.
- Open the Shopify POS app on your device.
- Shopify POS custom fee method 1: Add a custom fee tile to your smart grid
- Press “Add tile” within the grid.
- Press “Fee” to create a new fee.
- Enter a name and price for the custom fee.
- Press “Save”.
- Shopify POS custom fee method 2: Add a custom fee to a customer’s shopping cart
- Within your smart grid, press the “Custom fee” tile.
- Evaluate the custom amount, and press “Save”.
FAQs about how to add a custom fee in Shopify
Can I add a custom fee to specific product variants in Shopify?
Yes, you can add a custom fee to specific product variants in Shopify using an app like The Dotstore Extra Fees Manager. This lets you apply various types of custom fees to specific product variations, define additional conditions for which it applies, and show the custom fee as a standalone fee, separate from the product price, shipping fee, taxes, and other charges during the checkout process.
Shopify’s native settings don’t include the option to add extra fees to individual product variants. A workaround some merchants have found is to create a small, hidden product and automatically add it to the cart only when a specific variant is selected. However, this approach isn’t ideal because it requires knowledge of theme scripting or an app to automate properly.
Can I add a custom fee as a percentage of the cart total?
Yes, you can add a custom fee as a percentage of the cart total using 2 different approaches: a dedicated app like The Dotstore Extra Fees Manager for the online checkout and Shopify POS’s native option. There’s no built-in option to add percentage-based fees to the online checkout using Shopify’s native features alone.
The Dotstore Extra Fees Manager app lets you apply percentage-based custom fees based on the order total. Customers see the percentage fee listed as a standalone charge, separate from the product price, shipping rates, and taxes, during the checkout flow and in their order summary.
Retail stores that use Shopify POS can add a fixed amount or a percentage of the cart to the order total during checkout.
Ready to add a custom fee in Shopify?
There is no one-size-fits-all approach to adding custom fees to Shopify orders. The right approach depends on where you want the extra charge to appear and why you’re charging it.
In this post, I’ve shown you three different methods to add custom fees in Shopify, depending on the sales channel and objective:
- A Shopify custom fee app, The Dotstore Extra Fees Manager, that lets you add custom fees to your store’s online checkout.
- Shopify’s native shipping handling fee feature that lets you apply extra charges to third-party shipping carrier rates.
- Shopify POS custom fee feature for extra fees and surcharges at the retail register.
Each method exists for a different reason. For instance, adjusting Shopify’s native 3rd party shipping rates might be sufficient for merchants that want to recover packaging or transport costs, while Shopify POS’s custom fee option may be sufficient for applying extra charges to retail orders.
If you want to add custom fees to the online checkout, an app like The Dotstore Extra Fees Manager is the best option. It lets you apply various types of custom fees and set dynamic conditions, such as cart total, cart quantity, customer type, location, etc., that trigger them.
Equally importantly, custom fees aren’t bundled into the base product price or shipping rate. They are shown as standalone fees, separate from all other charges during the checkout process, so customers understand what the extra charge is for.
Install The Dotstore Extra Fees Manager’s free or pro version and add custom fees to your Shopify store today!