Table of Contents
Migrate-Guru gives WordPress website owners the capacity to move, duplicate, or clone sites from one site to another.
Migrate Guru is a league apart from other WordPress migration plugins because it uses a simple 1-step process that runs on BlogVault servers. It does not overload the source website and ensures that websites as large as 200 GB can be moved without any issues.
The plugin automatically takes care of both serialized and base64 serialized string substitution.
Migrate Guru Features
Here are a few features of the Migrate Guru plugin:
- One-click Migration: Enter host details and click Migrate. All you have to do is click! That’s it!
- Zero overload on source site: The migration process works on their servers, so it doesn’t crash your site.
- Large site capacity: Move or transfer sites as large as 200 GB effortlessly. Large site migrations usually fail because of live-site server import limits. There are no limits here.
- No add-ons: You don’t need any extras or add-ons to move multi-sites or sites with serialized data. You are not charged extra for anything!
- No storage space: Migrate Guru automatically copies your site to Migrate Guru servers. After the migration is complete, the copy is erased. Your privacy is retained, at no cost for their storage space.
- Web host compatibility: Move your site to and from any web host.
- 100% Automatic Built-in Search and Replace: Migrate Guru can easily handle serialized data with precise Search and Replace algorithms placed for your convenience.
- Timely notifications: You will receive real-time email alerts to keep updated about the status of the migration taking place.
Here’s the easiest walkthrough for Migrating or transferring a WordPress site from one server to another using Migrate Guru.
WooCommerce Fraud Prevention
Equip your store with our feature-rich fraud prevention plugin to reduce risk and safeguard your profits.
14-day, no-questions-asked money-back guarantee.
Step 1: Install Migrate Guru
To add the Migrate Guru WordPress Plugin.
- Go to Plugins and in that, click on Add New.
- Type in the name of the WordPress Plugin, Migrate Guru, or a related descriptive keyword, author, or tag in the Search Plugins box.
- Click on the Install button when you find Migrate Guru.
- The resulting installation screen will list the installation as successful or note any problems during the installation.
- If successful, click Activate Plugin.
Alternatively, you can download Migrate Guru and install it by uploading it to the WordPress dashboard or via SFTP
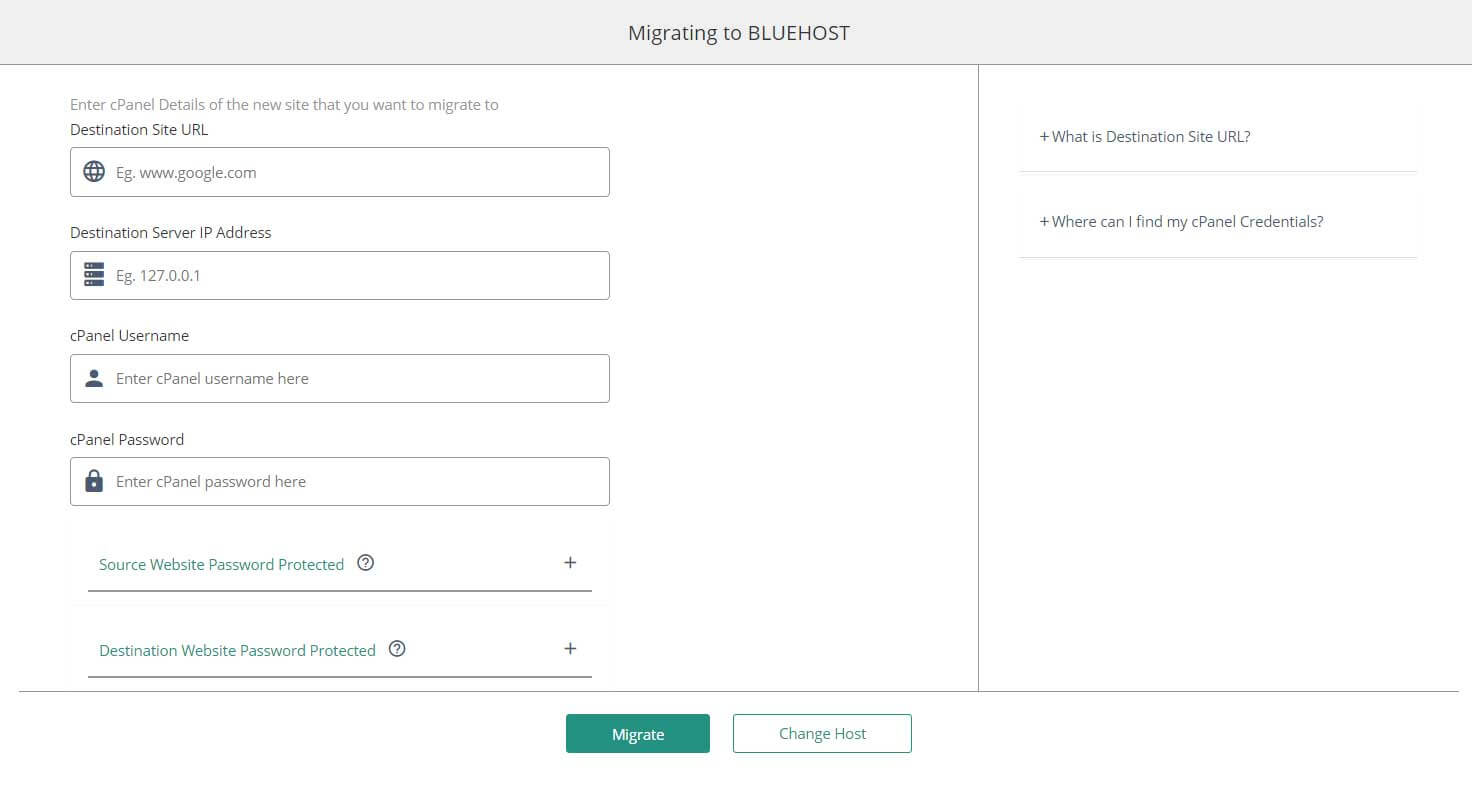
Step 2: Fill out the Migrate Guru Migration Form
Enter your email address to receive notifications and details of your site migration.
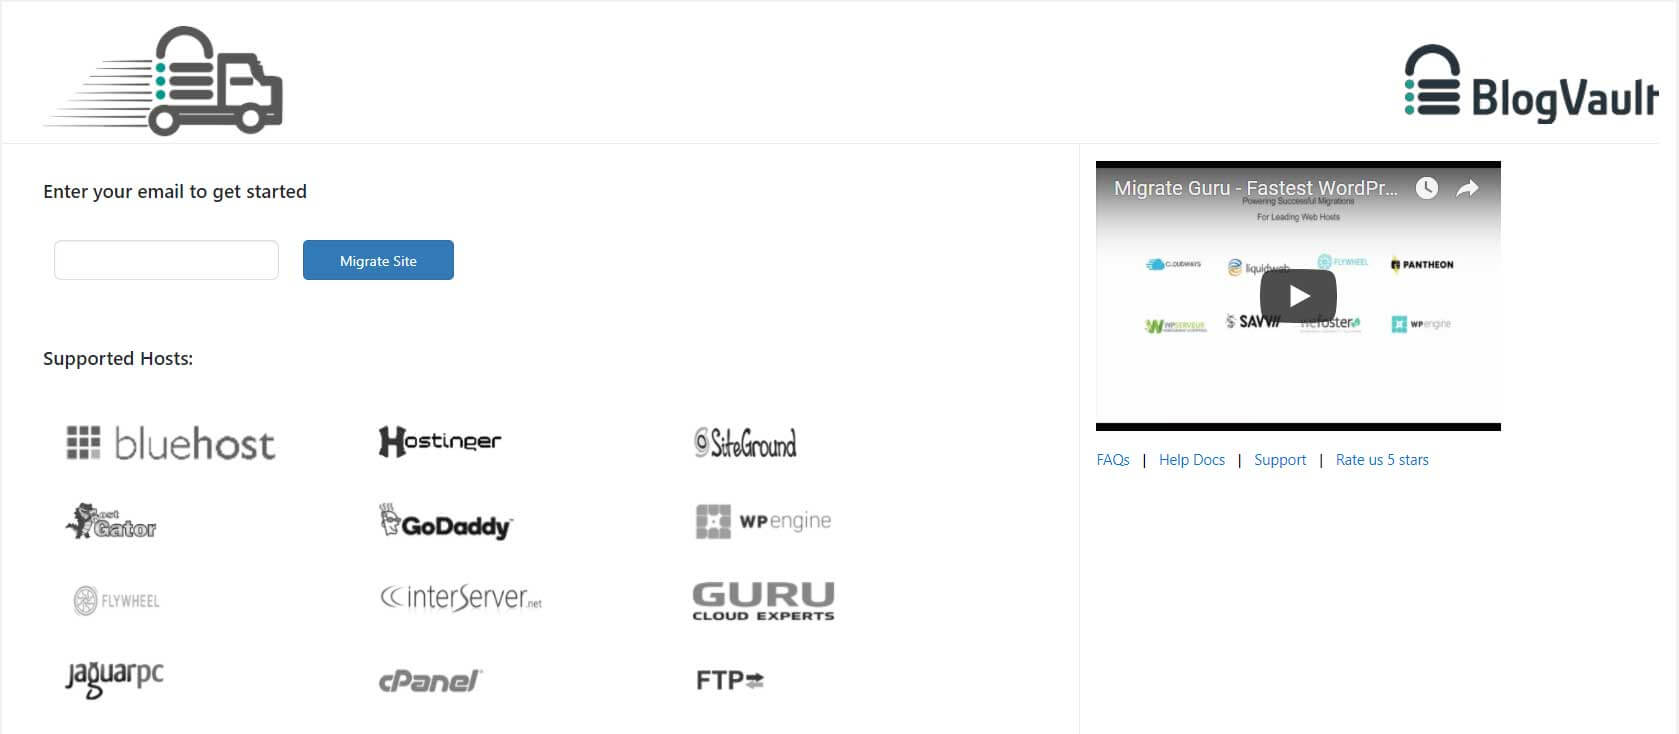
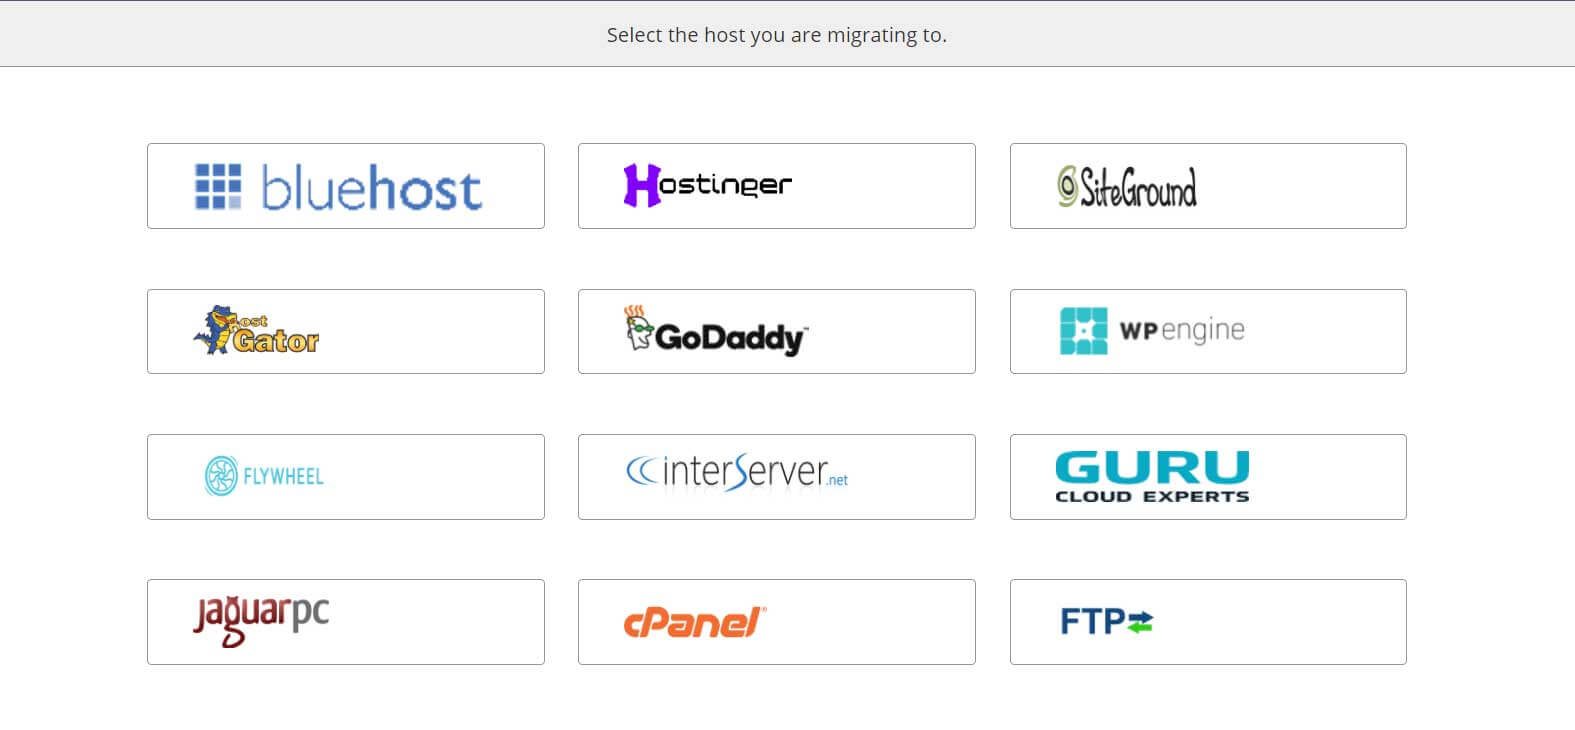
Select the web host you are transferring your web host to.
Then Migrate Guru plugin will give you a small form to fill up. The fields on this form are:
- Destination Site URL: This is the URL of the site (domain) you would have set up on your new web host.
- Destination Server IP address: This is the server IP address of the site configured on your web host account.
- Advanced Options: Click on this option ONLY if either the site being moved or the destination site is https:/ instead of http://.
If you do not know these details you can find them out easily:
- Log in to your web host account and go to the menu bar displayed at the top of the page.
- Click on Hosting and choose cPanel.
- The destination server IP address is on the left-hand sidebar of the cPanel page.
- For the cPanel username, access the mail your web host would have sent you when you first signed up for an account. The cPanel password is usually set when signing up for web host service. It is the same password you use to log in to your regular web host account.
- If you want to use FTP, follow the same steps as above.
Note: If the URLs of either one begin with ‘https://’, they are HTTP authenticated. If your web host domain’s URL is protected with HTTP authentication, you will have received an email with the validation credentials. These credentials can also be retrieved from the site’s server logs.
Now that you have all the required details, enter them in the Migrate Guru form. If you have any more doubts there is a Support and Help section over to the right.
Step 3: Click on Migrate
You have completed all the steps required to migrate your website successfully.
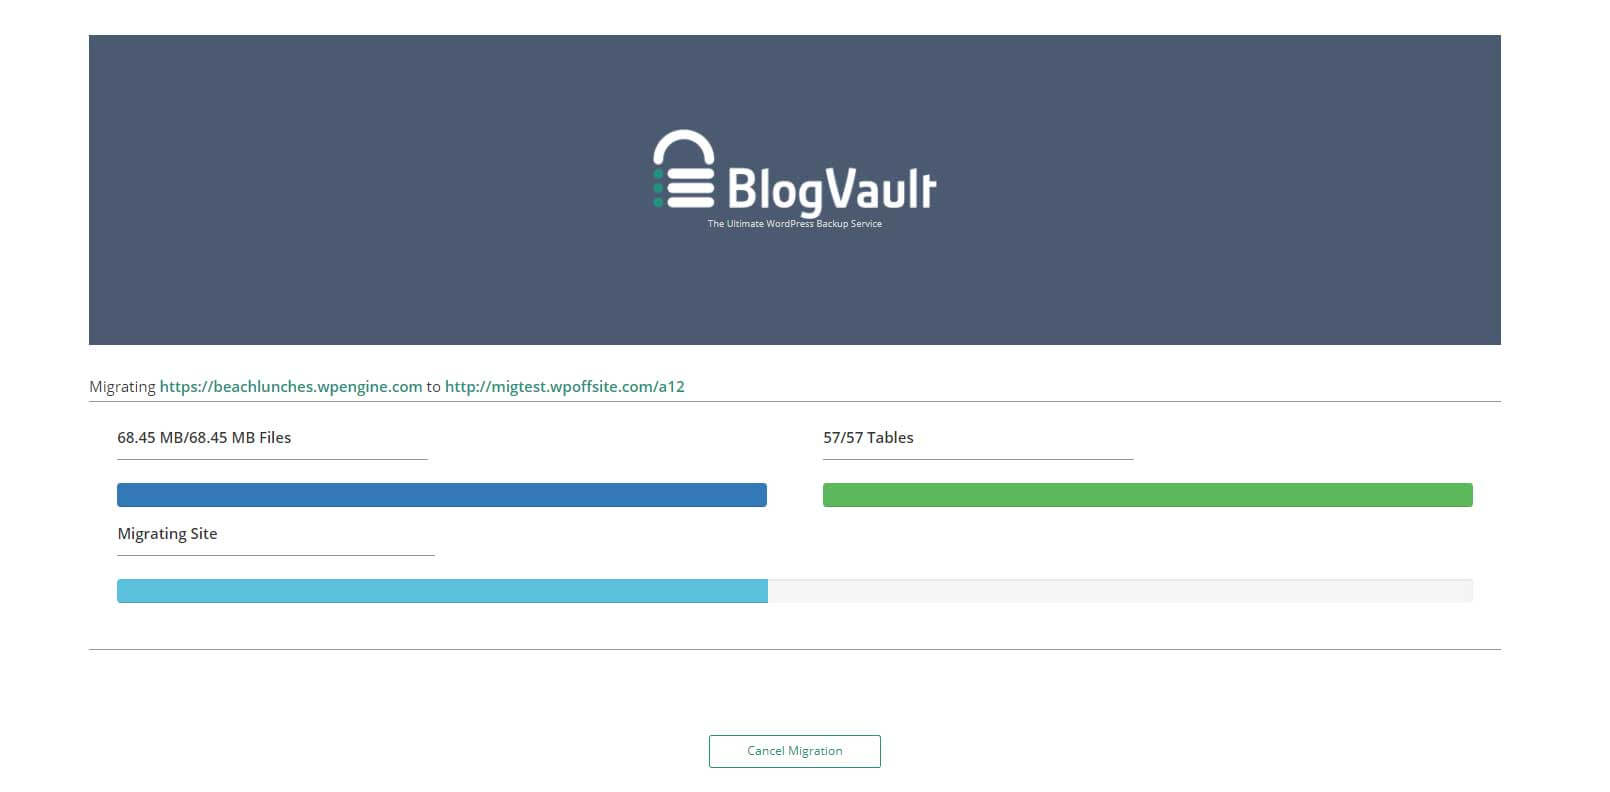
After you click the Migrate button, Migrate Guru will send you an email notification confirming that the process of migration has begun.
In the meantime, you will also be taken to a screen that displays the real-time process of your website migration.
You don’t need to keep your browser window open once the migration begins.
If you don’t see this screen, or if the migration screen reloads with an error message, then odds are that something wasn’t entered correctly. Go back through the directions above, and carefully make sure each field is correct, then retry. Or, if you just created your website, it may take a little time before Migrate Guru can connect to it.
Once the migration process is completed, you’ll receive another email from Migrate Guru notifying you about the successful migration.
You can view your new site by clicking on the Migrated Site button, which you’ll also receive a link to in your email alert.
In Short — Install the Plugin, Enter your Hosting Details & Click Migrate
If you have any queries you can contact the Migrate Guru team using their contact form on the support page.
We hope you found this informative, and more importantly, Migrate Guru WordPress plugin, useful. Migrate Guru is wildly popular – having over 500,000+ total migrations, 400,000+ sites migrated, 100,000+ hours saved, and a 99.99% success rate, with 0 risks!
It is the obvious choice for anyone wanting to make the most out of their time. You’ve got nothing to lose; it is free.
If you have used Migrate Guru, let us know about your experience with it.
WooCommerce Fraud Prevention
Equip your store with our feature-rich fraud prevention plugin to reduce risk and safeguard your profits.
14-day, no-questions-asked money-back guarantee.