Table of Contents
Without a doubt, e-commerce has come a long way and with this, the challenges faced by the leader have also increased. One of the biggest bottlenecks in the e-commerce industry is shipping. With the fact that customers now not only expect free delivery but also an expedited one or reasonable flat rate shipping, store leaders struggle to find a leeway.
Keeping this as our main topic of discussion, we see what flat rate shipping and how does it benefit WooCommerce store managers to win their customer’s trust.
What is Flat Rate Shipping?
As the name suggests, it is a single fee assigned to the cart in the name of shipment fee. It is one-way customers can predict the shipping cost of a product. Unlike the standard shipping fee that varies depending upon the size, cart, package type, etc, flat rate shipping is the fixed amount applied to the cart.
To put it this way, flat rate shipping adds to the predictability and accuracy of shipment expenses. Let say, for example, you have to set a uniform shipping fee for all the products that are purchased from buyers in the California region. With the flat-price shipping method, you can easily set rules that apply a fixed shipping fee. Similarly, if you are offering free samples on your WooStore, you can charge a flat shipping fee for your products.
How to set Flat Rate Shipping Method in WooCommerce?
Wondering how can you set flat rate shipping? Here is a step-by-step process that will help you understand and configure your WooCommerce store for flat rate shipping.
- To begin with move to your WooCommerce site. On the dashboard, click on settings and then select Shipping.
- Move around the field that says Shipping Zone location, one where you wish to add a shipping method. Now, click on Edit.
- This opens a new page. You now need to configure the same to set a flat rate shipping.
- Click on the Shipping Methods box, and now select Add Shipping Method.
- From the drop-down, click on Flat Rate. Once done, click on the add shipping method.
- Now you will see several rows of different rules created, all of which hint at flat rate shipping.
- To modify the same, click on edit just below the name of the method.
- Each zone will have different rates and you can always modify them in a way you want.
- Suppose you clicked on edit and this will lead you to a new page.
- Enter the method title. This is visible to the customers on the checkout page.
- Select Tax Status. Specify if the mentioned amount is subject to taxes.
- Enter cost: Set the fixed amount which is applied to the cart at once
- Click to save changes.
The above is the standard procedure for setting up a flat rate shipping method. In order to add more flexibility to your store, you can also do the above will the help of a plugin. We will discuss this in the upcoming sections.
Future Reading:
Advanced Flat Rate Shipping Methods
Boost your WooCommerce store’s revenue with flexible shipping options. Your business deserves the best!
Why should you opt for advanced flat rate shipping?
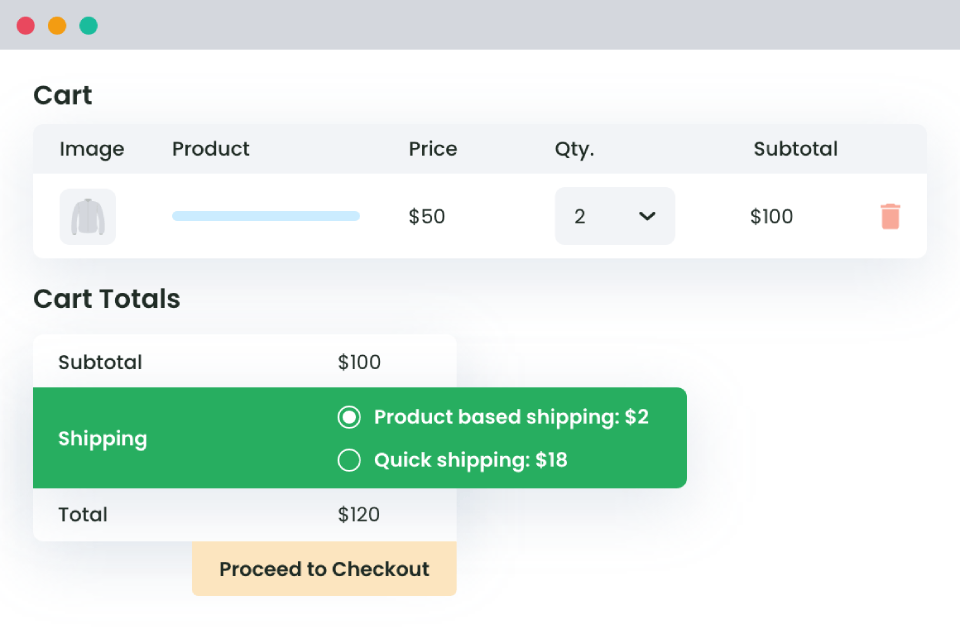
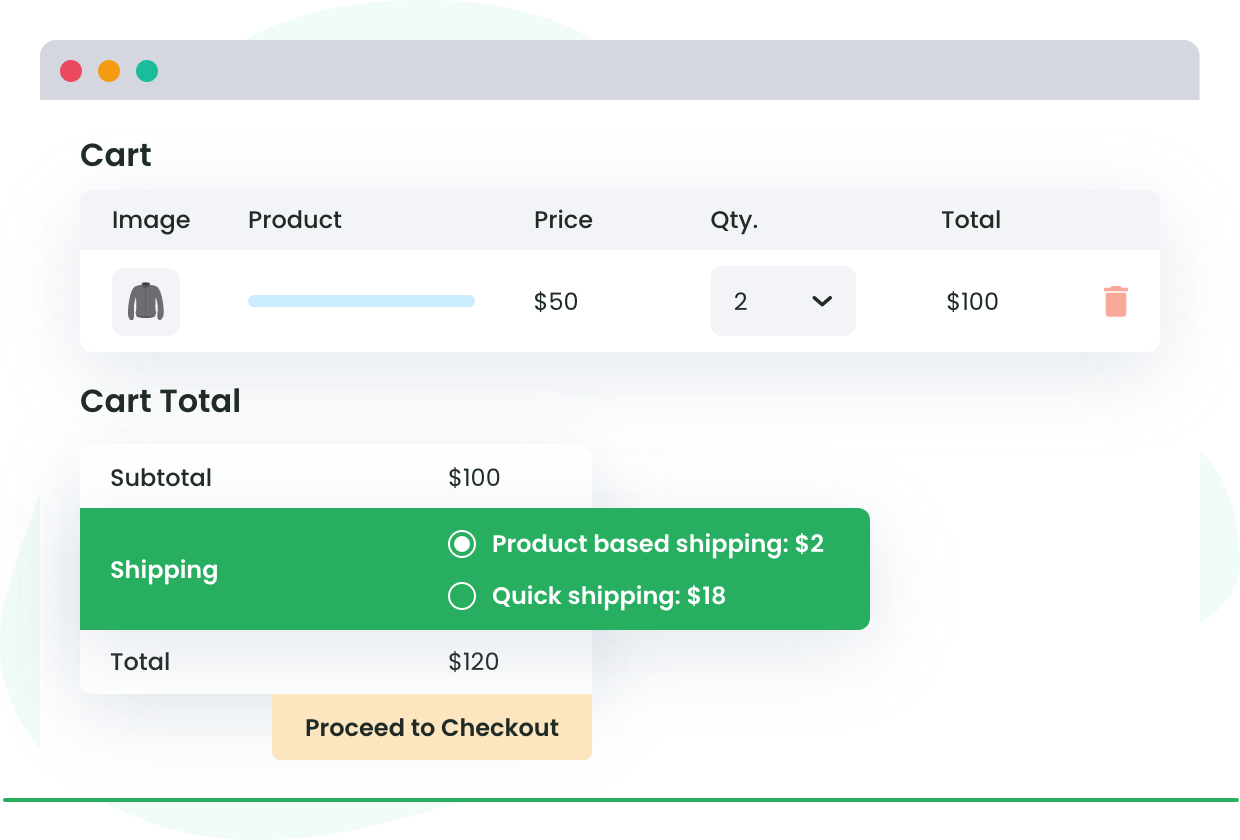
Flat rate shipping is an excellent way to offer a single shipping fee to the customers. Often it so happens that customers abandon the cart due to higher or flexible shipping rates. This costs the company huge and is often irrevocable. With it, you set standard rates for specific conditions. So, the buyer would know in advance what to expect when ordering a particular product. This helps make more sales and increase profits.
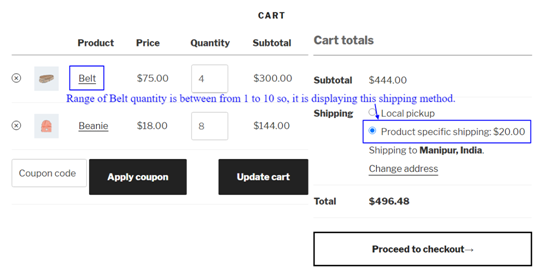
Let us give you an example here. Consider that you have to apply a different flat shipping rate with a customer purchases a belt. With the help of the respective plugin, it can be done in less than a minute.
Benefits of flat-rate shipping method
There are several reasons why both buyers and sellers prefer a flat rate shipping method. The most common ones include:
- Help eliminate the weight-based shipping fee, applied in the standard shipping fee.
- Eliminates the need to pay surcharges which are a common thing in USPS or FedEx delivery services.
- These shipping methods makes it easier for the users to predict the total cost in advance
- Limits the total shipment amount charged owing to various shipping rules.
How to create a flat rate shipping method with the help of a plugin?
In the above section, we talked about setting up flat rate shipping using the conventional method. Extending the discussion forward, we now see how to use a plugin to do the same thing.
While there are multiple plugins that allow you to set a flat rate shipping method, the one that we are going to discuss is the Advanced Flat Rate Shipping for WooCommerce plugin.
About the plugin
The Advanced Flat Rate Shipping for WooCommerce plugin is a custom-designed application that gives store owners the ease and the flexibility to create custom-fit rules while setting up flat cost shipping. For instance, if your store has the policy of free delivery for products of value $250 or more, you can use the plugin to do the same.
With that being said, let’s find the process of creating advanced shipping methods with flat pricing.
Step One: Integrate the plugin
- The first thing to do is to download the plugin. Depending upon whether you wish to opt for the free version or the paid version, head towards the official site and download the plugin.
- After you have the plugin, we need to upload the same on your WooCommerce store. To do so, open your WooCommerce site. Now, enter the credentials to authenticate your identity.
- Now move to the dashboard and scroll down to the plugin section.
- Click on add new. In the upper right corner, you will find an upload button.
- Click on it. Now insert the downloaded file and click on upload.
- You will now see the plugin in your plugin list. Click on install plugin.
- It might take a couple of seconds. Once done, activate the plugin.
With this, we now have the plugin integrated into the WooCommerce store.
Step Two: To configure the plugin
Once you have integrated the plugin, the next step to do is configure it. Again move to the plugin section and click on the name of the plugin.
- A page opens up with one or more fields. The first tab says edit shipping method. Since we are creating it for the first time, the table would be blank.
- To create our first method, click on the Add New Shipping Method.
Note: The page has multiple fields. Remember that the plugin can be configured in a variety of ways. Since we aim to set a flat rate shipping method, we will emphasize the same.
- On the top, we have a toggle switch. Click on it to activate the plugin whereas switching it off will then deactivate the plugin. For now, we toggle it.
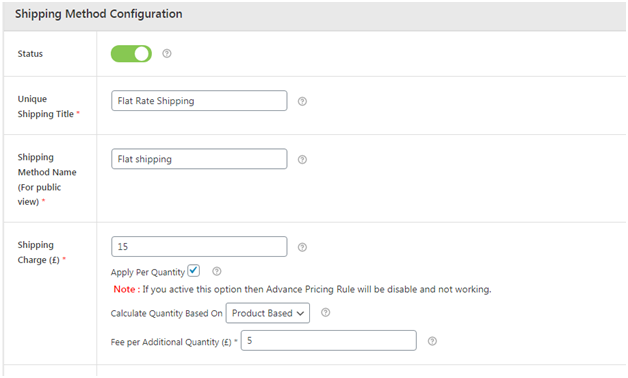
- Shipping Method Title: Add a unique name or title to the shipping method. This is important as you might create one or more methods. Adding a title helps you differentiate between them.
- Shipping Method Name: Like the title, you need to set a name as well. The only difference between shipping method title and name is the former is meant for the store owners and the latter is visible to the users.
- Shipping Fee: To set a flat rate shipping fee, enter a fixed amount here. Note you can also set a fixed percentage to calculate the fee as a percent of the total amount. Since this is a flat rate shipping, we will not set a fee per item( flat rate shipping isn’t dependent on them).
Besides this:
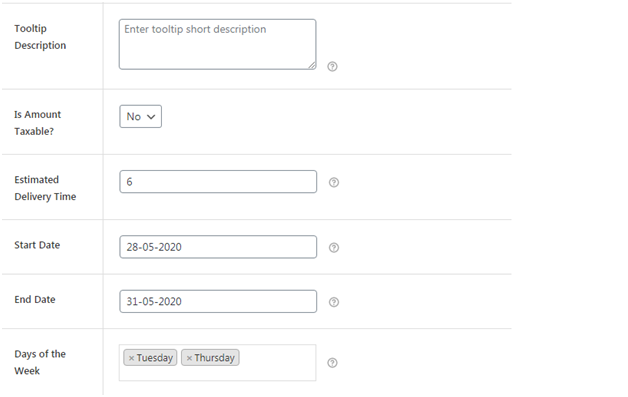
- Tooltip Description: Add a short description of the shipping method.
- Is value taxable: You can choose whether you want to apply taxes to the shipping fee or keep it free from the same.
- Estimated Delivery Time: Set a projected delivery time for the specific shipping method.
- Start Date/End Date: Specify the period for which you wish the shipping method to apply.
- Days of the week: Here, you can set the particular days in a week when the flat rate shipping method stands applicable.
Besides this:
Step Three: Adding Conditions
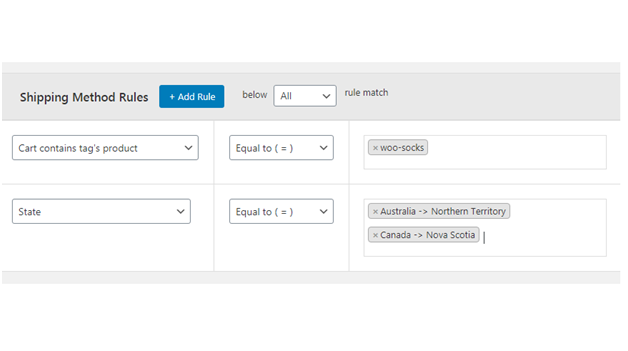
After you have configured the method, you now have the ease to create rules, specifying when and where the flat rate shipping method will apply. It follows a basic flow:
- Click on add row to insert a new rule
- Click on the first drop-down to select the rule-type.
- Next, click on the second drop-down to specify whether you wish to exclude or include parameters.
- Finally, select different parameters that fall under the rule.
- Click on save changes to make the rule live.
Examples:
How to use Advanced Flat Rate Shipping for WooCommerce Plugin?
Use Case One:
Set a $7 shipping fee for customers located in Australia (Northern Territory) and Canada (Nova Scotia) (ordered on Wednesday).
To set this, we first need to configure the shipping method.
- Toggle on the switch to activate the method.
- Since the flat rate shipping method is for a location, we can give it the title: Flat Rate Shipping for Aus-NT and Nova.
- Under the shipping method name, we can simply keep it as Flat Rate Shipping
- Enter $7 in the shipping fee box.
- Simply add $7 as a shipping fee for customers in California in the description box.
- Let’s keep the amount non taxable. Click on the drop-down and select No.
- We aren’t running it for any time, so skip these.
- The rule will be live on Wednesdays. Type Wednesday in Days of the week.
Now we move to the next section: Creating the condition.
- Click on Add Rule to add a row.
- Move down and then click on the location. Select country.
- In the next drop-down, click on Equal to.
- In the final box, type California.
- Finally, click on save changes.
You can run a false order to test whether the rule works or not.
Use Case Two:
Set a $7 shipping fee for customers located in California (ordered on Wednesday) and have ordered products of value $200 or more.
This is the same as that of case one. The only difference is that we have two conditions here. All we need to do is add a second rule.
To create such a shipping method, configure the same as we did in step one. Remember to change the description as you find it best.
Now under shipping method rules:
- Click on Add Rule to add a row.
- Move down and then click on the location. Select country.
- In the next drop-down, click on Equal to.
- In the final box, type California.
- Again click on Add Row.
- Now in the first drop-down, click on Cart value.
- Next, select greater than equal to.
- In the third box, enter $200
- Now, click on save changes.
Use Case Three: Set $0 as shipping fee for customers located buying products of Category X, is a premium member and has purchased products of $100 or more. Note that this offer is only for October.
To set this, we first need to configure the shipping method.
- Toggle on the switch to activate the method.
- Since this method is for a location, we can give it the title: Free Shipping for Premium Member.
- Under the shipping method name, we can simply keep it as Free Shipping
- Enter $0 in the shipping fee box.
- Free Shipping for Premium Members buying products of X category and the final amount exceeding $100 in the description box.
- Let’s keep the amount non taxable. Click on the drop-down and select No.
- We are running it for any period, so enter 01/10/2021 in the start date and 31/10/2021 in the end date.
Now we move to the next section: Creating the condition.
- Click on Add Rule to add a row.
- Move down and then click on the product. Select category.
- In the next drop-down, click on Equal to.
- In the final box, type X.
- Again click on Add Row.
- Now in the first drop-down, click on Cart value.
- Next, select greater than equal to.
- In the third box, enter $100
- Click on Add Rule to add a row.
- Move down and then click on the user.
- In the next drop-down, click on Equal to.
- In the final box, type premium
- Finally, click on save changes.
This way you can set flat rate shipping for your WooCommerce store.
The Final Word
Flat rate shipping is beneficial for most of the stores that have various products, categories, locations, and other such parameters. We understand that the shipping cost varies as per the conditions of your store and that’s why the Advanced flat rate shipping plugin for WooCommerce is created as a comprehensive solution. If you own a WooCommerce store,
Advanced Flat Rate Shipping Methods
Boost your WooCommerce store’s revenue with flexible shipping options. Your business deserves the best!