Table of Contents
Starting a new business in the year 2020, or own one already?
You would definitely want to create a website. Given the fact that we thrive in the digital era, having an online presence for any or every business is a must. As a matter of fact, organizations that adopt an online and offline mode of business tend to etch higher success as compared to the offline ones.
Meaning that designing a website is more of a necessity, like you get leverage on your competitors. However, the fact that creating a website comes with an overhead, business owners tend to avoid the deployment of the same. Of course, not all of us have knowledge about coding, let alone be an expert. So, a website for the business means extra cost, right? This is probably the reason why you eliminated this from your to-do list.
Well, we have an alternative for you. Neither would you need to be a software developer nor need to hire one to follow our guide. We are here to help you design and develop a website for your business and with no extra cost.
This article is specifically designed for the users that plan to have a website but without paying a penny more. Here, we have a step by step and detailed guide to assist you throughout the website development process. So, if you were to start with the development, head along with us to build an exquisite website.
Pre-Requisites
Before heading towards the guide to build a website, we have certain things to tell you about. To begin with,
1. Domain name & Host:
You will need a domain name for the website, and a hosting account. Without the two, you cannot deploy the website in the online environment. You can opt for a bluehost as your hosting service provider. They are economical, offer a range of features and further, provide excellent support services.
2. Platform:
Second, you would need a website developing platform. Though there are multiple such platforms that ease the process of creating a website, we recommend you to go with WordPress. Not only is the platform easy to use but it also encompasses a range of themes and plugins that enhances the feature-set of the website.
3. Cost:
This is something that might scare you off. We did state that this process would not cost you much, more than required. We adhere to what we said above. This section is just to educate you on the fact that the cost of developing a website depends largely on the features and functionality added, the hosting plan chosen and the platform used. For beginners, it is best to start with the least option and as the business needs expand, you can then scale your business by integrating more features.
These were the three things that you ought to know before starting the development process. Once done, you can now get ready to start the development process.
Step by Step Guide – Creating A Website
Without wasting any time further, we head straight towards the different steps to create a website. To make things readable and understandable for you, we divide the entire set into several parts. You can walk down each independently and streamline the entire journey.
Step 1: Setting Up The Account
We have mentioned before and once again, we highlight the importance of the website development platform. No matter how competent your website appears to be, if it does not have a strong platform, it will fail to gain the desired results. What we mean to say is you need to be very specific in the choice of the development platform.
In fact, it should be such that it will help your revenue grow along with your business. An efficient platform would provide support to all tools and technologies, allowing you to expand your business processes. Keeping in mind all of the above, we stress on the pick of WordPress.
- free to use
- option for self-managed to host
- themes and plugins
- flexible with addons
- Option to upgrade
So, seems a good one, right?
Now that we are done with the platform, let’s move ahead to set up the same. Here, we would require two different things,
- Domain name: the unique name associated with the website, one that would be used to visit the site.
- Hosting account: you can consider this to be the place where your website resides over the net, something like the home.
This is where you would need to spend some money. Both the domain name and website hosting is to be purchased. The pricing of both depends on the provider and the plan chosen.
Here, in the guide, we use Bluehost for our hosting needs. To get started with the process, follow the steps given below:
- Open your web browser and click open the Bluehost website. There, click on the highlighted button that says: Get Started Now.

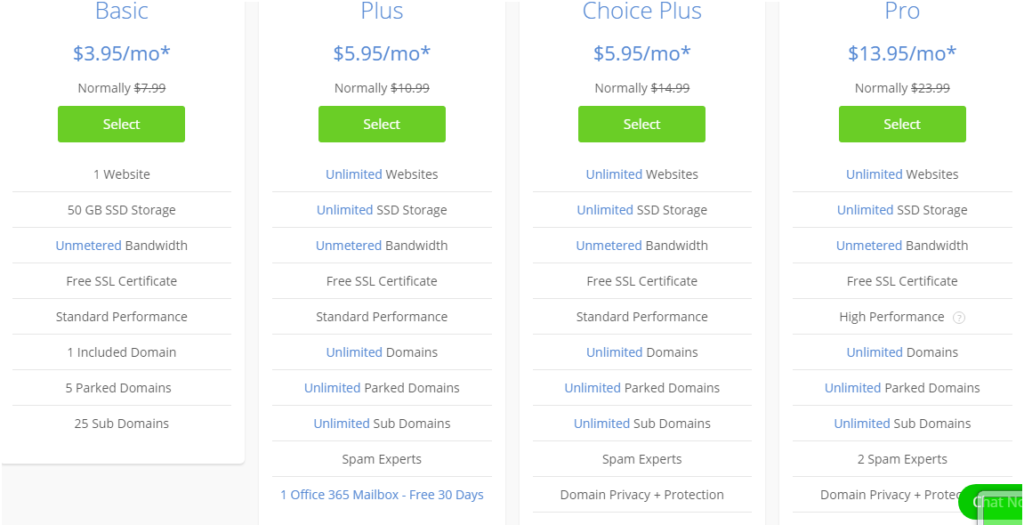
- Once you click on it, the next page that opens will showcase all of the plans. You can choose one that serves your purpose best. For starters, sd suggest you either choose the basic plan or if you want to have added features, opt for the plus plan.
Remember that you can always upgrade the plan and switch to a better one.
- After you have selected the appropriate plan, the next page would ask you to enter the domain name for the website.
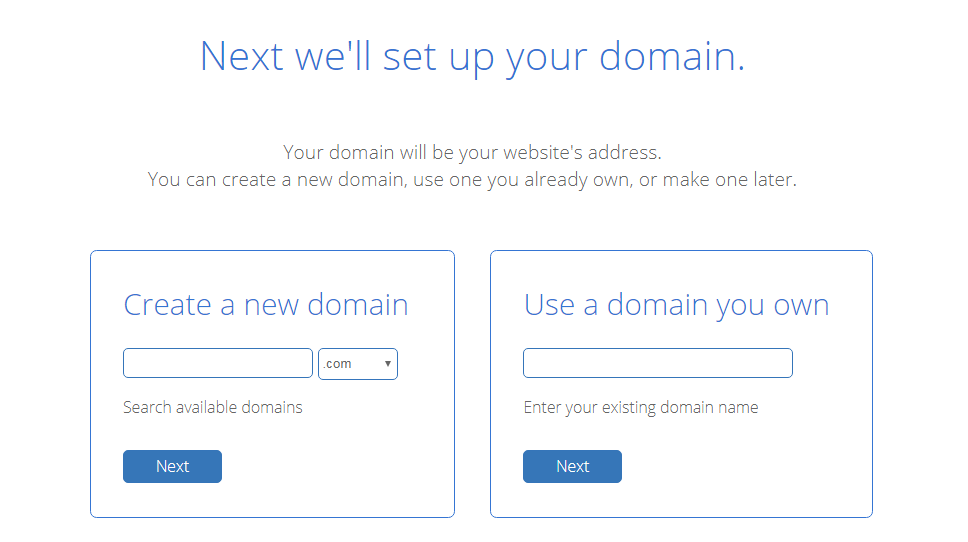
- In case, you already have a domain name, you can enter the same in the right box. If not, feed a name under the create a new domain option and click next.
Note: if the domain name is available, you would be given the same. In case the domain name entered by you isn’t available, they will suggest you the alternatives. You can choose from them to move ahead.
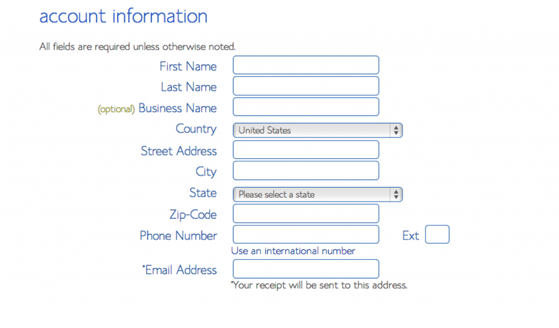
- The next page will ask you to enter the email address, password, and other personal details. Make sure the email address is valid and the password is strong enough to be hacked.
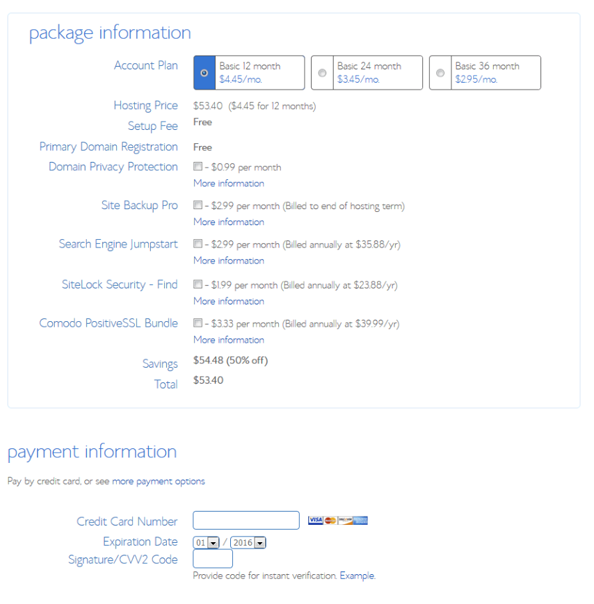
- Finally, the payment page opens up. Here, recheck the details entered by you and complete the payment process.
Once done, you will next receive a confirmation along with the cPanel login credentials in the email, you entered just before.
With this, we come to the end of the setup process.
Step 2: Installing WordPress
You can always download the WordPress site or log in directly to get started with the website creation. But because we already have a host, a domain name and a working cPanel, we won’t opt for the direct or the indirect way but head straight to our cPanel to get started.
Beginning with,
- Use the credentials sent in your mail to log in to the cPanel.
- Once, you are there you will find an array of icons on the front screen. Though we aren’t going to use most of them, we will stick to the one we need.
- Locate the WordPress icon and there, click on it.
- Once you do that, you will see the Quick Install screen Bluehost.
- The next page will ask you to enter the domain name upon which you wish to register the website. Click on the dropdown and then select the right domain name.
- On the next page, enter the name of the website, the username that would be used to log in to the website by the admin and a password. Make sure that the password is a combination of letters and numbers.
- Tick on all of the checkboxes and finally, click on next.
With this, the server would start the installation process. Meanwhile, you would notice several templates popping up on the screen, enticing you to download them and use it on your website. Ok, you don’t have to turn impatient. We will get back to this soon.
After the installation process is complete, you will see a message at the top of the page that says: Installation Complete. You will also have a link that will take you to the website. You can click on it to see the WordPress site URL and the login credentials.
You can now open WordPress, enter the login details and get started with your website.
Step 3: Theme Selection
So, we started with the setup process and then moved to install WordPress. Well, the journey isn’t over yet. We just have a bizarre model of the website. It doesn’t have anything to do with your business, in fact, any business. To connect it with one, we need to first decorate it and then add elements that serve your needs.
Now by the term decorate, we mean to say theme selection. It is the outward appearance of the website, one that will interact and engage with the users. It goes without saying, a website that has an engaging appearance is more likely to attract users.
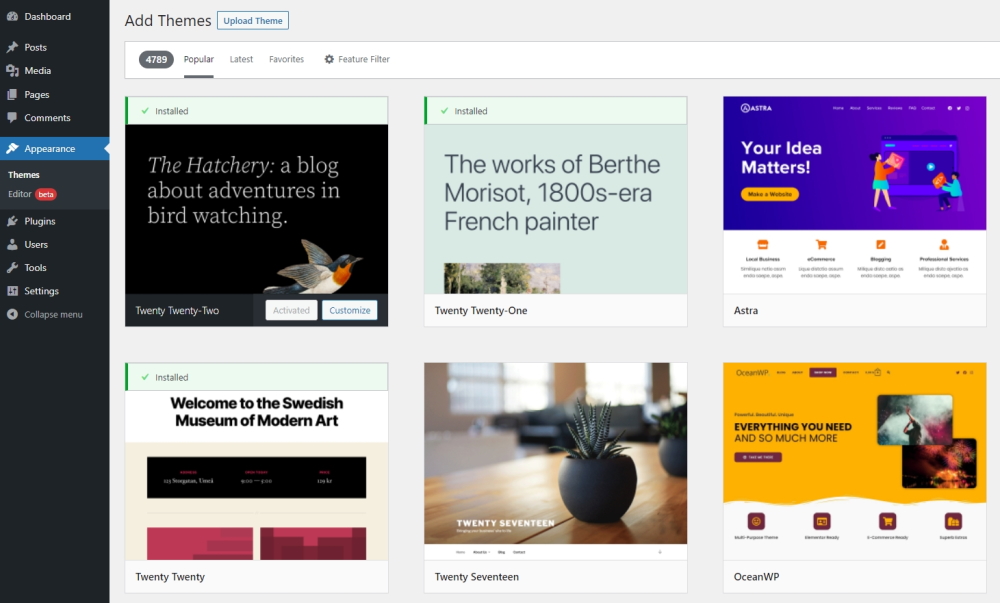
- Select Appearance, Themes and Add New
- Search for ‘astra’ or browse the most popular themes
3. Select the Astra theme, then Install and then Activate

4. Select the new Astra Options menu item from Appearance
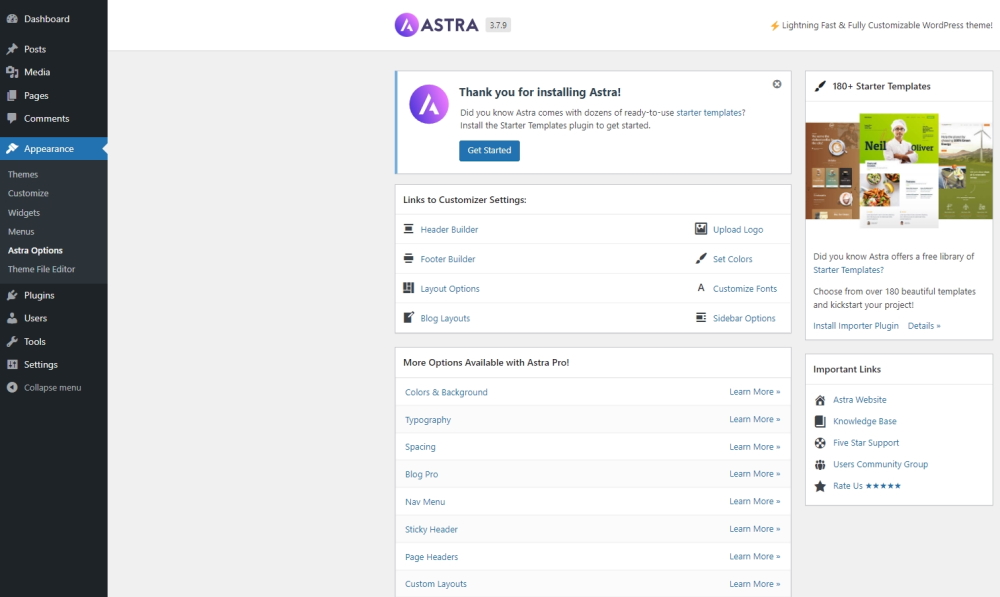
5. Select the blue Get Started button at the top of the Astra screen
6. Select the blue Build Your Website Now button when you see the new screen
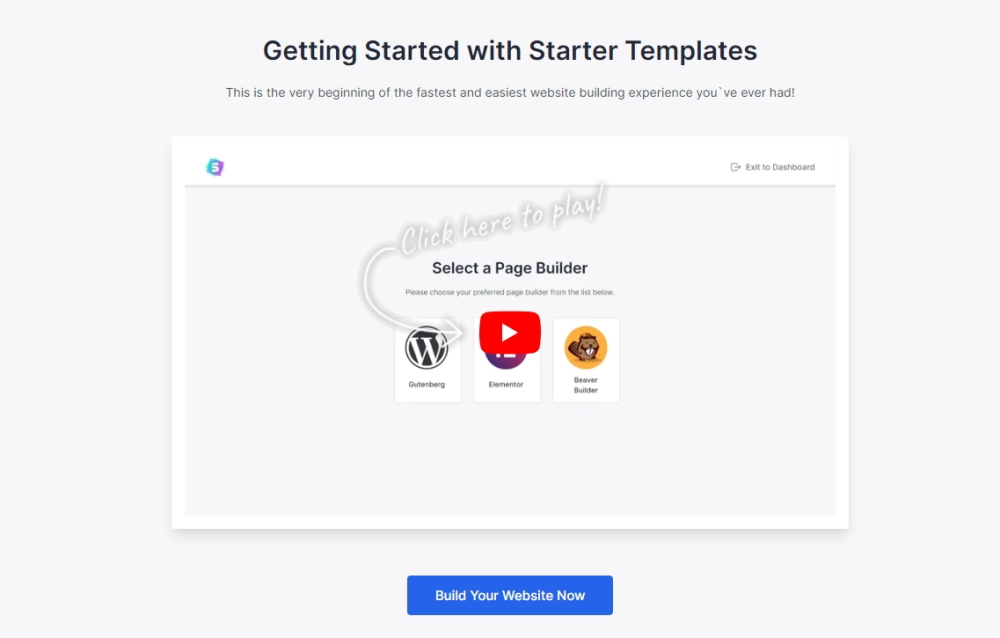
7. Select the page builder you want to use
8. Browse the Starter Templates on the next screen or search for one you like

9. Select a template and customize it as you see fit!
Step 3: Installing Plugins
After themes, we now have plugins. WordPress has a large repository of plugins that aim to ease the further business process. What a WordPress plugin does it, adds a feature to the site.
Case 1:
Imagine a situation where you want to create an online store, let’s say a woocommerce store. You start by using a plugin to create an online store environment. But this is not enough, you need to have several features. Starting with a login form to a payment gateway, a checkout page to the CRM system, you need to add everything to turn your website functional
Now since we aren’t going to code or program any of these features, what will we the best step?
Install plugins, yes that’s right.
WordPress has a plugin for each and every feature. Whether you want to introduce a payment portal, or adopt email marketing services, manage your business projects, secure a website, integrate quizzes or eliminate the boring checkout process, you will find a plugin for all.
Case 2:
Another scenario could be one where you are a blogger or just run an online website. How would plugins affect your course of action? Given that you are a blogger or a marketer, your prime consideration is to grab traffic and convert them to customers.
WordPress has a plugin that allows you to keep an eye on all of the information and then generate reports based on the results. You don’t have to sit and manually search for them, the plugin would automatically do all and in a matter of clicks.
As a matter of fact, WordPress has nearly 49000 plugins. Yes, this includes the paid ones and the free one. But the point here is that you have such a huge set of a feature-packed feature-packed plugin, all that eases the website tasks.
Types of Plugin
Carrying forward the first case, imagine that you want to start an online store. For that, WordPress has an eCommerce plugin named Woocommerce. All you need to do is:
- Log in to the WordPress dashboard using the credentials.
- Now, move to the left and there you will see an option that says plugins.
- Click on the above and then select add new.
- You can either look from the list or manually enter one.
- Here, we enter the keyword as Woocommerce and then click on search.
- The next page that opens will be the installation screen for Woocommerce.
- To the right, you will see the install button. Click on it to download and install the plugin.
- After you have installed the plugin, click on activate go get started.
As so it appears, the process of installing a plugin is pretty much the same for all, irrespective of the kind. You can also add plugins to your newly created Woocommerce store.
Some of the plugins that you might need to use includes:
- WPForms Lite: Add forms within the website as a login page or the contact forms.
- Monster Insights: Tracking the performance of a website is important, no matter what kind of business you run. It is the same as that of Google Analytics and allows website owners to assess and analyze the website traffic.
- Yoast SEO: Whether you like it or not, you will want it. Yoast SEO is one of the optimization plugins that allow owners to modify their website content and optimize it to get better search engine rankings.
- Sucuri: When it comes to a website, security is one thing that you can never compromise. The plugin enables regular checkups against malware.
Step 4: Stuff Website With Content
Now, these are only some of the plugins and as said above, WordPress has tens of thousands of such plugins. So, pick the one you need and go ahead. For now, we suggest you download and install the Yoast SEO plugin and the security plugin. You will need them regardless of the website type and content.
As mentioned above, you can either use the website as a store or as a platform to blog or host events. Either be the case, you would need to add content to your website. Now when we say content, it could either be a post or a page.
What’s the difference between a typical WordPress page and a WP post?
Posts are sort of a blog, you add and post them. These are stored in reverse order, sorted by date. On the other hand, pages are static content, one that sheds light on the business.
For instance, if you have a website on software development, you would need to add content on the home page, then a page that tells about you and your business, maybe a contact page and then a few pages that exemplify your services. On the other hand, posts are blog content or articles or vlogs that are uploaded frequently and optimized to grab traffic towards the website.
If you stick to the default setting, the blogs would be displayed on the front page. You can modify this and change it to any other page or create a separate one. Like, create a blog page that will have all your posts.
So, whatever you choose, content needs to be added to the website. Let’s see how?
To Add Pages
- Move to the admin area and then click on pages and select add new.
- The new page opens and here you will need to enter all of the information.
- Suppose that we are creating an about us page. So, under the title section, write about us.
- Below, in the text editor. Add the content, insert images or videos and then, click on publish.
- Follow a similar process to add more than one page to the website.
Add A Post
Now that you are aware of how to add pages on the website, we next need to add a post. This is not a mandatory step, yet having one would help you add more to the website.
Following a similar process, under the admin area, click on add posts.
- The screen that appears is the same as that of the pages screen. You will have a title bar and a text area.
- You will find some additional elements as tags, page format, etc. All of these are important to modify the visibility of the post, let alone categorize them.
- Once, you have added all that you want, click on publish to make the post live.
- If you aren’t yet done, you can save the post in draft and later restore it to publish.
Step 5: Customization
So, we are pretty much ready with the website, right? We have the theme ready, plugins installed, content added and domain set. But don’t you think all of this is a bit scattered? Like you could organize these and structure your website?
Well, that’s what we are to do here. Tweaks and changes to give the website a final touch!
Navigation Menus
You have added all within the website, but how will a user know where to go and how? This is where we add the navigation menus.
To create one, all you need to do is move under the appearances option and then click on menus. Here, create a new menu and then add the pages you want to display. Remember, you can always order the pages and finally, save the changes.
Front Page
We did create a home page earlier, remember? But how would WordPress know which page to display when?
To turn your home page the front page of the website:
- Visit the admin area and click on the setting. Here, click on the reading page.
- There would be an option that says Front Page Display. Here, click on the static front page option and then choose your page.
- For the front page, you can choose the home page. And the posts page will obviously be your blog page.
- Make sure you click on the Save button to reflect the changes
Tagline
Back when you were installing the site, you were asked to enter the title of the site, remember?
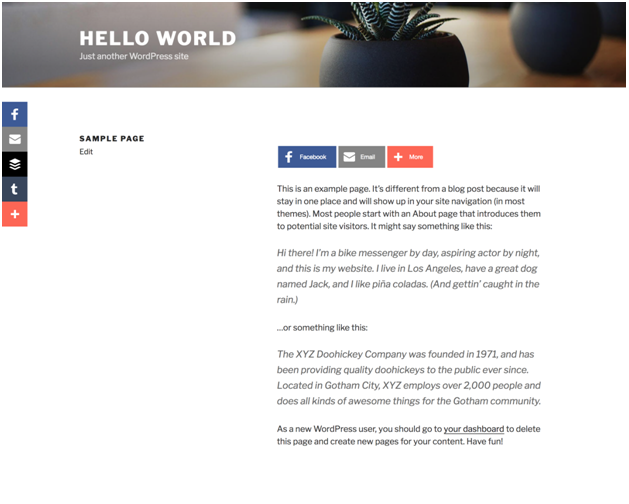
Well, along with the title, WordPress added a tagline. No there isn’t any innovation done on the part of WordPress. It has the default line that says: Just Another WordPress Website and it adds to all websites created.
Ok, you don’t have to stick to this one and can edit it. To do so:
- Move to the settings option, and click the one that says, General Tab.
- The page that opens up has different tabs. The first one depicts the site title, one that you would have chosen. Just below, you will see the tagline.
- Edit the box and if you want to create one for your website, enter it here. If not, leave the space blank
- Do not forget to click on save changes.
Handling Comments
By default, WordPress has a comment box for your posts that allows you to engage and address their issues. Though this is excellent given that you increase interaction with your users, yet there are instances where the comment box is used to target the owner by spammers. So, it is best to either disable the same or look for approval.
To do so:
- Click on the settings menu and then hover to the discussion tab.
- Click on it and then move down to find the option that says: Before a comment appears
- Here, select the checkbox that outlines the approval option.
Click on save changes to finally update the settings. This way you can make sure that your posts aren’t stuffed with irrelevant comments.
With all of this, we are now ready to use the website.
A Final Word: The Need of a Website
Though we have come to the end of the installation process, there is one thing you should know. You might have a decent idea of an online website and also be convinced on creating one for your website, if you still have your doubts on why create an online website, the following figures would appeal you further.
Statistics:
- 8 out of 10 customers prefer engaging with a business that has an online website.
- Websites offer 24/7 accessibility of a business.
- 60% of business traffic is directed through a website or a mobile device.
It is pretty obvious that users across the world are migrating to digital platforms and so is the need of you to make the shift and take your business online. Whether you are just a blogger or a physical store owner, a photographer or any other professional, a website will help you increase visibility and add more value.