Table of Contents
Quick answer: WooCommerce shows a plain number input by default. You can restyle it with CSS, add plus/minus buttons with a short jQuery snippet, or switch to a dropdown or radio layout. Set minimum, maximum, and step values by hooking into woocommerce_quantity_input_args. For rule-based control across products, categories, or user roles, a plugin handles it without custom code.
Key Takeaways
- The WooCommerce quantity selector button lets shoppers choose how many units of a product to add to their carts.
- The default WooCommerce quantity selector button is a basic <input type=”number”> field. Although functional, it offers limited styling, mobile usability, and quantity management options.
- Customizing the quantity selector improves user experience, checkout speed, and average order value (AOV) in a WooCommerce store.
- Popular WooCommerce quantity selector types include the default number input, plus/minus buttons, dropdown selector, and the radio button.
- The Min/Max Quantity for WooCommerce plugin by The Dotstore lets you change the selector style to dropdowns or radio buttons, set minimum and maximum quantities, step increments, change the default values, apply rules per product, category, user role, or shipping zone, and more.
The quantity selector is the small number field next to the Add to Cart button. Out of the box, WooCommerce renders it as a single HTML number input.
It works, but it is bland, easy to mistype on mobile, and offers no control over minimums, maximums, or step increments. This post covers the four common selector styles, free CSS and jQuery methods to change them, how to set quantity limits with code, how to hide the selector on specific products, and when a plugin is the better route. If you want a fuller breakdown of the input field itself, see our guide to the WooCommerce quantity input.
The default selector and its limits
WooCommerce outputs the quantity field from its quantity-input.php template as <input type=”number” name=”quantity”>. The up and down arrows you see are browser spinner controls, not WooCommerce features. That means:
- The arrow styling changes between Chrome, Safari, and Firefox, so it looks inconsistent.
- On mobile, the spinner arrows are tiny and easy to miss.
- There is no built-in way to enforce a minimum of 2, cap at 10, or force steps of 5 without code or a plugin.
- You cannot swap it for a dropdown or radio layout from the admin.
Everything below fixes one or more of these gaps.
The four selector styles
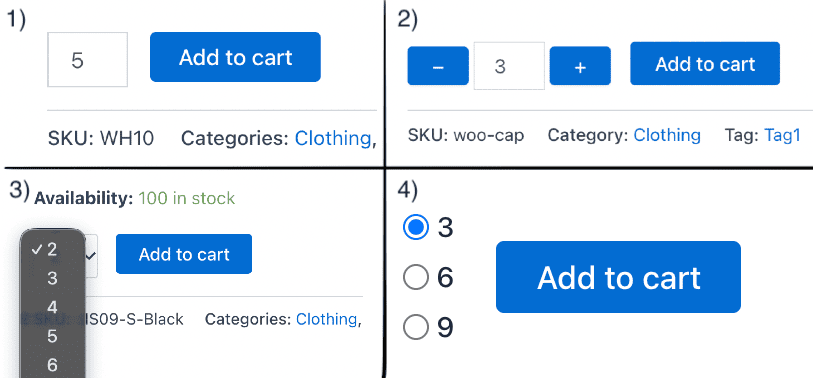
Number input is the default. Best when customers buy unpredictable quantities and you want the lightest markup.
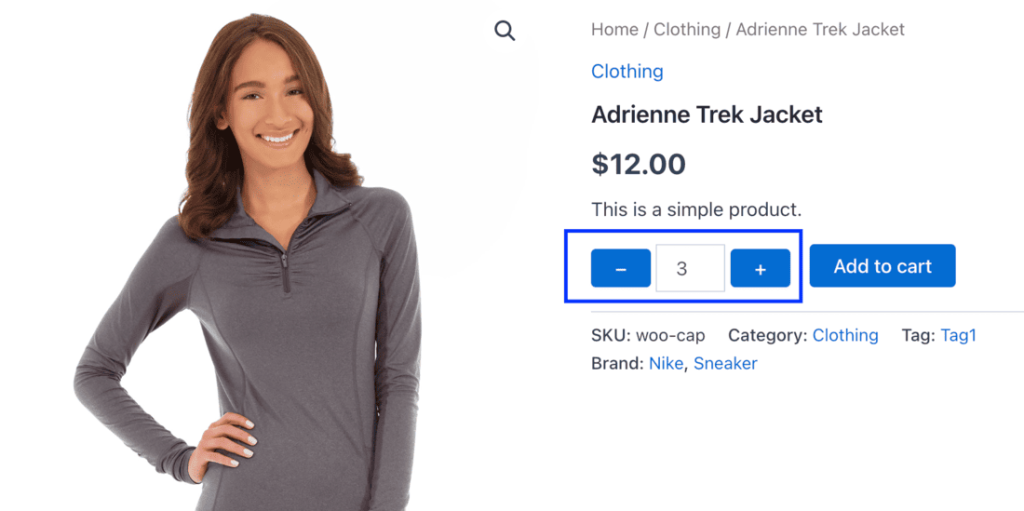
Plus/minus buttons wrap the input with clickable + and – controls. Best for touch devices and for nudging shoppers toward larger quantities. If you want the buttons to step by a fixed amount, our guide to WooCommerce quantity increment covers the options.
Dropdown lists a fixed set of options in a <select> menu. Best when only a handful of quantities make sense (1 to 5, for example).
Radio buttons show every option at once with no clicks to expand. Best for two or three preset pack sizes where you want the choices visible immediately.
Style the default selector with CSS
You can clean up the default input without touching PHP. Add this to Appearance > Customize > Additional CSS (or your child theme stylesheet):
.woocommerce .quantity .qty {
width: 70px;
height: 44px;
padding: 8px;
border: 1px solid #d0d0d0;
border-radius: 6px;
text-align: center;
font-size: 16px;
}
The font-size: 16px matters on mobile because smaller values trigger an automatic zoom in iOS Safari. The height: 44px gives a comfortable tap target. This alone makes the default field look intentional rather than browser-default.
Add plus/minus buttons (free method)
This is the most requested change and it does not need a plugin. The jQuery snippet below injects + and – buttons around the existing input and wires up the click behavior, respecting the field’s min, max, and step attributes.
- Open your child theme’s functions.php (Appearance > Theme File Editor, or edit the file over SFTP).
- Paste the snippet below. It enqueues a small inline script on product and cart pages.
add_action( ‘wp_footer’, function () {
if ( ! is_product() && ! is_cart() ) {
return;
}
?>
<script>
jQuery(function ($) {
$(document.body).on(‘click’, ‘.qib-button’, function () {
var $input = $(this).closest(‘.quantity’).find(‘input.qty’);
var step = parseFloat($input.attr(‘step’)) || 1;
var min = parseFloat($input.attr(‘min’)) || 0;
var max = parseFloat($input.attr(‘max’)) || Infinity;
var val = parseFloat($input.val()) || 0;
if ($(this).hasClass(‘plus’)) {
val = Math.min(max, val + step);
} else {
val = Math.max(min, val – step);
}
$input.val(val).trigger(‘change’);
});
$(‘.woocommerce .quantity’).each(function () {
if ($(this).find(‘.qib-button’).length) return;
$(this).prepend(‘<button type=”button” class=”qib-button minus”>−</button>’);
$(this).append(‘<button type=”button” class=”qib-button plus”>+</button>’);
});
});
</script>
<?php
} );
- Add CSS so the buttons sit flush against the input:
.woocommerce .quantity { display: inline-flex; align-items: center; }
.qib-button {
width: 40px;
height: 44px;
border: 1px solid #d0d0d0;
background: #f6f6f6;
font-size: 18px;
cursor: pointer;
}
.qib-button.minus { border-radius: 6px 0 0 6px; }
.qib-button.plus { border-radius: 0 6px 6px 0; }
.woocommerce .quantity .qty { border-radius: 0; }
The .trigger(‘change’) call is what keeps the cart total in sync when a customer updates quantity on the cart page. Leave it in.
Set minimum, maximum, and step values
To enforce limits without a plugin, filter woocommerce_quantity_input_args. This example sets a minimum of 2, a maximum of 20, a default starting value of 2, and steps of 2 on every product:
add_filter( ‘woocommerce_quantity_input_args’, function ( $args, $product ) {
$args[‘min_value’] = 2;
$args[‘max_value’] = 20;
$args[‘step’] = 2;
$args[‘input_value’] = 2;
return $args;
}, 10, 2 );
Because the plus/minus script above reads the min, max, and step attributes, your buttons will automatically honor these limits. The one caveat with the code-only approach: it applies the same rule everywhere unless you add conditional logic checking $product->get_id() or category.
That is where a plugin is the easier route, handling those rules from the admin without extra code. For background on the difference between caps and floors, see our notes on WooCommerce limit quantity, WooCommerce minimum quantity, and WooCommerce maximum quantity. To preset the starting value a customer sees, see WooCommerce default quantity.
Switch to a dropdown or radio layout
WooCommerce has no filter that converts the input into a <select> directly, so this means overriding the quantity-input.phptemplate. Copy woocommerce/templates/global/quantity-input.php into yourtheme/woocommerce/global/quantity-input.php and replace the input markup with a generated <select> (looping from $min_value to $max_value by $step) or a set of <input type=”radio”>elements. Keep the name=”quantity” attribute intact so WooCommerce still reads the value on Add to Cart. Template overrides survive plugin updates but break if WooCommerce changes the template, so recheck after major releases.
Hide the selector on specific products
For products you sell one at a time (a service, a single-license download, a deposit), remove the quantity field and the cart treats each Add to Cart as a single unit. Mark the product as Sold individually under Product data > Inventory in the product editor. To hide it across a whole category in code:
add_filter( ‘woocommerce_is_sold_individually’, function ( $individually, $product ) {
if ( has_term( ‘services’, ‘product_cat’, $product->get_id() ) ) {
return true;
}
return $individually;
}, 10, 2 );
Show rules and error messages on the front end
If you enforce a minimum or maximum, tell customers before they hit a wall. With code, you can validate against the cart using woocommerce_add_to_cart_validation and pass a message to wc_add_notice( $message, ‘error’ ), which renders in the standard WooCommerce notice area.
Displaying the rule itself (a small table on the product page reading “Minimum 2, sold in steps of 2”) is harder to do cleanly by hand and is usually where store owners reach for a plugin that outputs both the rule and the error automatically.
Mobile considerations
Touch targets are the main concern. Apple and most accessibility guidance put the minimum comfortable tap area around 44px. The CSS above uses height: 44px and 40px-wide buttons for that reason.
Two more things: keep the input font-size at 16px or higher to stop iOS zoom, and on plus/minus layouts give the buttons enough padding that thumbs do not overlap the input. Dropdowns work well on mobile because the OS renders a native picker; long radio lists do not, so cap radio layouts at three or four options.
The plugin route for rule-based control
Custom code is fine for one global rule. It gets unwieldy when you need different minimums per category, role-based limits for wholesale buyers, or step values that vary by product. At that point a plugin that manages rules from the admin is a simpler way to keep things organized than maintaining a growing functions.php.
Our Min/Max Quantity for WooCommerce plugin lets you set minimum, maximum, default, and step values per product, per category, per user role, or globally, and it shows the active rules and error messages on the product and cart pages without writing code.
Setup runs through Dotstore Plugins > Min/Max Quantity > Add New, where you define conditions and actions, then Save Changes. For a wider view of how it compares to similar tools, see our roundup of the best WooCommerce quantity management plugins. If a single CSS tweak or the jQuery snippet above covers your need, that route works just as well, the plugin is there for when rules grow beyond a single case.
Min/Max Quantity for WooCommerce
Set min/max/step quantities to manage product quantities effectively and enhance the customer experience in your WooCommerce store.
14-day, no-questions-asked money-back guarantee.
Comparison table
Here is how the four selector styles stack up at a glance.
| Selector type | Best for | Mobile-friendly | Needs plugin |
| Number input | Unpredictable quantities, lightest markup | OK with 16px font and 44px height | No |
| Plus/minus buttons | Touch devices, nudging larger orders | Yes, with 44px tap targets | No (jQuery snippet) |
| Dropdown | A handful of fixed options | Yes, native OS picker | No (template override) |
| Radio buttons | Two or three visible pack sizes | Only with short lists | No (template override) |
Conclusion
Most quantity selector goals are reachable for free. CSS smooths the default field, a short jQuery snippet adds plus/minus buttons, and a single filter sets your minimum, maximum, and step values. Dropdown and radio layouts take a template override but stay code-only.
The point where you should consider a plugin is rule complexity: different limits per category or role, front-end rule tables, and automatic error messages are tedious to hand-build and easy to break. When that is your situation, Min/Max Quantity for WooCommerce handles those rules from the admin and is a natural next step. The snippets above remain a solid free path for simpler stores.
Min/Max Quantity for WooCommerce
Set min/max/step quantities to manage product quantities effectively and enhance the customer experience in your WooCommerce store.
14-day, no-questions-asked money-back guarantee.
FAQs about the WooCommerce quantity selector button
Can I replace the default input with a dropdown or radio buttons?
Yes, but WooCommerce has no setting for it. You override the quantity-input.php template in your child theme and generate a <select> or radio markup, keeping name=”quantity” intact. A plugin avoids the template work.
How do I add plus and minus buttons without a plugin?
Use the jQuery snippet in the plus/minus section above. It injects the buttons and respects the field’s min, max, and step. Pair it with the matching CSS so the buttons sit flush with the input.
How do I make quantity increase by a custom increment like 5?
Filter woocommerce_quantity_input_args and set $args[‘step’] = 5. The plus/minus buttons read that step automatically, so clicking + jumps by 5.
How do I hide the quantity selector on specific products?
Enable Sold individually under Product data > Inventory for a single product, or filter woocommerce_is_sold_individually to apply it to a category. Both leave a single-unit Add to Cart with no quantity field.
Why do my quantity arrows look different across browsers?
Those arrows are native browser spinner controls, not WooCommerce styling. Replacing them with your own plus/minus buttons gives a consistent look everywhere.
Will my changes survive a WooCommerce update?
CSS and functions.php snippets are safe. Template overrides (for dropdowns or radios) can break if WooCommerce changes the underlying template, so recheck them after major version updates.
How do I set different minimums for different categories?
In code, add a has_term() check inside the woocommerce_quantity_input_args filter. For several rules this gets hard to maintain, so a rule-based plugin is the cleaner option.
Does changing the selector affect the cart total?
Only if the script fires a change event. The provided jQuery calls .trigger(‘change’) so the cart recalculates when a customer updates quantity on the cart page.

🛒 Take Control: Set Min/Max Limits and Quantity Steps!
Try the plugin 100% risk free!