Table of Contents
Whether you are running a gift shop or an online store, where sold products need to be shipped with some extra items, you would want to charge extra fees for customers’ orders. And when you have more than one cause for charging additional fees, Multiple Extra Fees feature becomes essential for you.
WordPress WooCommerce is definitely the perfect CMS option for your e-commerce business in this case.
In this article, we will tell you about –
- When do you need to charge multiple extra fees?
- Which plugin do you need for it?
- How to use that plugin to charge multiple extra fees for WooCommerce orders?
So if you own an e-commerce store running on WooCommerce, read it.
When do you need to charge multiple extra fees?
Online stores try providing all extra services, needed to make their customers feel good. It is needed because you want to ensure the best shopping experience for your buyers. After all, a store owner can’t risk its reputation in this competitive era.
For these extra services, sometimes it is fair to charge money from customers.
Check out a few examples when it is fine to charge extra fees or multiple extra fees through your WooCommerce store –
Payment Gateways’ or methods’ fee:
When your credit/debit card payment partner or gateway service provider is charging money from you, it becomes important for you to add this amount in customer’s bill. Otherwise, it will cause unnecessary overhead.
For Safer Packaging
If you are shipping a product which required heavy and safer packaging than other products you sell, you might want to impose this additional amount on your buyers. Understanding the nature of the shipped product, your customer will admire your effort instead of considering the extra fees a burden.
For Gift Wrapping
Consider that a purchaser is buying your product as a gift for someone else. He or she would appreciate if you could ship it wrapped for the same purpose. However, doing this for free is not a good idea. So, you should levy fees on the buyers who want gift wrapping services.
Additional Fee for extra tiny add-ons or services
Just as described in previous examples, online store owners may offer other services and add-ons. For example, your pizza store customers ask for extra sauce or oregano. Charge additional fees to earn a few extra pennies to increase your revenue.
For customization
If you provide product customization services, such as mug printing, cushion printing, etc., it is better to mention product cost and customization fee separately. For this, you will have to charge an extra fee in your WooCommerce store.
The Solution – Which plugin do you need for it?
WooCommerce stores are inherently extensible as they are built on WordPress. So to extend your shop’s functionality, you can always add plugins if you are using WooCommerce. It is better to search for existing free and premium plugins for the requirement, because developing a customized plugin may cost you more than your budget.
WooCommerce Extra Fees
Make profits from every confirmed sale through smart, conditional fees.
14-day, no-questions-asked money-back guarantee.
For adding multiple extra fees for WooCommerce orders, we found this plugin perfect.
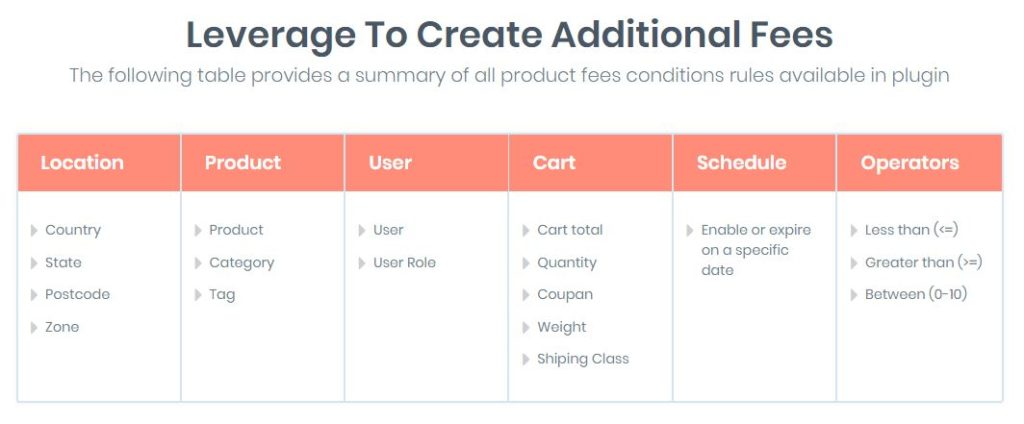
WooCommerce Conditional Product Fees for Checkout Plugin lets you add more than 16 types of conditional fee rules. You can schedule the fees from a particular time period, add multiple rules, deploy discounts and do a lot more with this plugin.
Fixed, as well as variable, you can charge both types of extra fees using WooCommerce Conditional Product Fees for Checkout plugin.
Note: Sometimes, you might want to charge extra fees for more than one service/purpose, so always choose a plugin which allows you to add multiple extra fees for WooCommerce Orders.
How to charge multiple extra fees for WooCommerce orders?
Note: We are using WooCommerce Conditional Product Fees for Checkout plugin for this demo.
Charging Extra Fees for WooCommerce Orders
To get started, open the plugin dashboard and click on ‘Add Product Fees’.
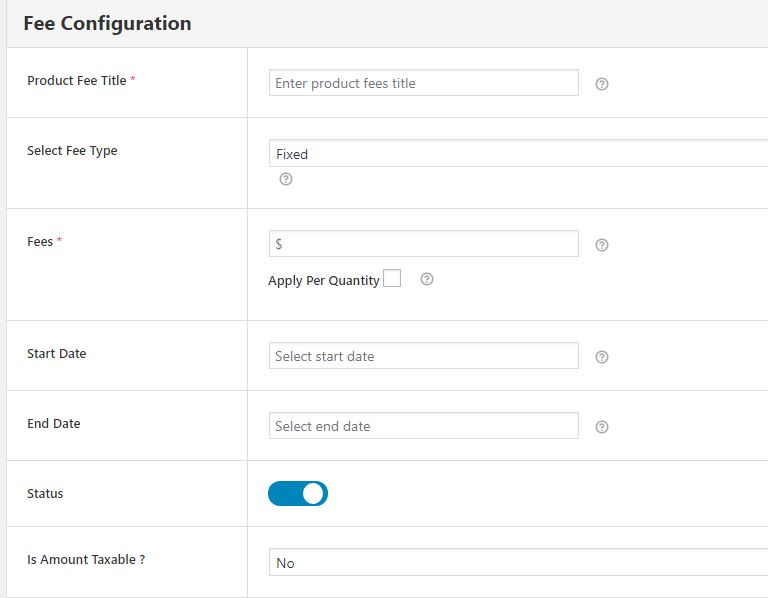
Thereafter, you will have to fill this fee configuration form.
Consider these suggestions while entering values in this form –
- Add the product fee title, to begin with. Name your method carefully so that you could use the method in the future too. For example – You can call it ‘Gift Wrapping Extra Fee’ if you are charging this amount from your buyer for packaging his/her purchased gift.
- In the option related to the fee type. You can select between Fixed and variable. For charging fixed amount like $5, $10, etc., choose fixed from the dropdown. If you want to charge some percentile amount of the cart total or product price, choose variable fee.
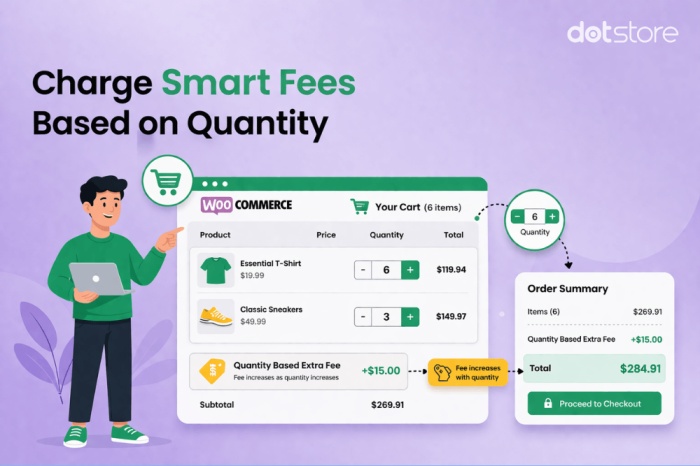
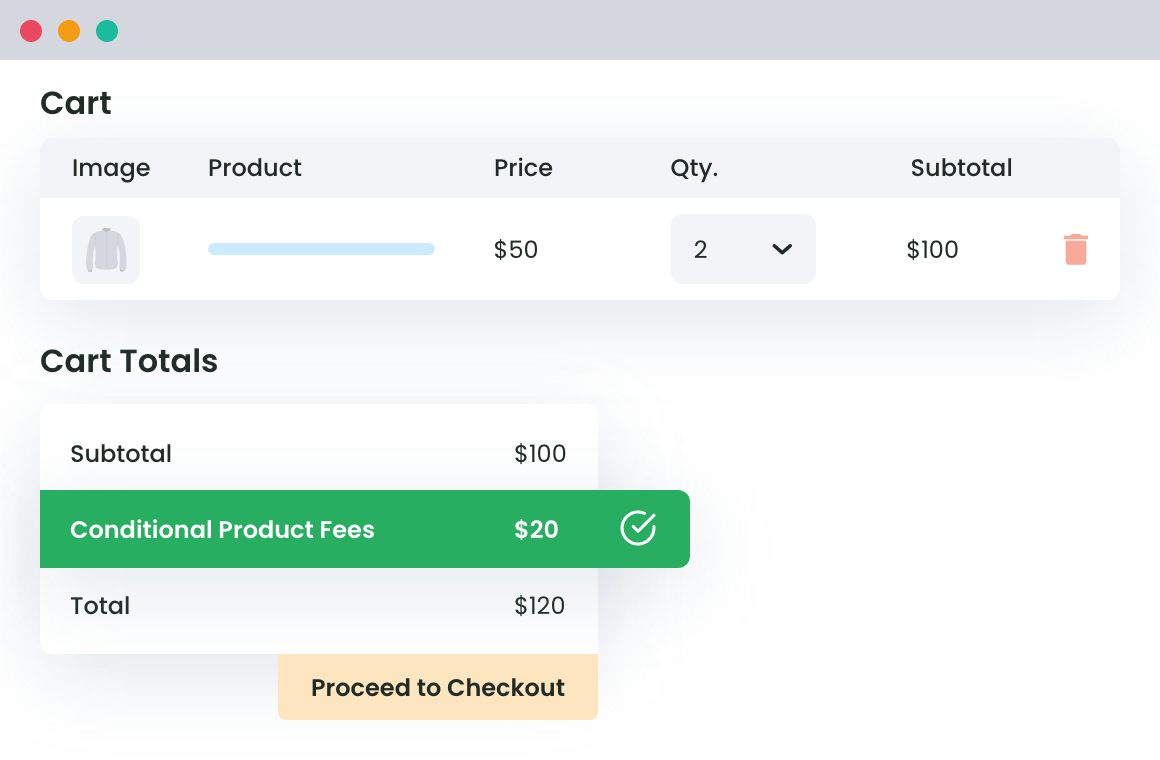
- Next is the option for filling fee value. In this space, fill the amount to be charged from the customer if conditions matched (we will explain how to add conditions to the method in a minute). If you want to charge less on bulk orders, you can check ‘Apply per quantity’. In the new textbox available to you now, fill in the amount which is to be charged extra on each additional item.
- Fill the optional fields of the form like start date, end date, and status if you want. Here, start date and end date is for the timeline, during which, this extra fee should remain implied.
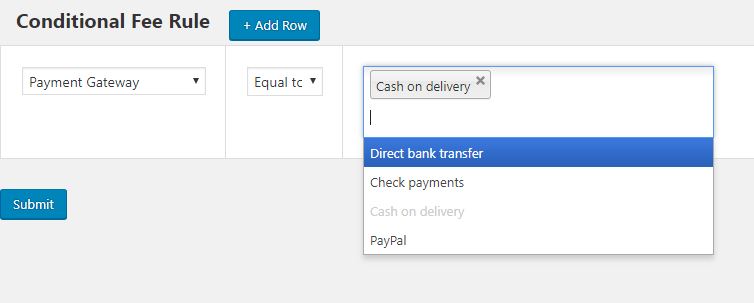
Scroll down to add conditional rules now.
This form will allow you to imply multiple conditions. As per the rules, you will add, extra fees will be charged.
For example,
If you want to apply the added extra fee for a selective payment gateway, e.g. cash on Delivery, you will have to choose ‘Payment Gateway’ from the dropdown list and type the value (Cash on delivery) so that a dynamic list could appear. Select the value, for which, you want this additional fee setting to work.
Finally, just save the method and it’ll work for your WooCommerce orders.
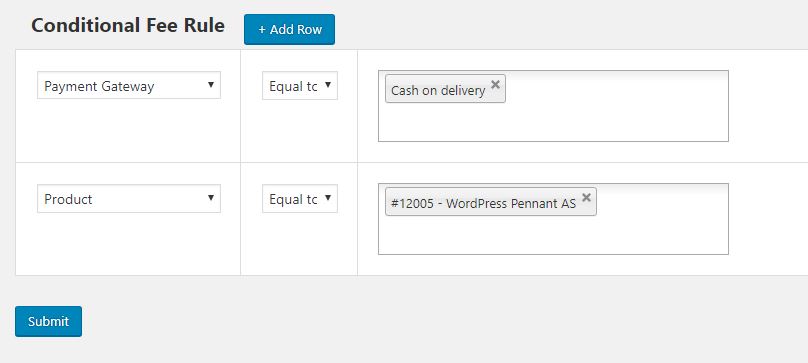
In case you want to add more constraints to your method, you can always do so using the plugin we have selected for the demo.
For instance, we’ve added the product name to the method –
Charging Multiple Extra Fees for WooCommerce Orders
In the previous step, we learned to create a Product fee method. In a similar way, you can create multiple methods.
In the previous example, we created an extra fee method when an additional amount will be charged if the product is WordPress Pennant and Payment Method is Cash on delivery. To add multiple extra fees on this product i.e. WordPress Pennant, you will have to create another method which intersecting conditions.
Try the plugin using this store link and click on live demo to understand how it works and how effective will it be for your eCommerce store. In case of any query, do not hesitate to reach out to Dot Store team.
WooCommerce Extra Fees
Make profits from every confirmed sale through smart, conditional fees.
14-day, no-questions-asked money-back guarantee.