Table of Contents
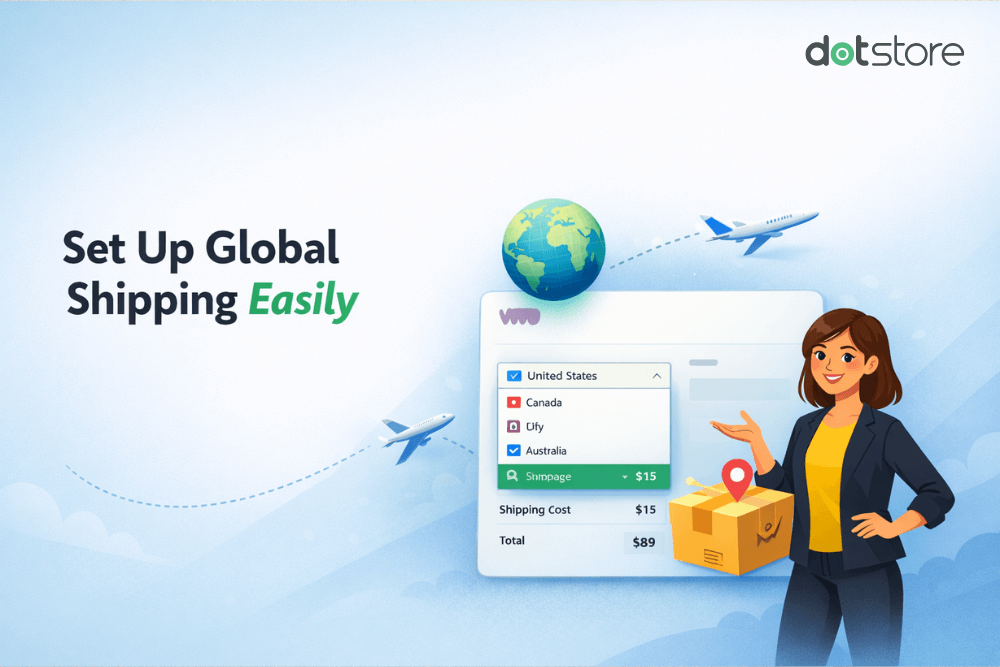
WooCommerce enables businesses to sell products worldwide — no matter where they are based. In this detailed tutorial, we’ll walk you through the steps to set up WooCommerce international shipping with the default settings and with a simple-to-use plugin.
Thinking about shipping your products internationally?
Running an ecommerce store means that you can attract customers from all over the world. But with that growth comes a big question: how do you handle international shipping in a way that’s smooth for your business and seamless for your customers?
Delivering products across borders is much more than ticking a few boxes to add another country as a shipping option at checkout.
You need to configure your store so it can handle different shipping zones, rates, tax rules, and carrier requirements depending on the mix of items in customers’ shopping carts. Get any of these wrong, and you risk showing customers incorrect rates or running into costly delivery issues.
In this no-nonsense tutorial, you’ll learn:
- 4 ways offering international shipping benefits ecommerce businesses.
- How to set up WooCommerce international shipping with the default settings.
- How to set up international shipping with the powerful Flat Rate Shipping Plugin for WooCommerce by The Dotstore.
- Best practices for adding WooCommerce worldwide shipping in an online store.
- FAQs about setting up WooCommerce international shipping.
- Much more.
Plugins mentioned in this guide
- Flat Rate Shipping Plugin for WooCommerce: A powerful plugin that enables you to factor in multiple parameters such as location, product types, order value, product quantity, cart weight, cart subtotal, product categories, etc, and calculate complex flat rate shipping rates for international orders with ease. Free and pro versions available.
- Advanced USPS Shipping Plugin: A lightweight plugin that syncs WooCommerce with USPS and shows accurate, real-time USPS shipping rates on your site’s checkout page. Free and pro versions available.
Advanced Flat Rate Shipping Methods
Boost your WooCommerce store’s revenue with flexible shipping options. Your business deserves the best!
14-day, no-questions-asked money-back guarantee.
Let’s jump right into it.
Why Set Up International Shipping in WooCommerce?
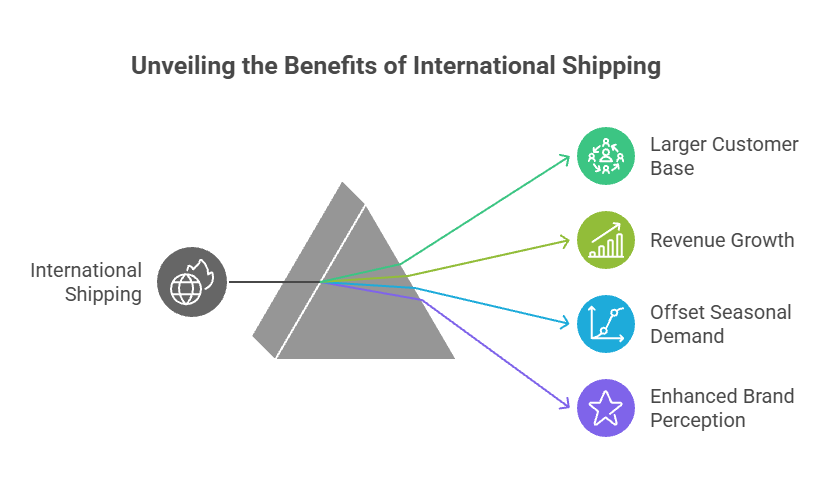
Once you’ve established a solid domestic customer base, expanding your WooCommerce store’s shipping options to support international shipping can result in massive benefits for your business.
Let’s explore 4 reasons why WooCommerce international shipping should be a core part of your strategy as your business starts to scale.
Access to a Larger Customer Base
There are buyers around the world who are actively searching for products like yours, particularly if what you offer is unique, high-quality, or unavailable in their region.
Only selling to customers in the country you’re based in can drastically limit your reach. Opening up your store to international buyers multiplies your potential customer base and enables you to tap into a much broader market overnight.
Revenue Growth
Entering international markets maximizes your existing setup. It’s still the same store, same branding, same operations; just with wider reach.
If you’re already paying for warehousing, advertising, and product development, opening your store up to global buyers helps you squeeze more value out of your existing overhead. Your existing inventory can start working harder for you, simply by being available to more people.
And an added bonus of selling products globally is that international customers often purchase more per transaction to get their money’s worth or qualify for free shipping thresholds (if available).
Offset Seasonal Dips
Most businesses experience recurring lulls in sales from time to time. Think: post-holiday slumps, summer slowdowns, etc. Considering that different countries operate using different retail calendars, you can shift supply to other countries during periods of low demand in yours.
This concept applies to both seasonal and non-seasonal businesses. For example, a WooCommerce store that sells winter sports gear in Canada will likely see a predictable sales dip from May through August. Refocusing their efforts to sell to customers in Australia and New Zealand (where it’s winter while it’s summer in the northern hemisphere) can generate consistent orders during what would have been slow sales months.
Similarly, cultural events, holidays, and school calendars vary around the world. A stationery store can capitalize on the fact that schools in different countries reopen at different times of year and tap into the back-to-school wave in different countries to consistently sell planners, stationery, or educational toys all year round.
Boost Brand Perception
Even if your business consists of a small team working out of your garage, a co-working space, or remotely, shipping to other countries can position your business as a global brand.
Offering WooCommerce international shipping, even if it’s only to a few select destinations, sends a strong signal of credibility about your brand. It gives customers the impression that you’re a legitimate business that has invested properly in infrastructure, and that people around the world already value your products.
How to Configure the Default WooCommerce International Shipping Settings
WooCommerce ships with basic in-built features for setting up shipping to different countries, regions, and continents. Here’s how to configure the default WooCommerce international shipping settings.
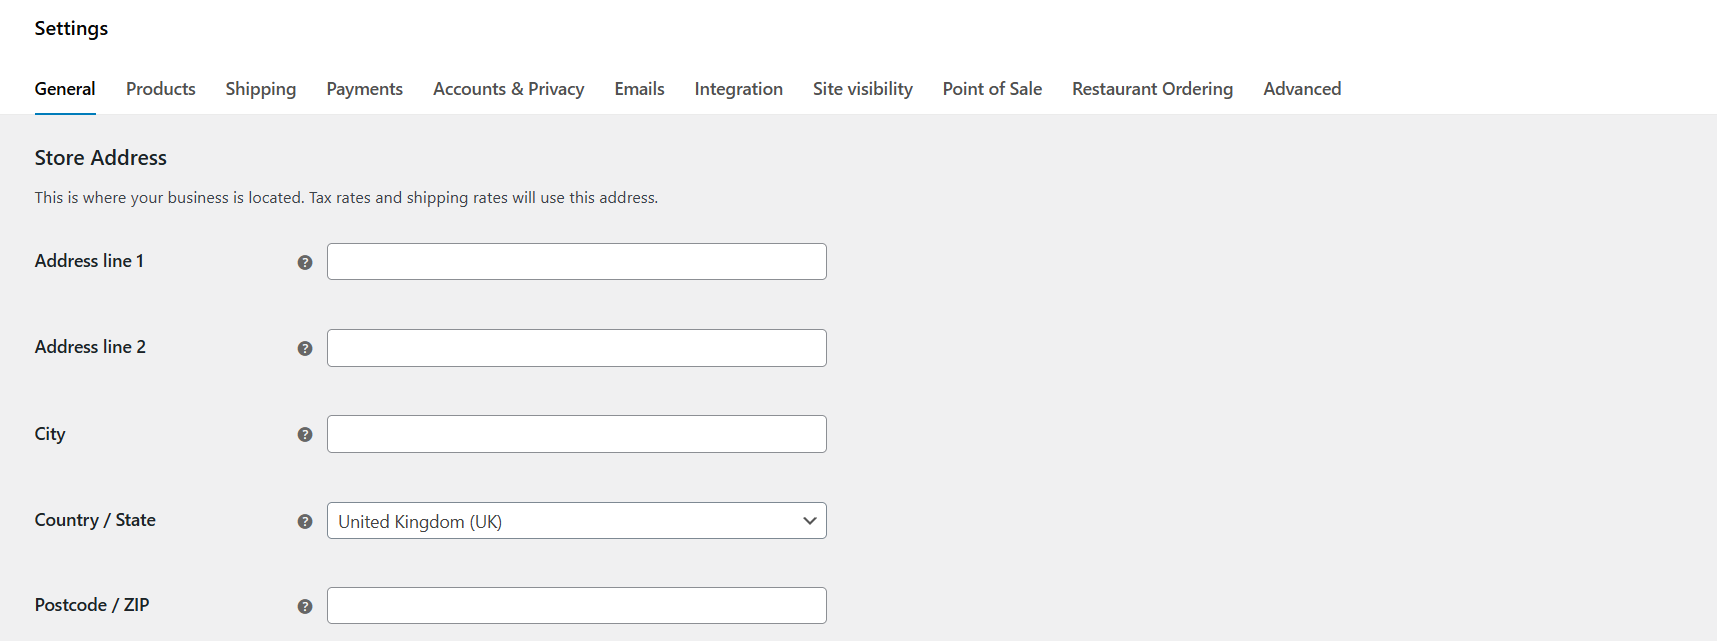
Step 1: Add Your Store’s Shipping Address And Define Selling and Shipping Locations
The first step is to set the default shipping country for your WooCommerce store and specify the specific countries you plan to ship to.
- In your site’s admin panel, navigate to WooCommerce → Settings → General.
- Under “Store Address”, add the exact location you ship products from, including the city, state, country, and postcode.
- From the same page in your site’s admin: WooCommerce → Settings → General, scroll down to “General options”.
- Select the settings that support the international destinations you plan to ship to:
- Selling location(s) to either “sell to all countries”, “sell to all countries, except for…”, or “sell to specific countries (e.g., United States, United Kingdom, Germany)”.
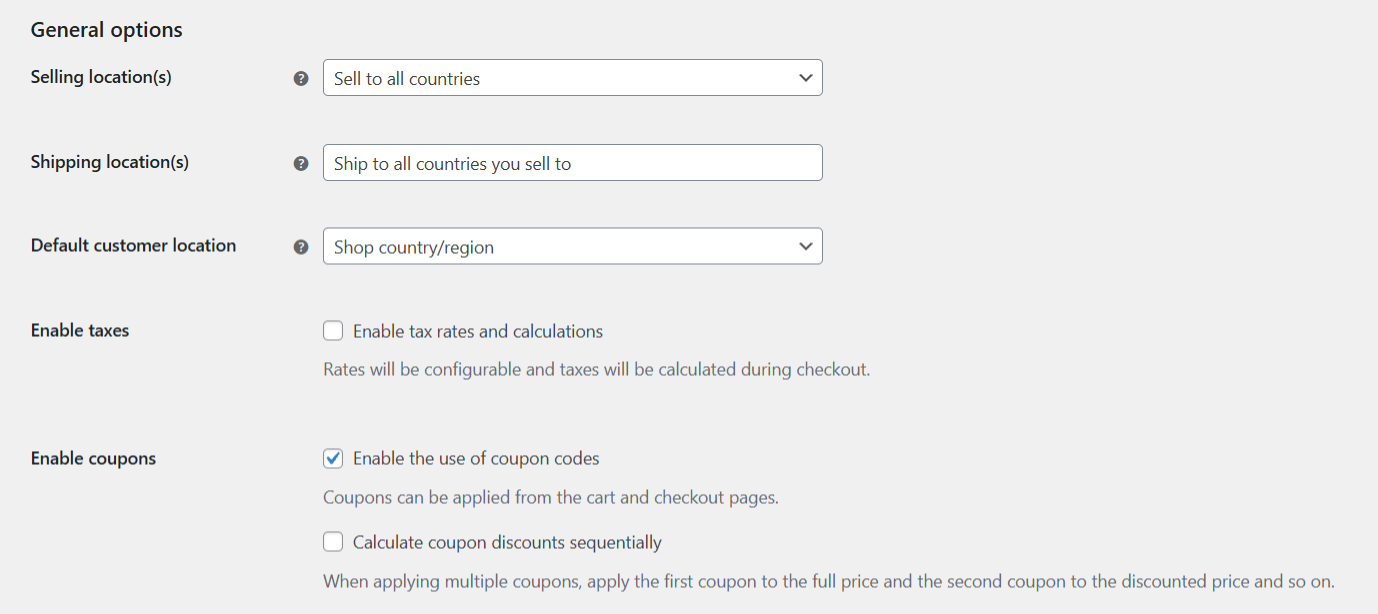
- Shipping location(s) to either “ship to all countries you sell to”, “ship to all countries”, or “ship to specific countries only”.
- Selling location(s) to either “sell to all countries”, “sell to all countries, except for…”, or “sell to specific countries (e.g., United States, United Kingdom, Germany)”.
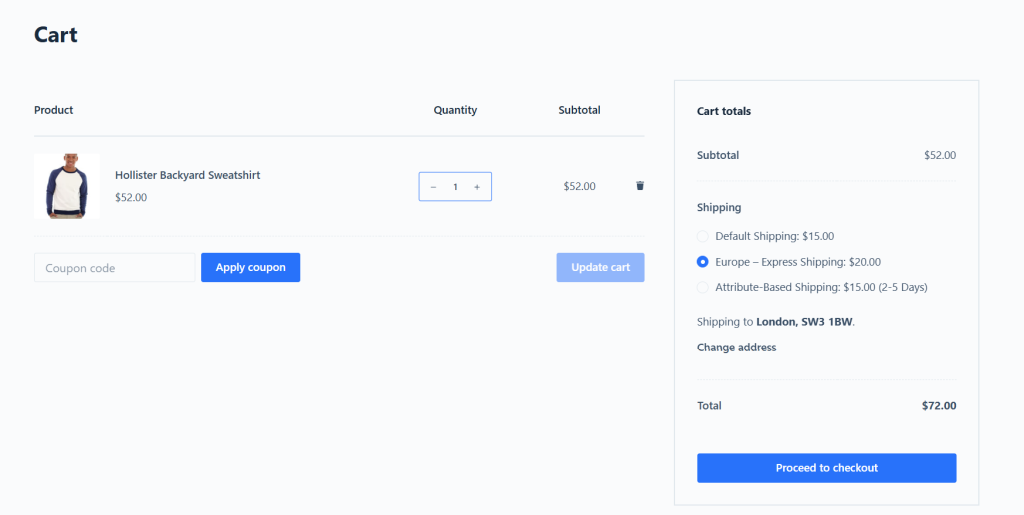
Step 2: Set Up WooCommerce International Shipping Zones
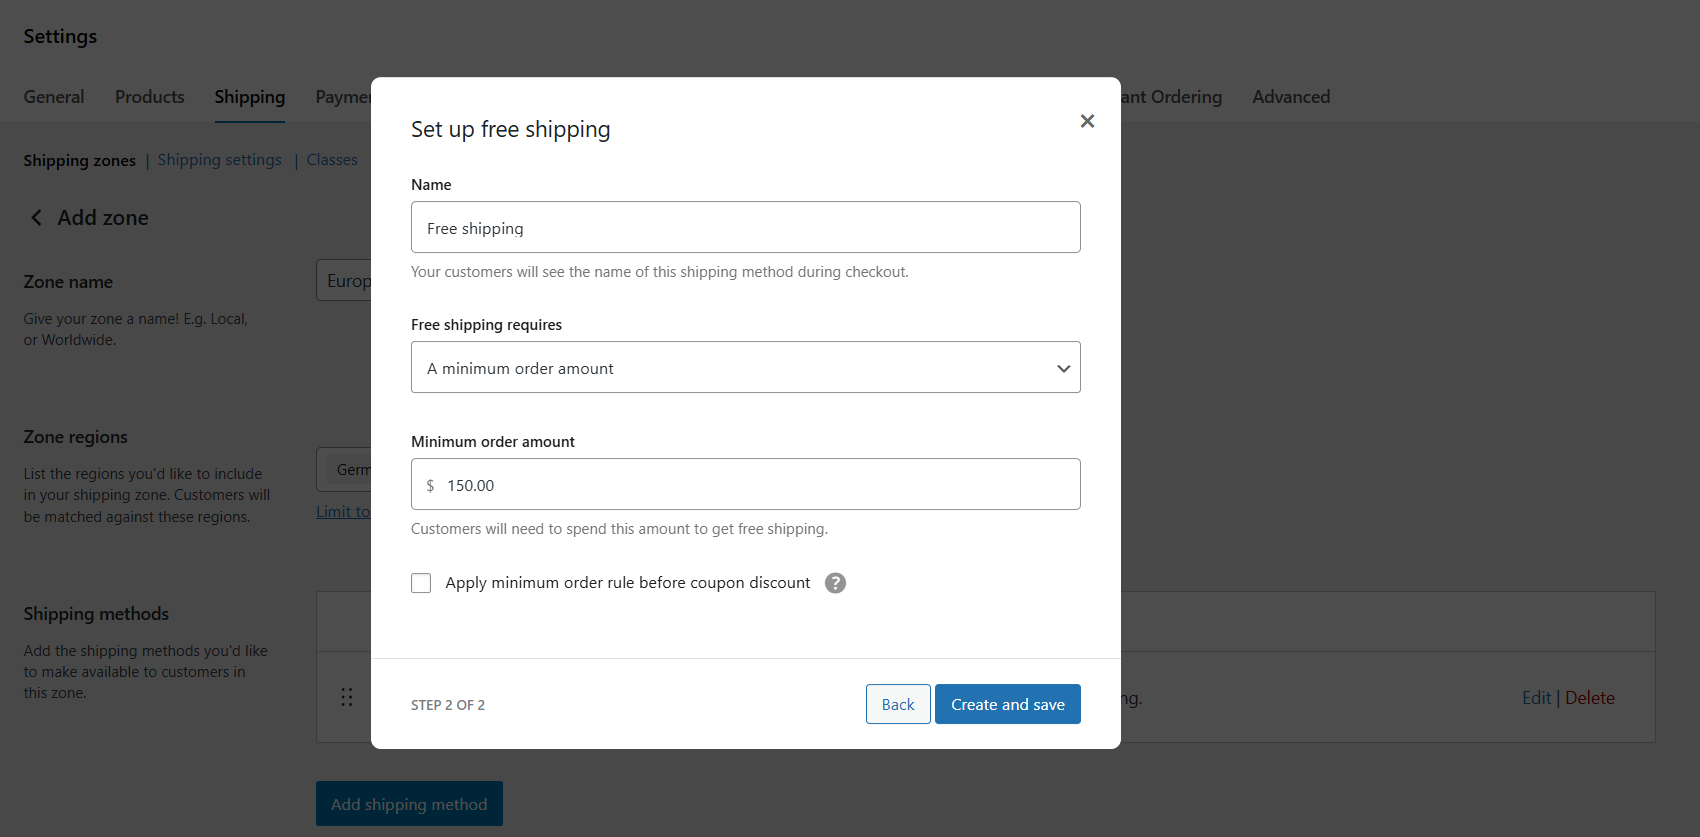
Define the specific international geographic regions for shipping methods and their rates. For instance, in this tutorial, we’ll create a zone called Europe that includes Germany, France, and Italy, with flat rate shipping at $25 and free shipping over $150.
Related reading: A complete step-by-step tutorial on how to create shipping zones in WooCommerce.
- In your site’s admin panel, navigate to WooCommerce → Settings → Shipping.
- Press “Add Shipping Zone”.
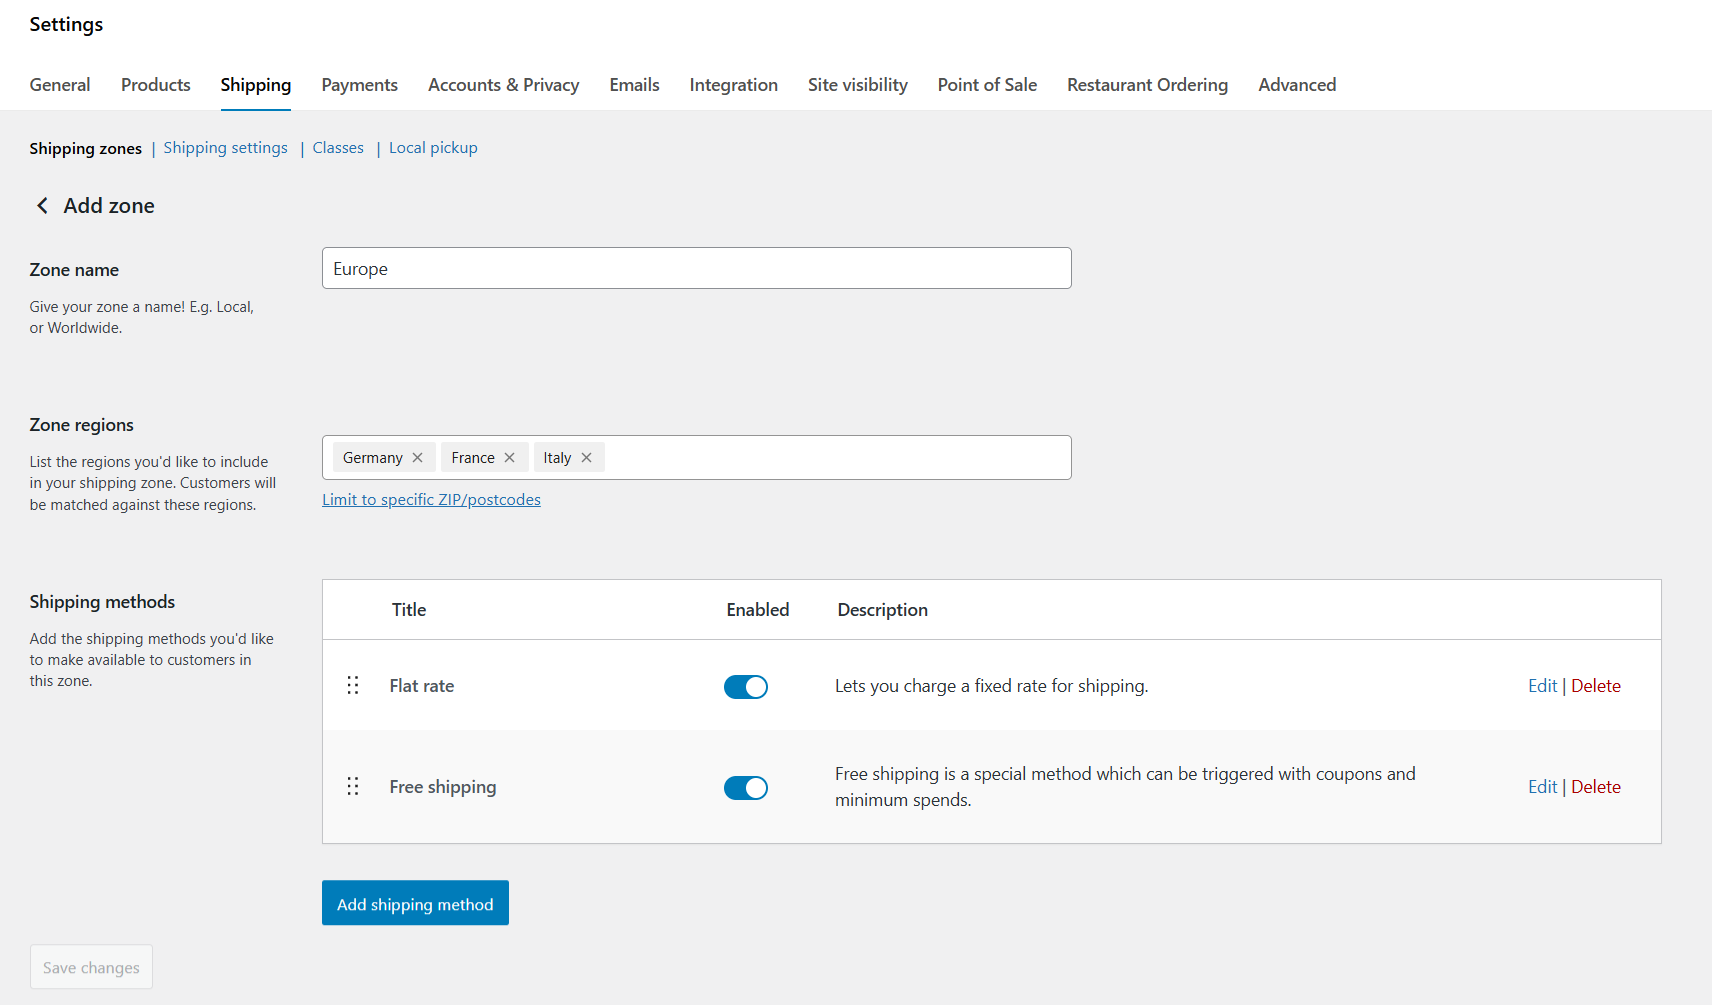
- Name the zone (ideally something recognizable like “Europe – Standard” or “Asia – Express”).
- In the “Zone regions” field, mention specific international places you’ll ship to. This can be specific countries (e.g., Canada, Japan), continents (e.g., Europe), or individual states or provinces within countries.
- Once you’ve added all relevant regions to each zone, press “Add shipping method”, then select your preferred shipping method: free shipping, flat rate, or local pickup.
- Configure each shipping method for this zone as appropriate.
- Save your settings.
Step 3: Create a Fallback Shipping Zone
The fallback shipping zone, aka the “Rest of the World” zone, is used in the event that a customer enters an address that doesn’t match any shipping zone that you set.
Important notes:
- Skip this section if you don’t plan to ship worldwide.
- Because WooCommerce applies shipping zones to orders in the order you sort them in your site’s admin panel, the first zone that matches a customer’s address is applied first. This means the “Rest of the World” zone should always be the bottom of your shipping zones list.
- From WooCommerce → Settings → Shipping in your site’s admin panel, press “Add Shipping Zone”.
- Leave the “Zone regions” field blank.
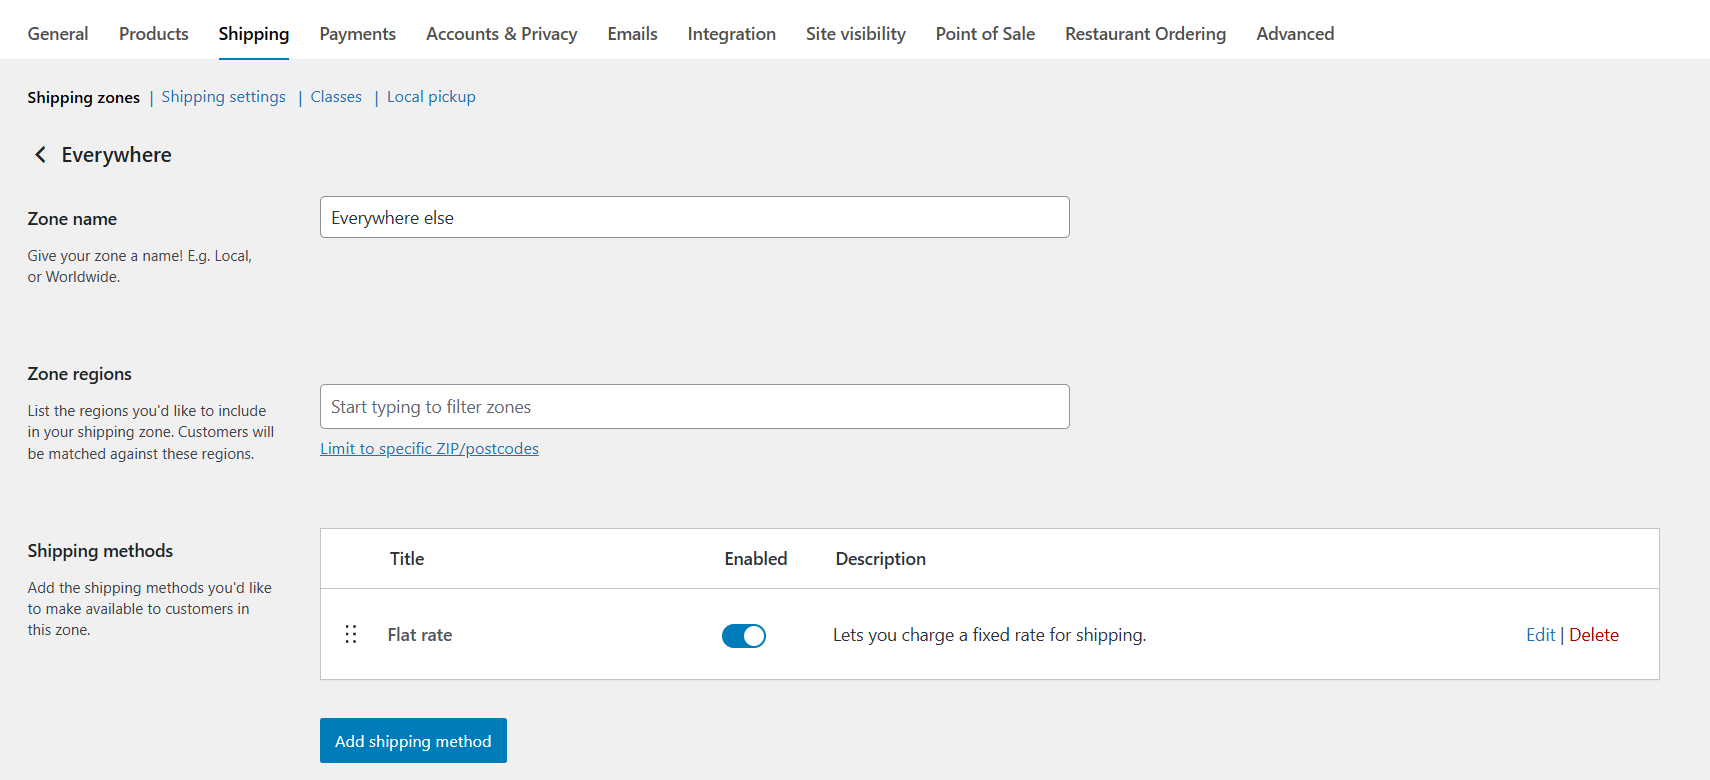
- Add as many shipping methods as appropriate (flat rate, free shipping, etc.).
- Save your settings.
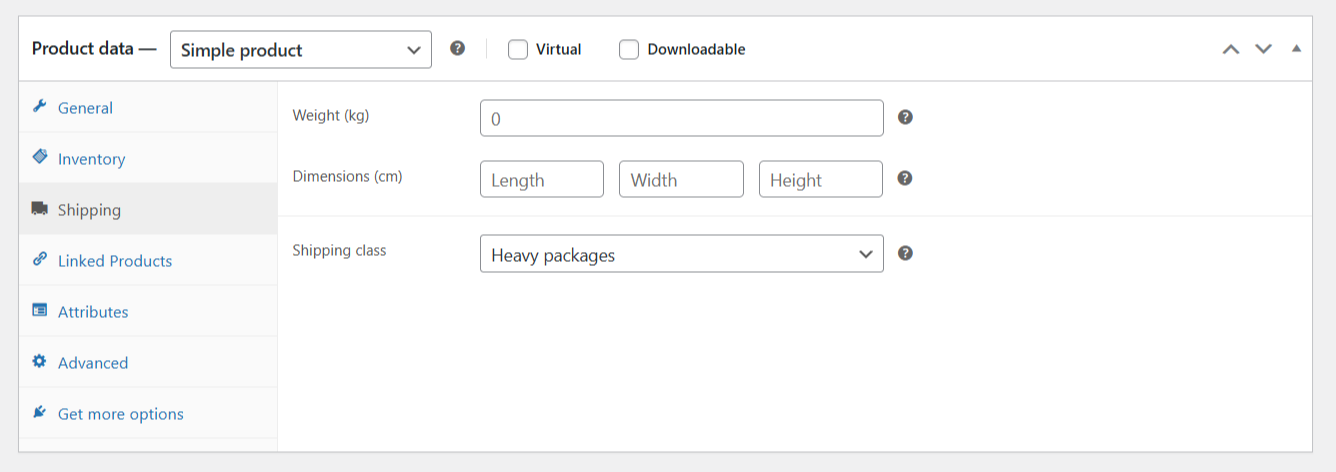
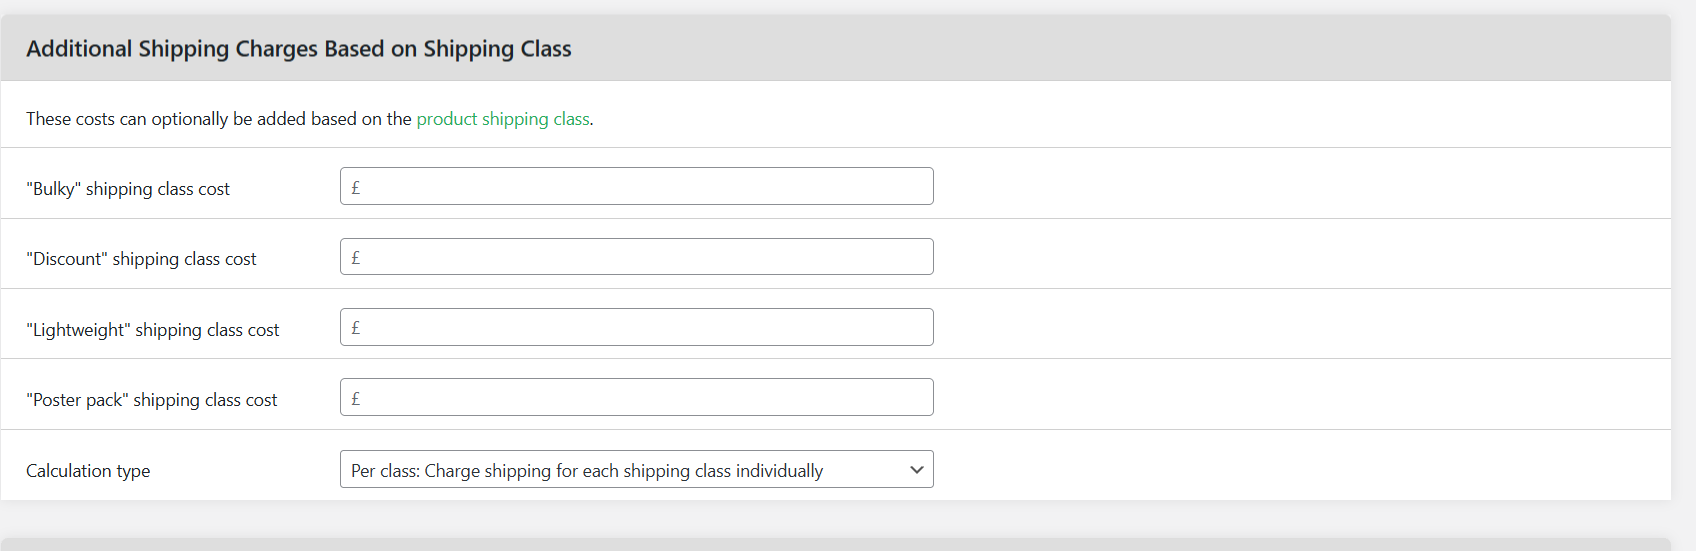
Step 4: Configure Shipping Classes (Optional)
Shipping classes enable you to group products with similar shipping costs. This is particularly handy for stores whose catalog contains a mix of products with certain items being heavier, bulkier, or more expensive to ship than others.
- Go to WooCommerce → Settings → Shipping → Classes.
- Press Add Shipping Class.
- Update the class name (e.g., “heavy items”), slug, and description, and press “Create.

- In your admin panel, head to “Products” and open the “Edit” page for applicable products.
- Locate the “Product Data” modal, navigate to Shipping → Shipping Class, and apply the relevant shipping class.
- Then, go back to WooCommerce → Settings → Shipping → Shipping zones.
- Press “Edit” for the relevant shipping zones you want to add each shipping class to.
- Locate the “Shipping methods” section and select the flat rate shipping method.
- You’ll now see the “Shipping class costs” section where you can define costs per shipping class (e.g., $10 for “standard”, $30 for “heavy items”).
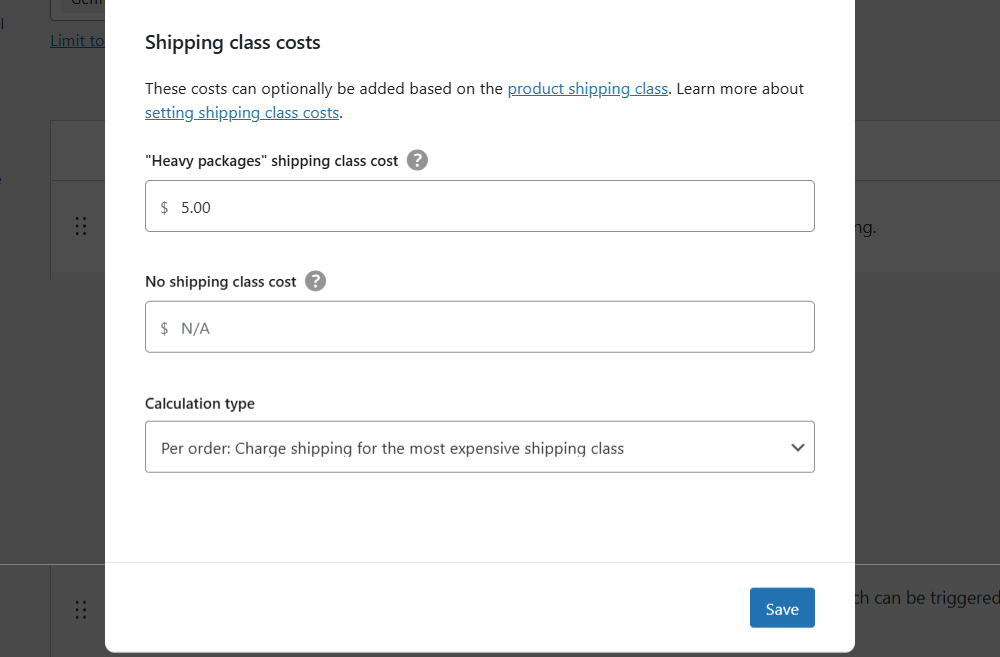
- Update the shipping classes details and save your settings.
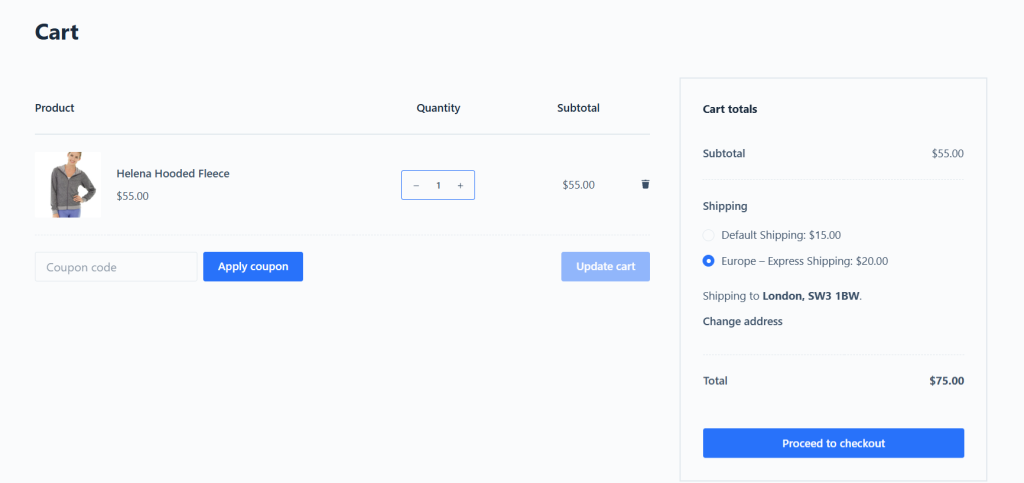
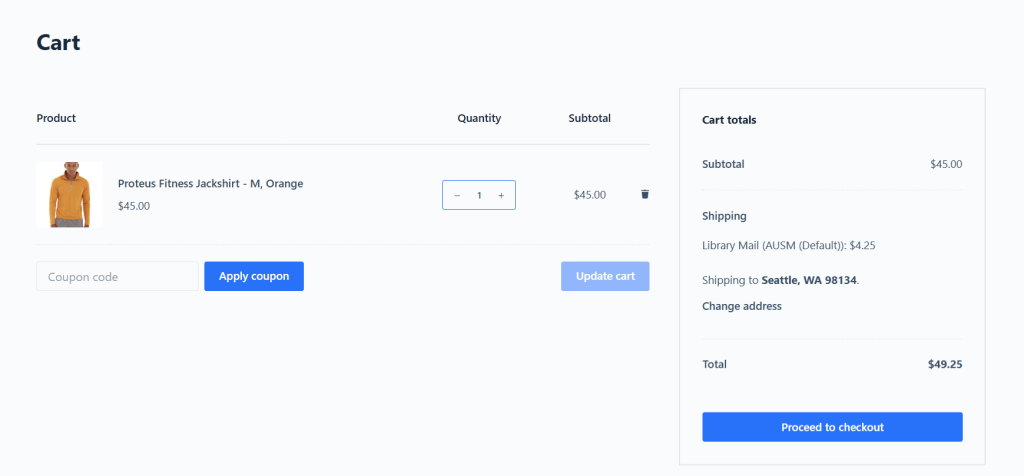
That’s it. Head to your store’s front end and add products to your shopping cart. On the checkout screen, enter appropriate international addresses in the countries you ship to and place test orders.
To test your configuration, verify that the correct zone is applied, expected shipping methods show up, and the shipping rates match your setup.
Limitations of the Default WooCommerce International Shipping Settings
WooCommerce’s inbuilt shipping settings are a good starting point. But they aren’t enough to manage the complexities of international shipping for growing ecommerce businesses.
Here are some of the most common limitations store owners run into when using the default WooCommerce international shipping settings.
- ❌ It’s not advanced enough for complex rules. The default WooCommerce international shipping setup can handle basic flat rates or cost-per-item rules, but that’s about it. If you want to charge based on weight, product dimensions, or offer tiered rates for different order values, you’ll quickly run into roadblocks.
- ❌ Not intuitive for non-technical users. Unless you’re a WooCommerce expert, setting up international shipping can feel scattered and overly technical.
- ❌ No lead times during checkout. The default setup doesn’t show estimated delivery times on the checkout screen. This can increase cart abandonment rates as many customers don’t want to guess when their order will arrive or take the extra step to reach out to hunt throughout your site to confirm the details.
- ❌ Time-consuming to manage. As you’ve seen from the walkthrough above, shipping settings live in different parts of the WooCommerce dashboard: some are under WooCommerce → Settings → Shipping, and others inside individual products. Updating rates across multiple countries can turn into a tedious manual process whenever carriers change their prices or if you want to run a temporary shipping-related promotion.
- ❌ No way to restrict certain products from being shipped. Enabling shipping to a certain country means that all products in your catalog can be shipped there. With the default setup, you can’t exclude specific products from being shipped internationally.
Bottom line: The default WooCommerce international shipping settings alone may be sufficient for low-volume stores with a handful of products that intend to only sell to a few international destinations. However, growing businesses will need much more than WooCommerce’s default shipping setup is capable of.
Introducing a Powerful WooCommerce International Shipping Plugin
Relying solely on WooCommerce’s default shipping settings will eventually slow your business down or, worse, cost you sales.
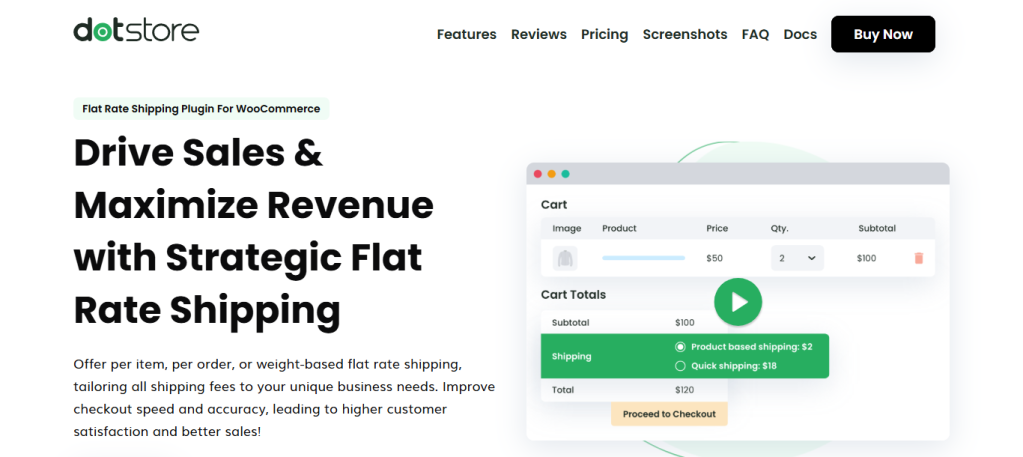
For these reasons, thousands of WooCommerce admins prefer to use The Dotstore’s Flat Rate Shipping Plugin for WooCommerce to configure their store’s international shipping settings.
Available in both free or premium versions, Flat Rate Shipping Plugin for WooCommerce enables you to manage complex international shipping requirements. It is super intuitive, flexible, and gives you granular control over your store’s worldwide shipping settings in a way that the default settings alone cannot.
Flat Rate Shipping Plugin for WooCommerce allows you to create unlimited flat rate international shipping rules based on location, order value, product types, cart weight, quantity, cart subtotal, product categories, and other parameters.
For instance, store admins can assign higher flat rates to items based on their dimensions or exclude certain products from being shipped to certain destinations. This helps reduce cart abandonment by offering clear, predictable shipping costs without relying on external APIs or carriers, which can potentially slow down your site.
Best of all, it’s packed with powerful features while still being simple to set up and manage, even for non-technical users.
Top Features
- ✔️ Create unlimited shipping methods and rules. You can define as many WooCommerce international shipping rules as you need. Set up different flat rates per country, state, city, postal code, or continent.
- ✔️ Set product- and category-based shipping rules. Apply custom rates based on product categories, tags, or specific SKUs. This is especially useful when some products in your catalog are bulkier or restricted in certain countries.
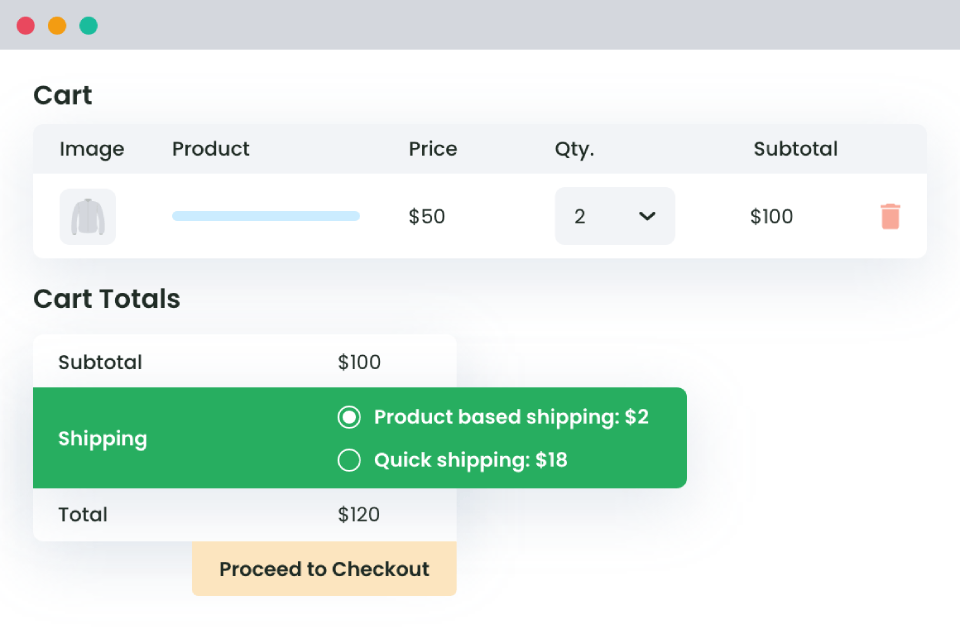
- ✔️ Apply condition-based shipping logic. Set rules based on cart quantity, cart subtotal, cart weight, total quantity, product weight, product category, shipping class, or customer role. For example, a store based in the US can charge a $15 shipping fee for orders under $100 and offer free shipping above that to customers in Australia and New Zealand.
- ✔️ Restrict shipping methods based on conditions. Unlike WooCommerce core, you can prevent certain shipping methods from being displayed when the cart contains specific products, falls below a set total, or is headed to an unsupported location.
- ✔️ Customize shipping method titles and visibility. It lets you display different shipping method names at checkout, like “International Standard – 7 to 10 Days” or “Express Delivery to Europe.” You can also activate and deactivate shipping methods as needed without deleting them.
How Do I Add International Shipping in WooCommerce?
Setting up international shipping with the Flat Rate Shipping Plugin for WooCommerce is pretty straightforward. The entire process takes less than ten minutes from start to finish.
Here’s how to add international shipping to WooCommerce.
Step 1: Create International Shipping Zones in WooCommerce
Shipping zones determine which countries or regions each set of rates applies to.
- First things first, install and activate the free or premium version of Flat Rate Shipping Plugin for WooCommerce on your site.
- Navigate to Dotstore Plugins → Flat Rate Shipping → Settings → Manage Zones, and press “Add Zone”.
- Enter a name for the zone. This should be as clear as possible, like Europe, Asia-Pacific, or Canada.
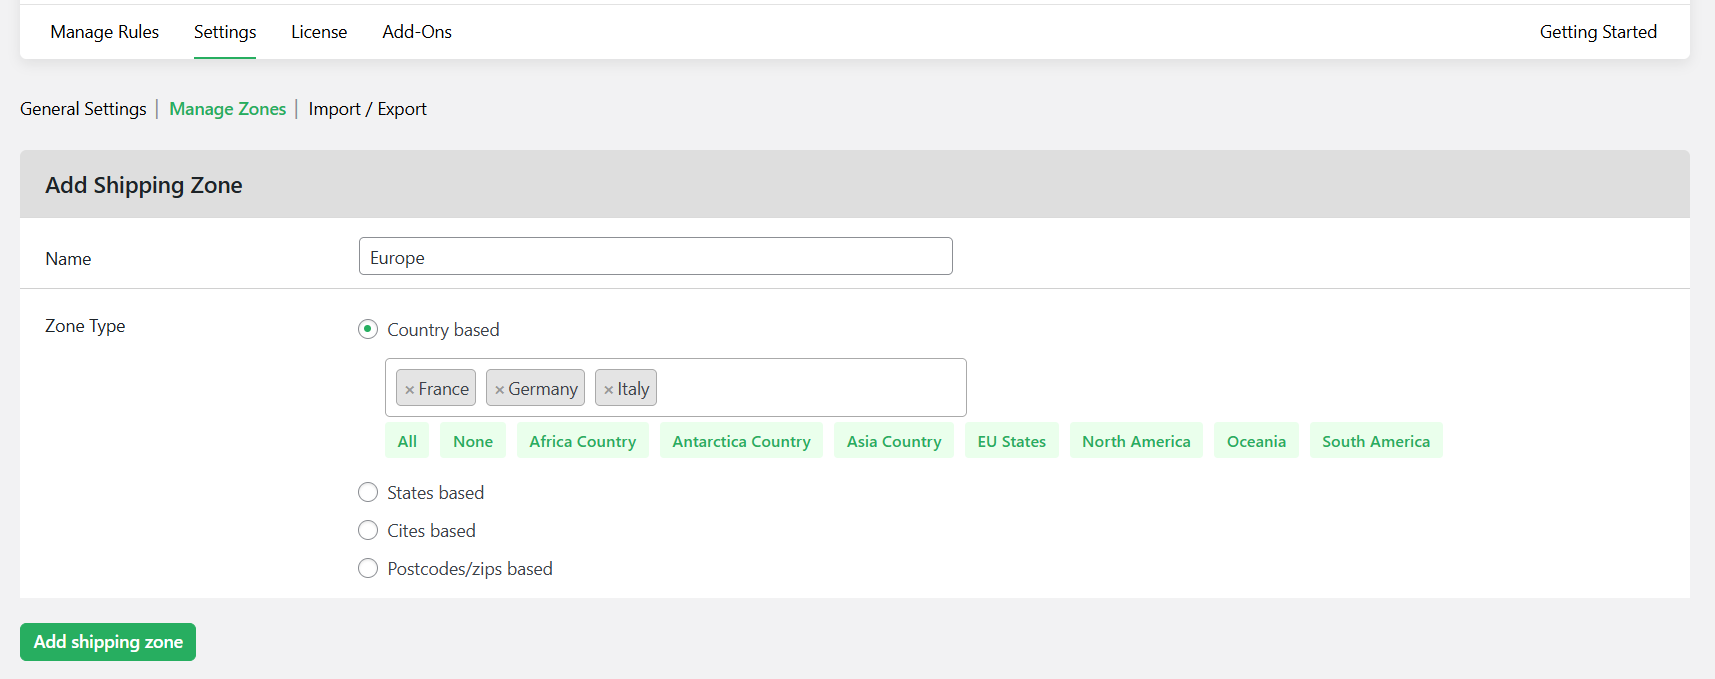
- Then choose the countries, states, cities, or zip codes that should fall into this zone in the “Zone Type” field. Note that you can only group one type of destination into each zone.
- Once done, press “Add shipping zone” to register it.
- Repeat the steps to create as many shipping zones as needed.
Step 2: Create a Flat Rate Shipping Rule
Once your zone is set, you’ll need to create shipping options.
- With your zones set up, navigate to Dotstore Plugins → Flat Rate Shipping → Manage Rules, and press “Add New”.
- Activate this shipping method by turning on the “Status” button.
- Shipping title: Add an internal label for this method.
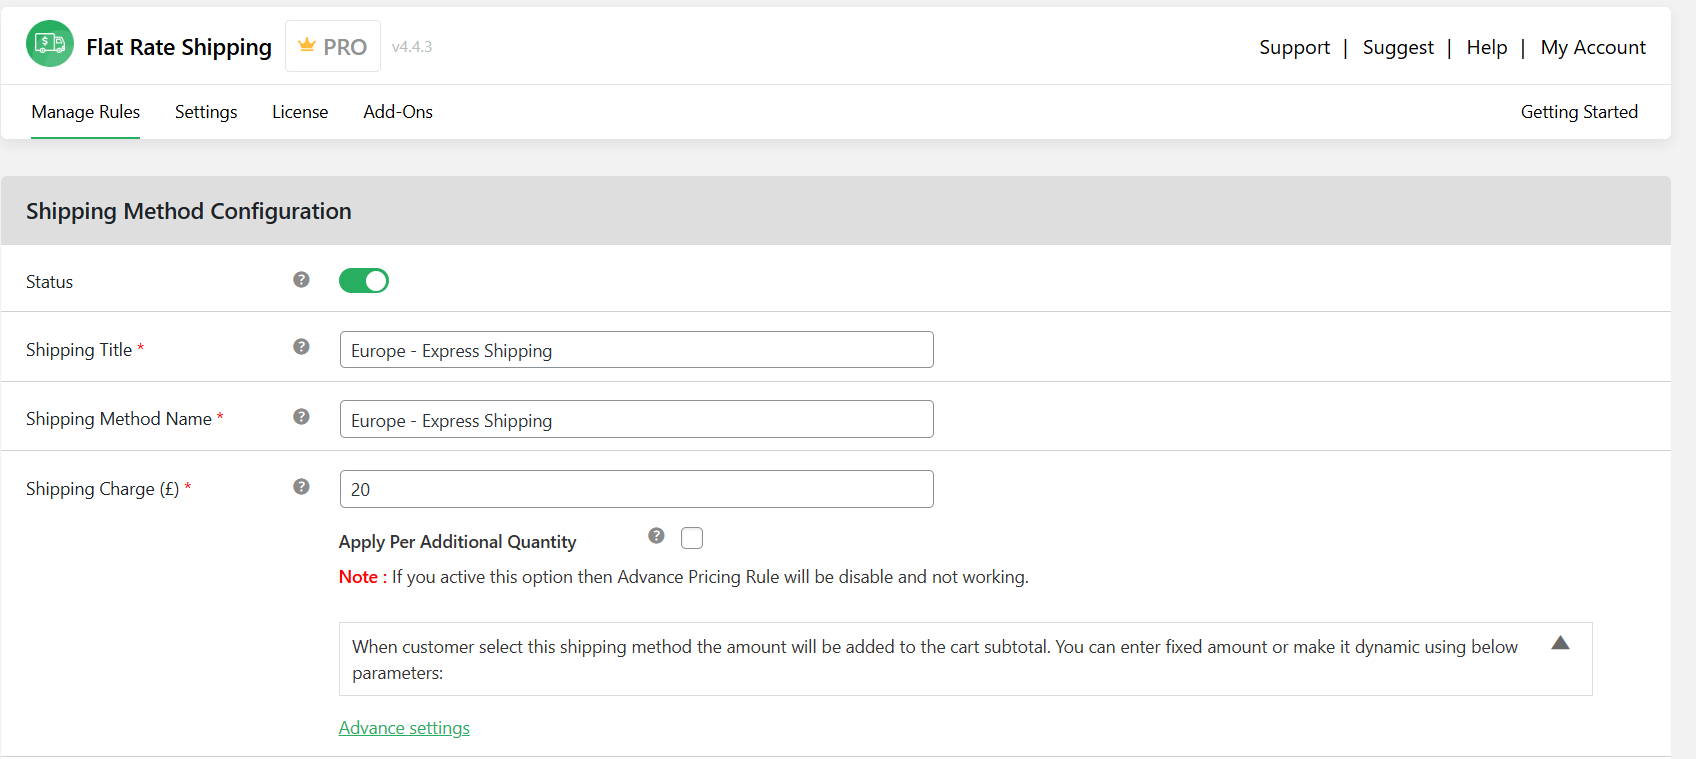
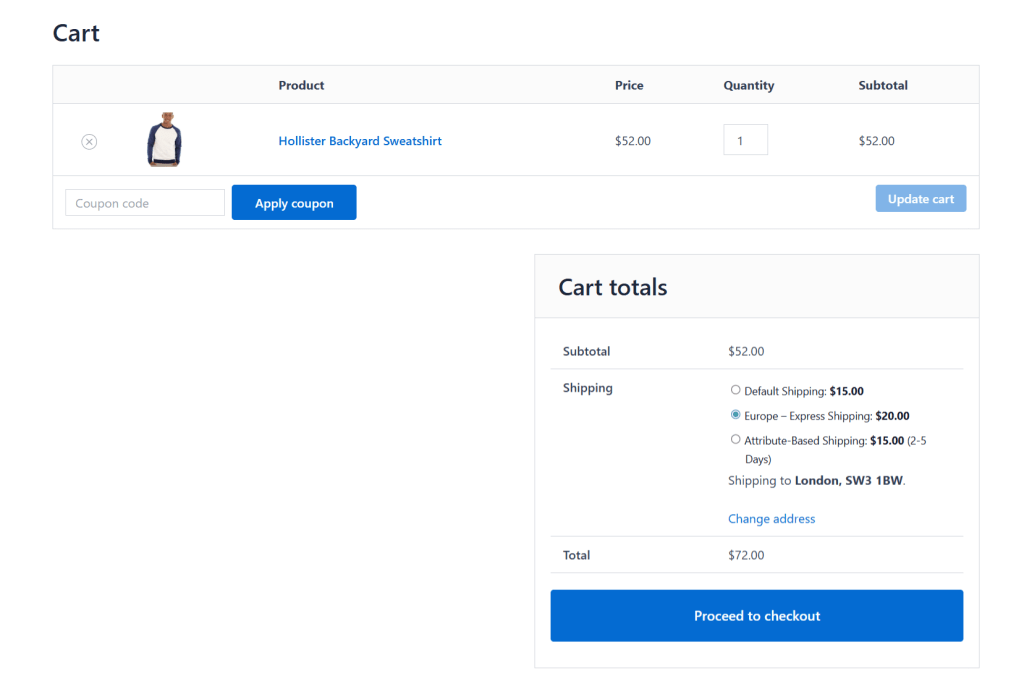
- Shipping method name: Add a customer-facing title for this method. For example, “Europe – Express Shipping”.
- Shipping charge: Set the shipping cost.
- Tick the “Each Weight Rule” if you’d like to calculate the shipping cost based on product weight.

- Similarly, if you’d like to calculate the shipping cost based on product quantity, tick the “Each Quantity Rule”.
- Default selected shipping?: Select “yes” if you’d want to preselect this shipping method on the checkout page.
- Is Amount Taxable?: Select “yes” if you’d like to enable tax charges for this shipping method.
Step 3: Add Conditions To the Flat Rate Shipping Rule
Assign this flat rate shipping rule to specific zones and add extra conditions as needed.
- Scroll to the “Shipping Method Rules” section to add rules and conditions to customize this WooCommerce international shipping method as needed.
- Press the “Add Rule” button.
- Define the shipping zones for this shipping method to apply. For instance, select the following options to make this method appear only when a customer’s shipping address matches the Europe zone:
- Condition type: “Shipping Zone”.
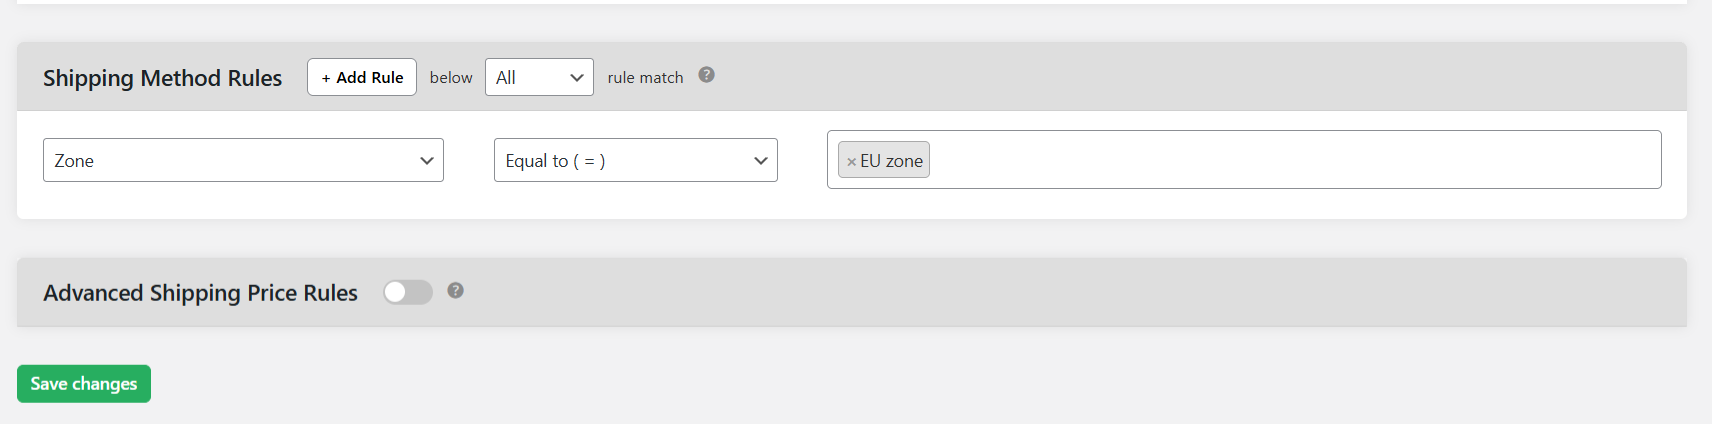
- Operator: “Equal”.
- Value: “Europe”.
- Condition type: “Shipping Zone”.
- Optional: Layer on more rules to refine how shipping costs are calculated. Note that you can combine these using AND/OR logic to match exactly the conditions you need, such as:
- Cart subtotal thresholds (e.g., free shipping over $100).
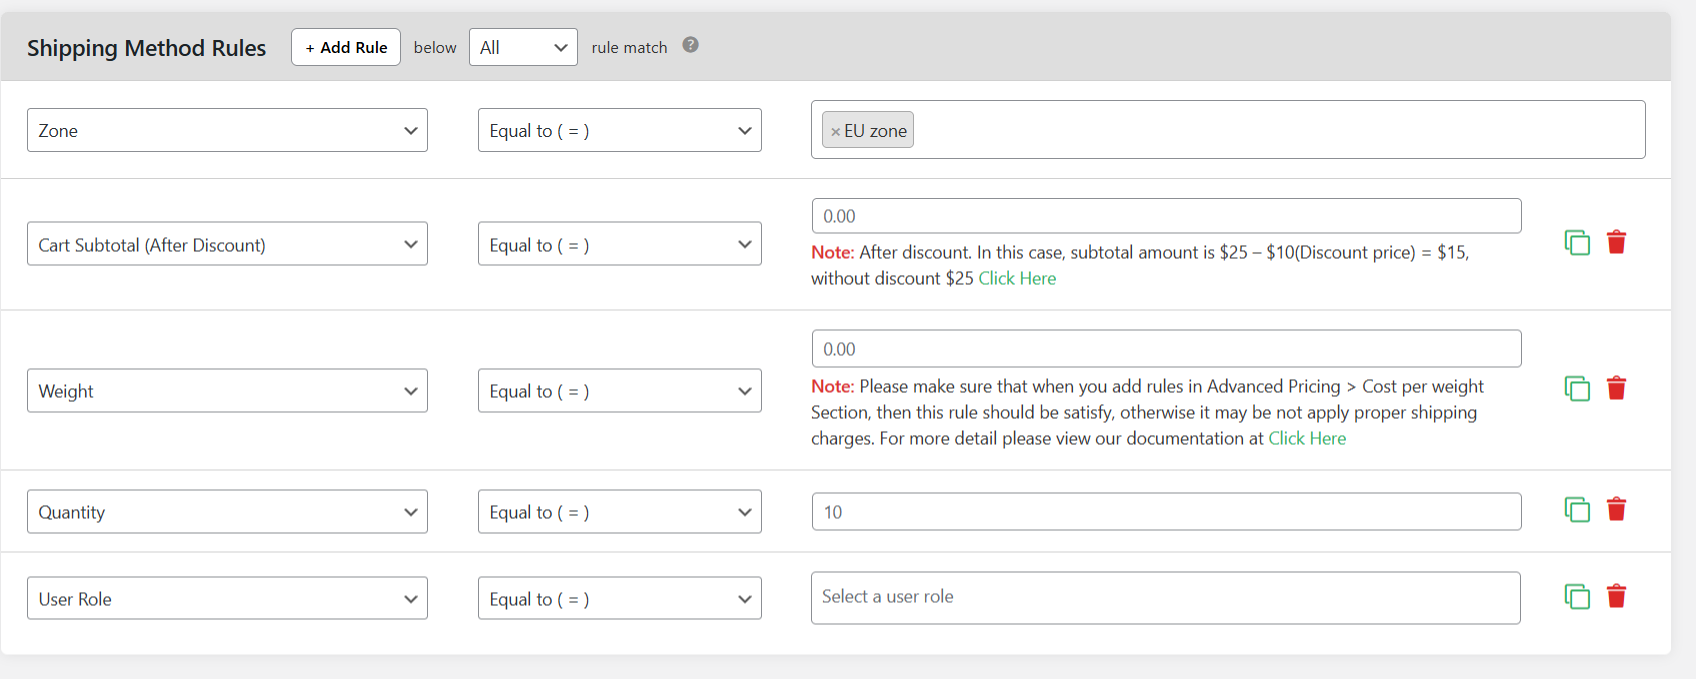
- Total order weight rules.
- Number of items in the order.
- Product category, SKU, or tags (e.g., fragile goods or bulky items).
- User role
- Coupon usage.
- Cart subtotal thresholds (e.g., free shipping over $100).
- Optional: Scroll up to the “Additional Shipping Charges Based on Shipping Class” section or scroll down to “Advanced Shipping Price Rules” to add more parameters that control how the shipping cost is calculated.
Head to your site’s front end and add suitable products to your shopping cart. Input an international shipping address that matches the rule you want to test and verify that the correct shipping methods and cost appear on the checkout page.
Feel free to test your setup with other addresses to verify that those don’t trigger the rule unexpectedly.
Optional: Integrate USPS With WooCommerce
Do you want to ship internationally to the US?
The Advanced USPS Shipping Plugin by The Dotstore connects with USPS’s API and shows customers accurate, real-time shipping costs based on their location, order weight, and the latest USPS rates.
It prevents undercharging on heavy packages or overcharging for lighter ones. Advanced USPS Shipping is particularly handy for stores that ship customers situated in the US and want to automatically calculate and show live carrier rates on the checkout screen.
Note: Advanced USPS Shipping is an add-on for the Flat Rate Shipping Plugin for WooCommerce. It won’t work without it.
Visual learner? Watch the video walkthrough below. Otherwise, read on for written step by step instructions.

Section 1: Connect USPS’ API to Your WooCommerce Store
- From within Plugins → Add New in your site’s admin panel, add and activate the Advanced USPS Shipping Plugin’s free or pro version.
- Navigate to Dotstore Plugins → USPS Shipping → Configure USPS.
- Turn on the “Status” button.

- Add your USPS web tools user ID in the “USPS User ID” field, then press the “Check Connection” button to validate it. The icon turning green indicates that it works as intended.
- Enter your WooCommerce store’s zip code in the “Origin Postcode” field. This is where it’ll calculate shipping costs from.
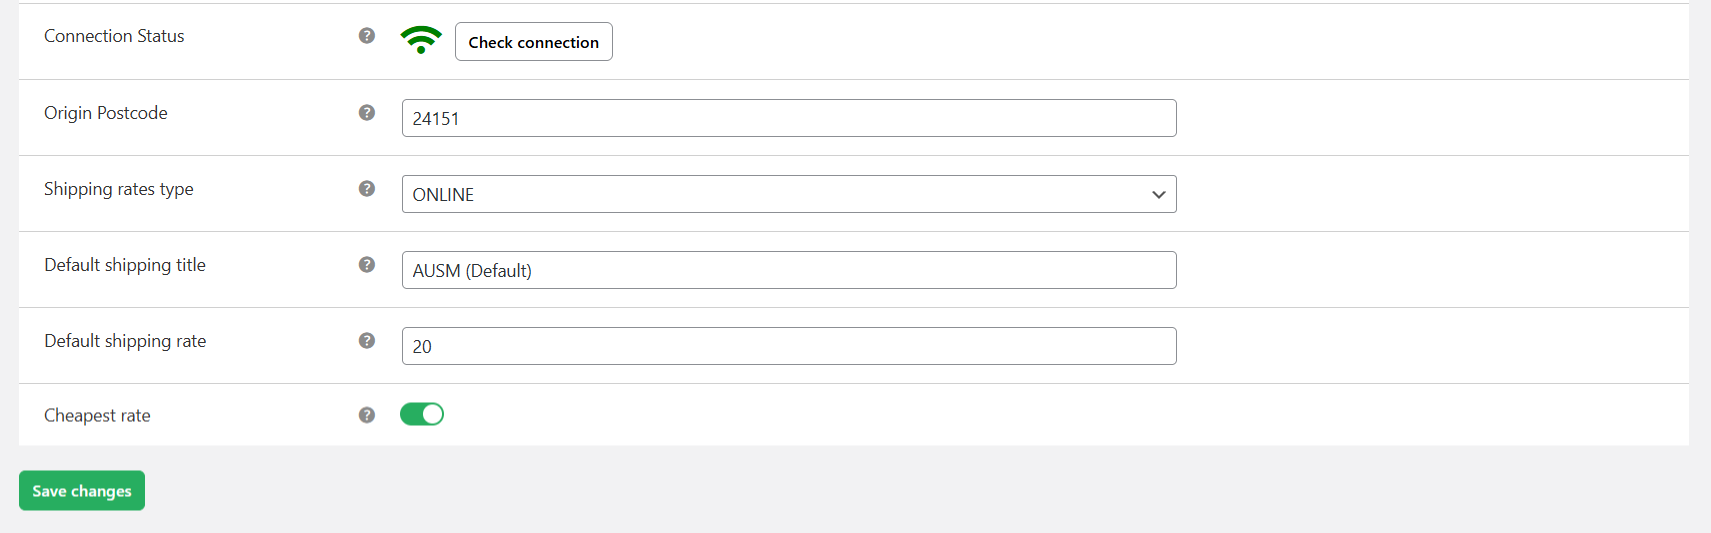
- Select “Online” from the “Shipping rates type” field.
- The “Default shipping title” is the fallback shipping method that will be shown on the checkout screen in the event that the live shipping rates aren’t available (for any reason). Name the default shipping method, something like “USPS Standard Shipping”.
- Add the fallback shipping rate to be charged in situations where live shipping rates aren’t available in the “Default shipping rate” field.
- If you want to only show the lowest-cost USPS rate, toggle on the “Cheapest rate” button. To show all available USPS shipping rates and methods (leaving shoppers the choice to pick their preferred option), leave it off.
- Press the “Save changes” button to save the master settings.
Section 2: Enable USPS Shipping Methods and Adjust Shipping Rates
- Scroll down to the “USPS services settings” section, which lists all the available USPS shipping methods. Tick the checkboxes for all the shipping services you wish to offer.
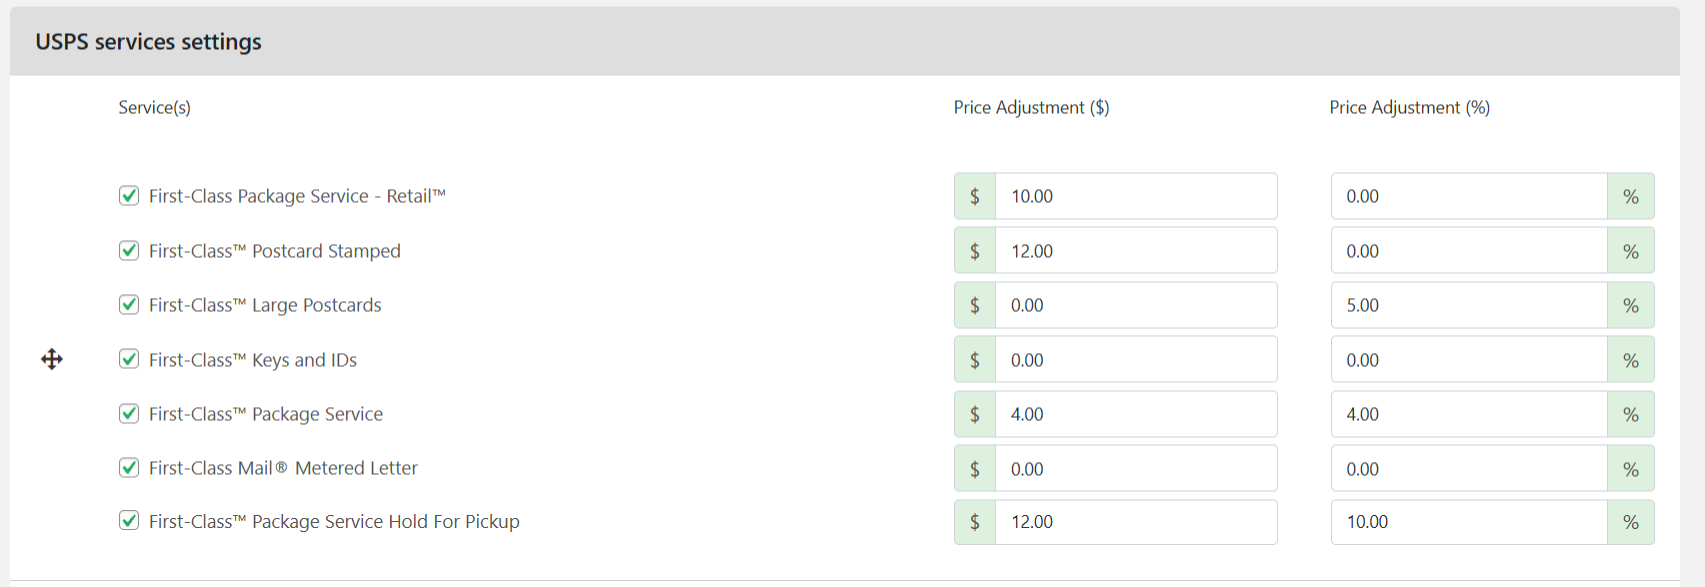
- You can also markup the final shipping rates by a fixed amount or percentage. This enables you to cover packing, handling, and other extra fees associated with getting each order to customers.
- Press “Save changes” at the bottom of the page.
That’s it. To test your setup, head to your site’s front end and add relevant products to your shopping carts to see relevant shipping options, including live USPS shipping rates.
If USPS doesn’t meet your shipping needs, you can use the FedEx Shipping Plugin for WooCommerce with Print Label as an alternative. It integrates with FedEx’s API to display accurate, real-time FedEx shipping rates at checkout based on order weight, destination, and live carrier rates. The plugin also allows you to generate and print FedEx shipping labels directly from the WooCommerce order dashboard, simplifying the fulfillment process. This ensures correct shipping charges while speeding up dispatch for both domestic and international FedEx shipments.
Best Practices for Adding Worldwide Shipping in WooCommerce
Setting up worldwide shipping in WooCommerce is much more than getting products from point A to point B. It’s about doing it efficiently, predictably, and profitably while keeping your customers happy.
Here are 10 best practices for expanding into international markets.
- Group destinations into logical shipping zones, e.g., by continent or shipping service level. Don’t create individual shipping rules for every country unless absolutely necessary. This simplifies your backend setup and keeps the experience consistent for buyers in similar regions.
- Offer multiple shipping methods per region, if possible. This enables your international customers to choose between cost and speed.
- Showcase estimated delivery windows for each shipping method on the checkout page. This helps manage expectations and reduces cart abandonment.
- Launch WooCommerce international shipping in countries with high cart traffic or product interest (based on data from WooCommerce analytics or Google Analytics). Then, once you see traction, expand to more countries based on demand.
- Let customers know whether your prices include import duties, handling fees, and VAT or GST, or whether they will need to pay those separately on delivery. This avoids unpleasant surprises at the time of collection.
- Audit and update shipping costs regularly to make sure your settings are in line with the latest shipping courier rates. This makes sure you’re not undercharging and bleeding into profit margins or overcharging and scaring buyers away.
- Offer free WooCommerce international shipping over a certain amount to encourage higher order values in key countries (for example, your biggest international markets).
- Create an FAQ section and link to it from product detail pages and the footer that answers relevant questions international buyers want to know, such as: who pays customs and duties, if they can return the product, who pays for return shipping, and more.
- If you plan to ship worldwide, create a catch-all shipping zone for destinations you haven’t explicitly configured yet. This ensures that customers from new or unexpected countries can still complete purchases, even if they’re charged a standard fallback rate.
- Create standard operating procedures (SOPs) that include the customs documentation process (accurate product descriptions, HS codes, declared values, sender information), packaging instructions by product category, carrier preferences by region, and emergency contact info for each shipping provider.
FAQs About Setting Up WooCommerce Worldwide Shipping
Can I Create a Flat Shipping Rate for All European Countries in WooCommerce?
Yes, you can set a flat shipping rate for all European countries in WooCommerce. You’ll need to create a shipping zone that covers all the European countries you want to include, then add a flat rate shipping method to that zone.
Can I Ship Internationally on WooCommerce?
Yes, WooCommerce fully supports international shipping, but it’s not enabled out of the box. You’ll need to configure it in your store’s Shipping Zones, Methods, and Rates.
How Do I Change the Default Shipping Country in WooCommerce?
The default shipping country in WooCommerce determines the point of origin for tax and shipping rate calculations, and available payment gateways.
Here’s how to change the default shipping country in WooCommerce:
- Log in to your site’s admin panel and navigate to WooCommerce → Settings → General.
- Scroll to the “Store Address” section.
- Here, you can add the exact location you ship products from, including the city, state, country, and postcode.
- Press “Save changes” at the bottom of the page.
How Do I Set the Default Country On the WooCommerce Checkout Page?
Changing your store’s default customer location settings automatically pre-fills the “Country” field for new customers on the checkout form. This setting is particularly useful for stores that primarily sell to a specific region but still ship worldwide.
Here’s how to set the default country in WooCommerce checkout page:
- Access your WooCommerce site’s admin panel, navigate to WooCommerce → Settings, and open the “General” tab.
- Look for the “Default customer location” dropdown. This controls what location is pre-selected on the checkout screen.
- WooCommerce offers a few options here:
- Shop country / region – This uses your store’s base country and address.
- No location by default – This leaves the address field blank until the customer fills it out.
- Geolocate – Uses the customer’s IP address to auto-detect their location.
- Geolocate (with page caching support) – This uses the customer’s IP address to auto-detect their location (as above) and adds support for cached pages.
- For most international stores, Geolocate or Geolocate with caching support is ideal, as it auto-fills based on where your customer is browsing from.
- However, if you’d rather set a specific base country for your store, update the “Store Address” fields at the top of this same page. Note that this affects tax and shipping calculations too.
- Press “Save changes” at the bottom of the page.
Ready to Add WooCommerce International Shipping?
Offering WooCommerce international shipping opens your ecommerce store to a global audience, which boosts your revenue and brand perception.
WooCommerce’s built-in shipping methods might suffice for basic international shipping situations. But as you scale and start needing to set different shipping rates by product, region, or order size, you’ll need a more flexible solution.
Available in both a generous free and pro version, Flat Rate Shipping Plugin for WooCommerce provides an intuitive, simple-to-use interface for you to set up WooCommerce international shipping options for even the most complex scenarios. With it, you can:
- Create unlimited shipping methods and rules. There are no limits on the number of methods you offer, so you can create tailored options for each market or region you deliver to.
- Set product- and category-based shipping rules. You can charge specific rates for certain product types, categories, or SKUs to keep profit margins consistent across regions.
- Apply condition-based shipping logic. It lets you adjust rates or methods dynamically based on weight, quantity, order total, or destination country.
- Restrict shipping methods based on conditions. You can hide or disable options that don’t apply to certain orders to reduce confusion on the checkout screen.
- Customize shipping method titles and visibility. It lets you name shipping options as desired (for clarity). And you can choose which user roles to apply them to.
Download the free or pro version of the Flat Rate Shipping Plugin for WooCommerce and set up international shipping today!
Advanced Flat Rate Shipping Methods
Boost your WooCommerce store’s revenue with flexible shipping options. Your business deserves the best!
14-day, no-questions-asked money-back guarantee.