Table of Contents
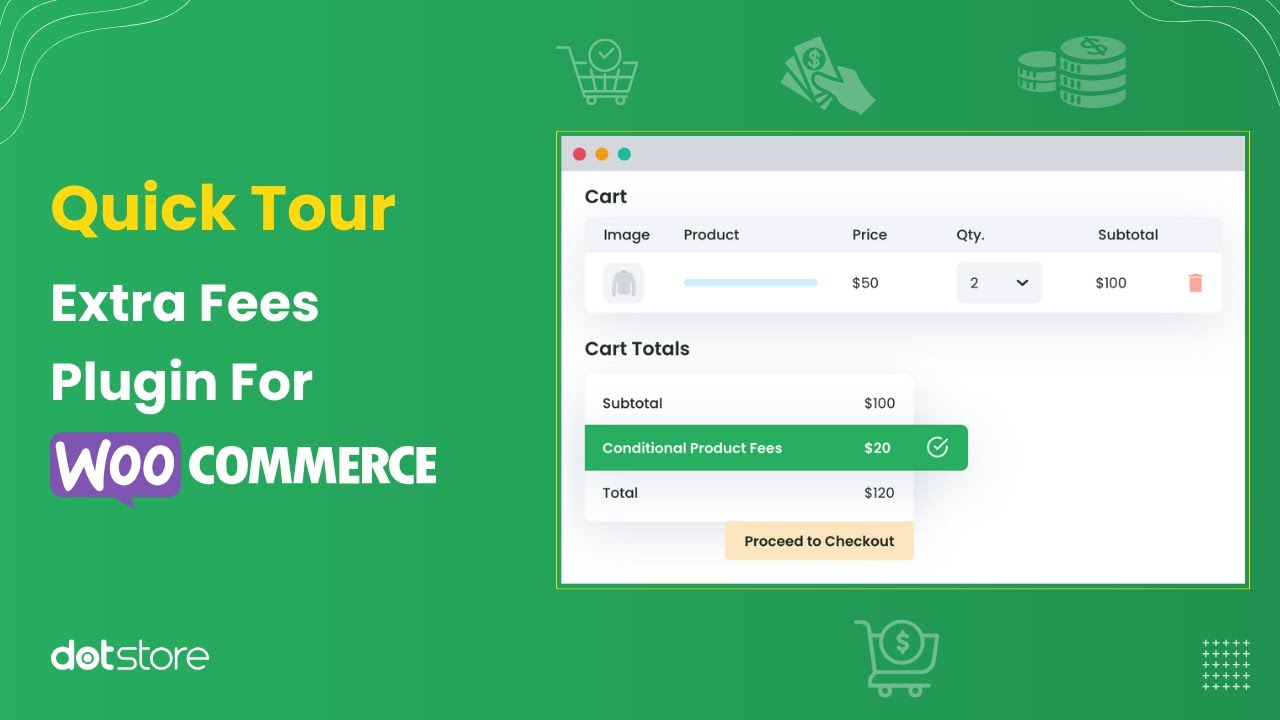
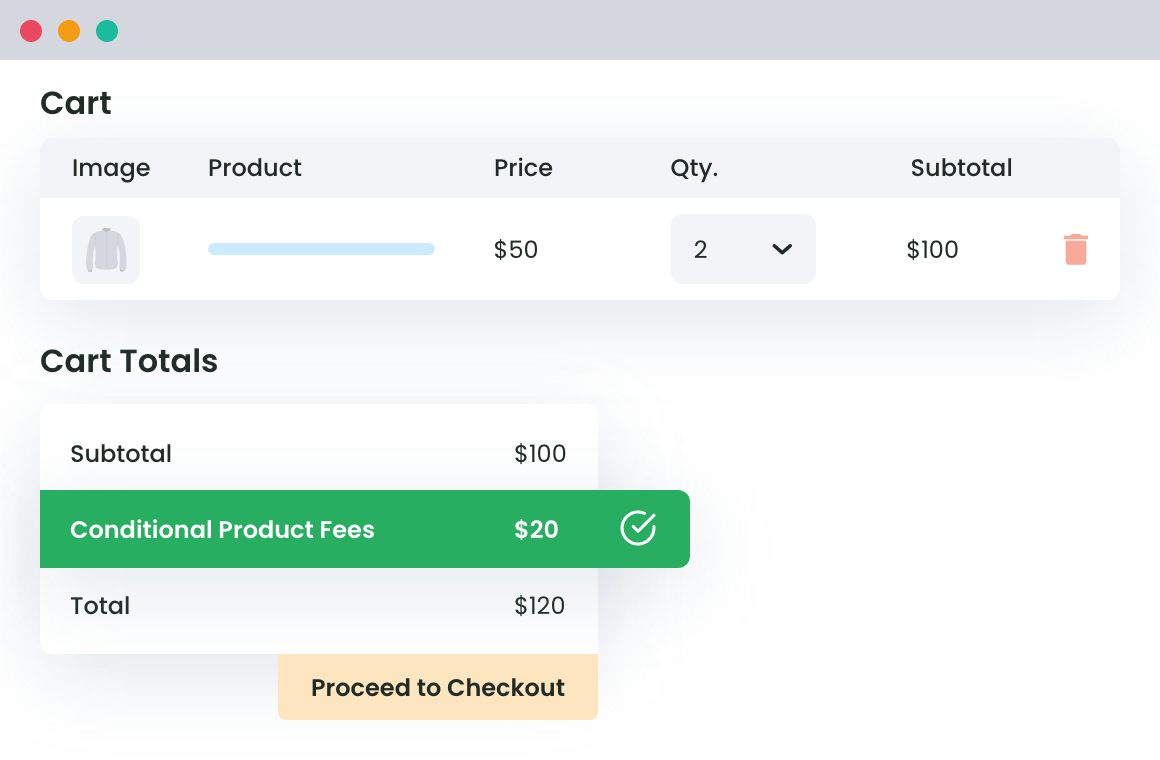
Do you want to add handling charges, payment gateway fees, rush processing charges, and other types of extra fees? In this detailed tutorial, I’ll walk you through the steps to collect extra fees in WooCommerce in ten minutes or less — no coding needed.
If you’re searching for a quick and easy method to charge extra fees in WooCommerce, this guide has your back.
Adding extra fees for certain products or orders allows you to cater to different customer preferences, remain competitively priced, and run a profitable online store.
There’s no built-in option within WooCommerce to charge extra fees. So we’ll set this up using the powerful WooCommerce Extra Fees plugin.
Plugin used in this guide:
- WooCommerce Extra Fees: The best plugin to add fixed amount, percentage-based, fixed plus percentage-based, and quantity-based extra fees in WooCommerce. Easily collect handling charges, payment processing fees, rush shipping options, and more.
Let’s kick things off by understanding how charging extra fees can be beneficial for your e-commerce store.
Benefits of adding extra fees in WooCommerce
Many WooCommerce store owners are wary about adding extra fees on top of the standard product prices — and with good reason. Higher prices can scare customers away. However, when correctly implemented and communicated, adding extra fees can actually boost your store’s revenue.
Here are the top benefits of adding extra fees in WooCommerce.
- They can increase profits: Extra fees help protect your profit margins. For instance, many payment gateways charge a 2-3% fee per transaction. And if your store sells expensive products, those fees can quickly add up. Passing on payment gateway fees to customers in the form of a small “transaction fee” or “processing fee” can help ensure your margins remain intact.
- They can help cover irregular costs: Not all orders cost the same to fulfill. The most common examples are products that require special packaging due to their size or fragile nature. Rather than factoring these costs into the base product price — which can make the items seem more expensive than competitors’ — it might be better to apply a handling fee that covers extra costs.
- They can help manage low-value orders: Minimum order fees can help balance out the costs of handling smaller transactions. If your store sells products that are a mix of low and high margins, small orders can be a drain on your resources, especially when you factor in packaging, shipping, and payment processing. Adding a “small-order fee” nudges customers to add more products to cross the threshold which increases the average order value. Plus, it guarantees that even when customers don’t meet the minimum amount, their orders remain profitable.
- They can help improve cash flow: Extra fees aren’t just about covering costs, they can also be a way to generate additional revenue. Think: value-added options like expedited shipping, gift wrapping, monogram service, or customized packaging. Offering these services as optional extras enables you to cater to customers who are willing to pay more and ensures that you are adequately compensated for your efforts.
- They can help boost corporate social responsibility (CSR) efforts: It’s always great to give back to causes that are close to your business’s mission. Some ecommerce stores partner up with specific charities and encourage customers to make small donations along with their orders. This helps charities raise more money and can help ecommerce stores fulfill their corporate social responsibility goals.
A run-through of the best WooCommerce extra fee plugin
WooCommerce Extra Fees is the best plugin to add various kinds of extra fees. It gives you complete control over how fees are presented and applied in your WooCommerce store.
Thousands of stores use it to add small-order surcharges, payment processing fees, special handling charges, expedited shipping options, payment-method-specific fees, and pretty much any other type of additional fees.
It’s super simple to use and takes less than ten minutes to set up from start to finish — zero coding required.
Here’s why this plugin is the best option for integrating extra fees in WooCommerce:
- Multiple fee types: You can add fixed fees, percentage-based fees, and a combination of fixed and percentage-based fees. You can even set up a quantity-based fee structure that scales with the number of units in customers’ carts.
- Dynamic rules and conditions: It lets you create rules to charge fees based on cart contents, user roles, payment methods, shipping options, and a ton of additional criteria. This means you can apply fees in a way that matches your business’s specific needs.
- Advanced conditional logic: Conditional logic lets you tailor fees to different scenarios. For example, you can apply fees based on product quantity, order total, or specific product categories.
- Apply taxes to fees: You can specify whether extra fees are taxable or non-taxable to remain compliant with local tax laws. If extra fees are taxable, the plugin seamlessly handles the calculations in the backend — no complicated settings to configure.
- Fee visibility and transparency: It lets you decide where and how the extra fees are displayed to customers. You can choose to show the fees on the product detail page and/or on the checkout page.
How do I add extra fees to WooCommerce?
To begin toward the WooCommerce tutorial, you will first have to set up an environment to follow our instructions. You can either edit your WooCommerce store with us so that, by the end of this article, you will be able to charge a WooCommerce Extra Fee.
Visual learner? Check out the video below for a step-by-step walkthrough of how to add extra fees to a WooCommerce store. If you prefer written instructions, read on.
Step 1
Get the free or premium version of the WooCommerce Extra Fees plugin.
WooCommerce Extra Fees
Make profits from every confirmed sale through smart, conditional fees.
14-day, no-questions-asked money-back guarantee.
Step 2
After installing the plugin, check your WordPress store’s admin dashboard. You must be able to find this plugin listed in the left-side navigation bar. Your dashboard should now look like this.
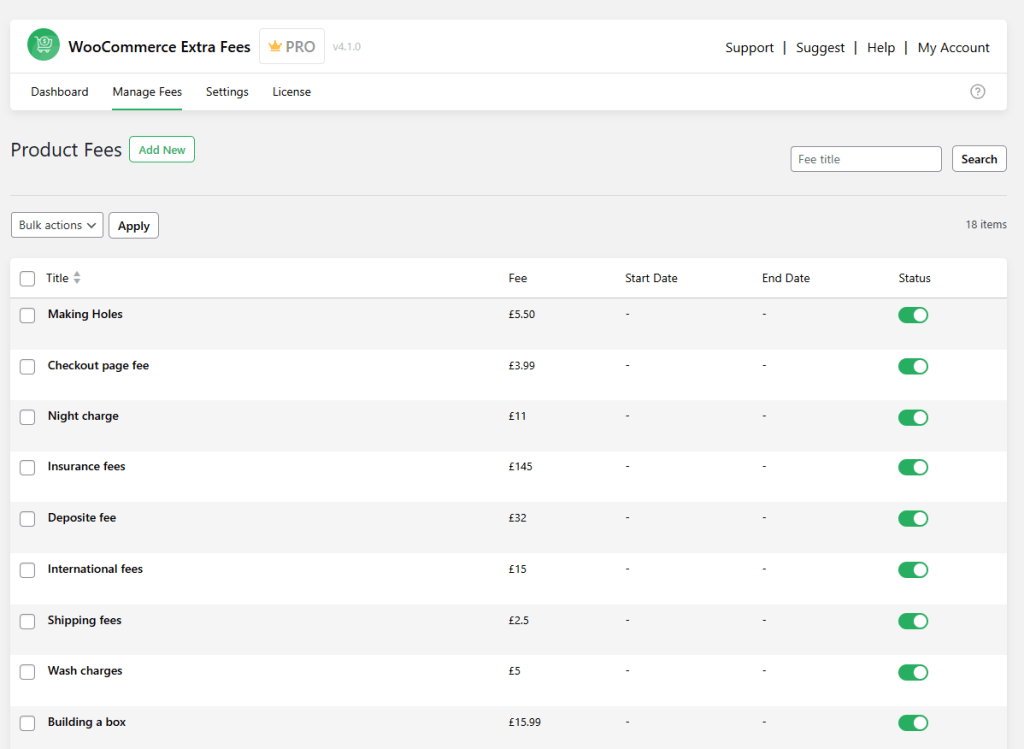
Navigate to Dotstore plugins > WooCommerce Extra Fees > Manage Fees, and select “Add New”.
Step 3
Clicking on ‘Add New’ will open a new page with three forms.
First of those three forms is ‘Fee Configuration’ form, as shown here in the picture –
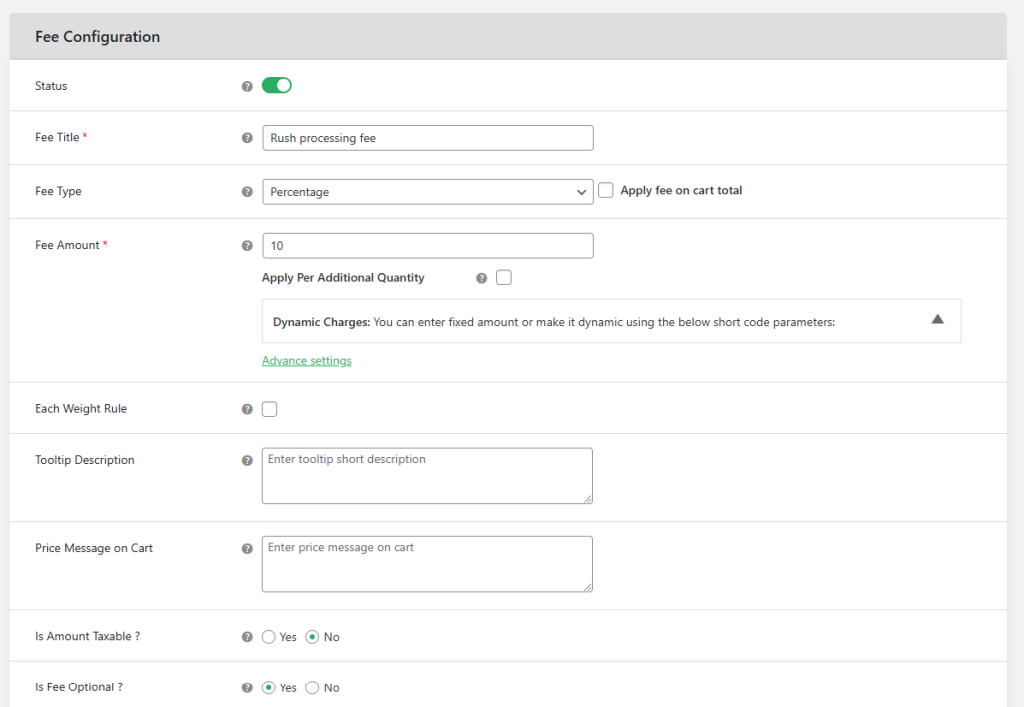
In this form, you will have to provide basic details related to your product fee method, through which, you can add extra fees on your customers.
Start with giving an understandable and memorable name to your method. Keep in mind that this product fee title will be visible to your customers if applied on the cart. So, do not use a confusing name.
Now, there are 2 types of extra fee you can charge from your customers –
- Variable Fee
A variable type of extra fee option is selected when you want to charge a cost proportional to the product cost or cart total, for example, a 10% fee or 0.5%.
- Fixed Fee
Use this type of fee if you want to charge a fixed cost, such as $3 or $5.7, on the cart subtotal instead of charging the extra money as a percentage.
In the ‘Fees’ field, fill in the value as 10, 3, 5.7, 0.5, or whatever percentage/fixed cost you want to add as an extra fee to the purchase.
Note – If Bulk Shipping, check the ‘apply per quantity’ box and add additional value to the new text field. Do it if you do not want to apply shipping costs on each
product separately while shipping in bulk. The new text field, here, holds the value which has to be increased per product. For example, if the base fee is $5 and $0.2 is filled in the new text field, your buyer must pay $5+7*0.2, i.e., $6.4, for buying 8 items.
In the Start date and End date fields, you can fill in the value of the timeframe for which the offer is valid. However, it is not compulsory to fill these fields.
Similarly, when you want to temporarily disable the method, you can toggle the ‘Status’ and set it off.
If you want to charge taxes on the extra fee, set ‘yes’ from the dropdown for ‘Is Taxable?’.
Step 4
This is the crucial step of the process, as we will apply the conditional rules on the method at this step. These conditional rules decide the scope of your method.
Let us explain it to you with a short example.
If you want to apply the WooCommerce Extra Fee Option for a city only, you can add a conditional rule related to the country and select
the country to which this city belongs. Add another rule with the city’s zip code details. Once applied, this method will apply to that city
only.
This is how your ‘Conditional Fee Rule’ Section will look in this case –
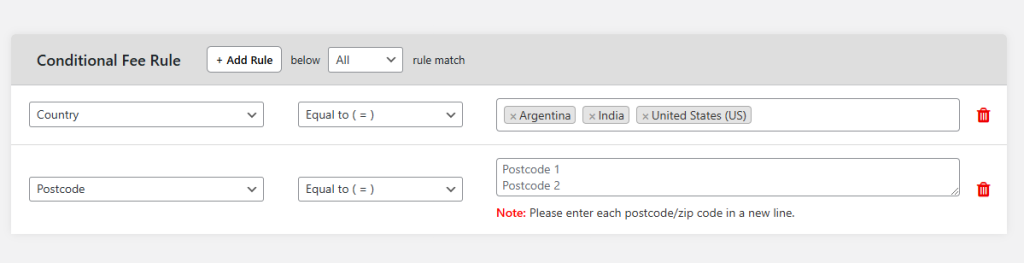
Here, we applied two rules and added details of the country because the postal code may be similar for 2 cities belonging to different countries. Always keep such minute details in mind while using the plugin for your online store.
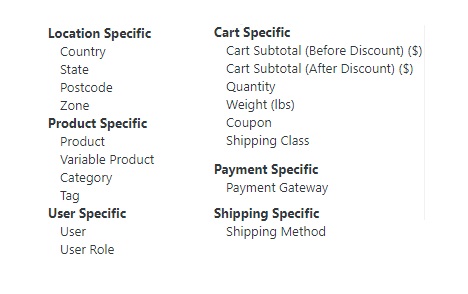
Not just related to location, the plugin can be used to apply an extra fee based on many factors. While you can use the free version of this plugin up to a limit, you will need the premium version to utilize the full capabilities of the plugin.
The factors, on which extra fee option can be enabled and extra fees can be charged are –
Let us give you another example to help you with understanding how to add WooCommerce extra fee option –
In case, you want to charge extra fees on an item from all shop managers as you are providing warehousing services to them, just add a rule stating –
User Role = Shop Manager
Afterward, save the Settings.
Here’s how it will look like –
In order to do the same with the shop managers of a particular city, you can combine the 2 rules of the previous example and 1 rule of this example.
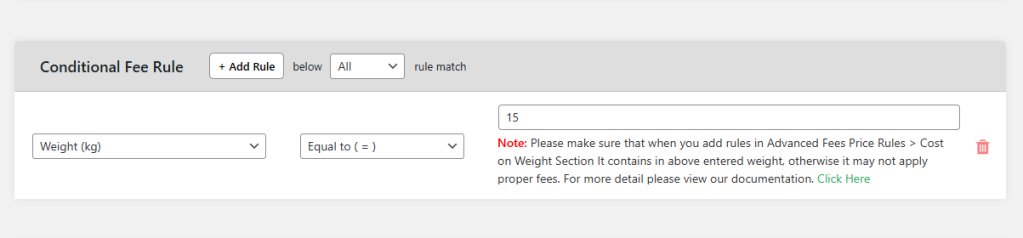
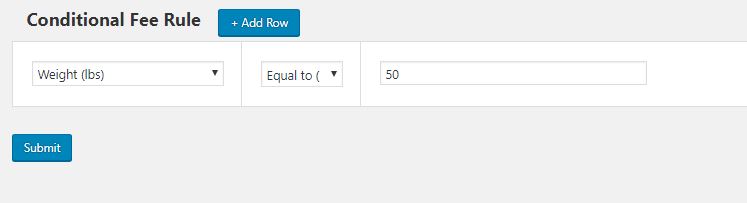
If willing to charge an extra fee when product weight crosses a certain limit, let’s say, 50 lbs, you can do it by adding this rule –
You can also apply extra fee on the payment method, payment gateway, product name, product tag, variable products, product category, user, product quantity, product weight, coupon, shipping class, cart subtotal before discount, cart subtotal after discount, country, state, postcode, and zone.
In conclusion, you can apply as many rules to a method as you want. Similarly, there could be multiple extra fee methods being applied to a single product. It is all up to you how you make you of the plugin.
Still facing trouble in adding WooCommerce Extra Fee Option to your store?
Comment here. We’ll be happy to help you out in setting up the extra fees option for your e-commerce store.
Common questions about adding extra fees in WooCommerce
What types of extra fees can I add to my WooCommerce store?
- Handling fees: These cover the cost of special packaging or additional labor required to process an order. This is especially added to items that are fragile, oversized, or require custom packing materials.
- Payment method surcharge: PayPal, Stripe, and other payment gateway providers typically charge hefty transaction fees. Woo stores can pass a portion or all of this fee to customers by adding a small percentage of the order total at checkout on orders for which the customer has chosen specific payment options.
- Small-order fees: Small-order fees are usually added to orders that fall below a specified minimum value — such as $20 or $50. This subtly nudges customers to increase their cart size to avoid the fee and helps ensure that smaller purchases still contribute to your bottom line.
- Rush order or expedited shipping fees: Rush processing or expedited shipping fees compensate for the added effort and cost of ensuring faster turnarounds.
- Regional or location-based fees: Some regions or countries — for example, remote areas or specific international destinations — are more expensive to ship to. Adding a location-based fee can help ensure that the additional logistics costs don’t eat into your profit margins.
- Customization fees: Engraving, monogramming, custom packaging, and the like, are popular value-added services that cost additional time and effort to create. Adding an additional customization fee ensures that these orders remain profitable.
What is the best WooCommerce extra fees plugin?
WooCommerce Extra Fees is the best plugin to add fixed amount, percentage-based, fixed plus percentage-based, and quantity-based extra fees in WooCommerce.
The WooCommerce Extra Fees plugin makes it super easy for you to collect handling charges, payment processing fees, rush shipping options, and any other type of extra fee. Not to mention, it’s easy to set up and use — no coding required.
What is a handling fee in WooCommerce?
A handling fee in WooCommerce is an additional charge applied to an order to cover the costs of processing, packaging, and preparing a product for shipment. Charging handling fees enables store owners to account for the time, labor, and materials spent to fulfill an order beyond the standard costs.
Because handling fees are applied over and above the regular product and shipping costs, they are usually only applied to items that require special care. Think: fragile items like glassware, electronics, or custom goods that often need bubble wrap, custom-sized boxes, and extra packaging materials to ensure safe delivery.
Can you extend WooCommerce’s capabilities?
WooCommerce is a famous e-commerce website development solution, opted by many for their stores. The best thing about this feature-rich solution is its extensibility. Whether you are a small store selling just one product with your city or a multi-country brand with a good range of products, WooCommerce is equally good for both.
It is not that WordPress with WooCommerce is fully comprehensive and you won’t need any add-on after installing WooCommerce over your WP website. However, unlike other e-commerce solution, WooCommerce has so many supporting plugins to extend the functionality of your online shop that you won’t need to hire WooCommerce developers in order to upgrade your store.
For example –
Do you find it difficult to charge a flat rate shipping fee through your e-commerce store? Use Flat Rate Shipping Plugin For WooCommerce plugin.
Do you want to block suspicious and fake orders? Use WooCommerce Fraud Prevention Plugin.
These are just two examples.
In reality, WordPress directory and the internet is full of free and premium plugins which are highly usable for one or another online business.
Ready to start collecting extra fees in WooCommerce?
Collecting mandatory or optional extra fees for certain products or orders enables you to cater to different customer preferences, remain competitively priced, and make more money.
Since there’s no default WooCommerce setting that enables you to charge extra fees, you’ll need to set this up using a plugin like WooCommerce Extra Fees.
WooCommerce Extra Fees enables you to charge extra fees for orders that require special handling, rush processing, and additional services, all while keeping base prices the same. Plus, it gives you total control over how fees are presented and applied in your WooCommerce store.
Get started with WooCommerce Extra Fees today!
WooCommerce Extra Fees
Make profits from every confirmed sale through smart, conditional fees.
14-day, no-questions-asked money-back guarantee.
Learn More:
- How to Charge Quantity Based Advance WooCommerce Extra Fees
- How to Charge Cart-Based Extra Fee In WooCommerce
- How to add WooCommerce Extra Fee Option
- How to add multiple Extra Fees For WooCommerce Order
- How to charge a WooCommerce Extra Fee In WooCommerce
- How to charge Extra Fee-based on Product In WooCommerce Store
- How to charge Extra Fee Dynamically In WooCommerce Store
- How to manage Extra Fees on your WooCommerce Store
- WooCommerce Conditional Product Fees For Checkout Review