Table of Contents
Searching for how to modify the WooCommerce quantity input options in your online store? In this in-depth tutorial, I’ll walk you through the steps to enforce minimum purchase rules, define maximum quantity limits, allow customers to buy in specific quantity increments, adjust the default quantity, and change the style of the quantity selector button.
![How to Customize WooCommerce Quantity Input Options [Best Methods] - featured image](https://www.thedotstore.com/wp-content/uploads/sites/1417/2026/03/How-to-Customize-WooCommerce-Quantity-Input-Options-Best-Methods-featured-image.png?w=1000)
If you’re looking for a quick and easy way to modify your store’s quantity input settings, this guide has your back.
Here, I’ll show you two different ways to customize the quantity input in WooCommerce. By the end of this tutorial, you’ll be able to:
- Change the style of the WooCommerce quantity input box to customize the interface through which customers can select product quantities when shopping in your online store.
- Customize the value of the standard quantity input field. Think: to change the default quantity, set minimum and maximum quantity limits, and adjust the step quantity increment.
The best part? Everything takes less than ten minutes to set up from start to finish. Plus, there’s no coding involved and it’s 100% beginner-friendly.
WooCommerce’s default quantity input options are pretty basic, so we’ll need to use the free or pro version of the advanced Min/Max Quantity for WooCommerce plugin to customize them.
Plugin used in this tutorial
- Min/Max Quantity for WooCommerce: A lightweight and simple-to-use plugin that lets you change the quantity input style (from plus/minus buttons to dropdowns or radio options), control minimums, maximums, step values, default quantities, per product, per category, storewide, with ease. Trusted by 4,000+ WooCommerce stores, rated 4.8 out of 5 stars, and available in both free and pro versions.
Min/Max Quantity for WooCommerce
Set min/max/step quantities to manage product quantities effectively and enhance the customer experience in your WooCommerce store.
14-day, no-questions-asked money-back guarantee.
Ready? First things first, let’s understand how the standard WooCommerce quantity input options actually work, and why you may need to further modify them.
How do the default WooCommerce quantity input settings work?
Out of the box, WooCommerce provides a simple quantity input field in the form of a small number box or dropdown menu on product detail pages. Customers can then select the quantity they want to purchase by using a plus/minus button or manually typing a number.
Every product starts with a default minimum quantity of “1”. This means customers must add at least one item to their shopping carts. There is no default maximum quantity, so customers can enter any number unless you specifically define an upper limit e.g. for better stock management or to enforce bulk purchasing rules.
The default step increment is also “1”. This allows customers to increase the quantity of each product in their shopping carts by one unit at a time. Clicking the “+” button will increase the value from 1 to 2, then to 3, and so on.
WooCommerce accepts only positive whole numbers and ensures customers can’t order products in negative or fractional quantities. It also respects stock availability and prevents customers from ordering more than what’s in stock. So, for example, if only 8 units of a specific item are in stock, they can’t add 10 to their cart.
When customers adjust the number of items in their shopping carts, it will automatically update to reflect the new totals.
Fundamental limitations of the default WooCommerce quantity input settings
Although WooCommerce’s standard quantity input settings are functional, they are quite limited in flexibility. Here’s where they fall short:
- It doesn’t include the option to modify the quantity input selector. By default, the input field doesn’t allow you to change the default style of the WooCommerce quantity input box to predefined quantity options, which can simplify product selection and provide a more user-friendly experience overall.
- You can’t set minimum or maximum limits. There are no native options to enforce minimum or maximum purchase quantities. For example, you can’t make it mandatory for customers to buy at least 2 units of a product or cap their purchase at 10 products.
- You can’t offer step quantity increments. The default setup allows customers to choose any integer quantity, but it doesn’t let them enforce intervals like multiples of 5 or 10. This isn’t suitable for wholesale stores or stores that require customers to buy in specific pack sizes.
- There is no way to add product-specific rules. It doesn’t support different quantity settings for individual products. For example, if one product requires a minimum quantity of 5 while others don’t, you can’t enforce that rule.
- There is no way to create product bundles. It doesn’t natively support fixed quantities for bundled products or curated sets. For example, if you want to sell gift boxes containing exactly 3 products, the default settings won’t enforce this.
- There’s a high possibility of manual input errors. Since customers can manually type any number, they may accidentally enter invalid quantities, (like 1.5 or a number that exceeds the number of available units of a product). This can lead to confusion or a higher number of abandoned carts.
What does it mean to change the WooCommerce quantity input field?
Changing the WooCommerce quantity input field in WooCommerce means modifying how customers select the number of products they want to purchase. By default, WooCommerce provides a simple quantity box on product and cart pages. Customers can increase or decrease the quantity value using the in-built plus and minus buttons or manually typing in a number.
You can change the behavior, appearance, or rules of WooCommerce’s quantity input field to match your store’s needs.
Here’s an overview of the types of changes you can make (along with relevant examples):
- Change the quantity field’s design or input style. For instance, you can replace the default number box with a dropdown selector, add plus/minus buttons for a more modern user interface, style the WooCommerce quantity field to align with your brand’s look and feel, and more.
- Adjust quantity rules. For instance, you can set a minimum quantity (e.g., customers must buy at least 5 units), define a maximum quantity (e.g., no more than 20 units per order), change the step value (e.g., increments of 2 for products sold in pairs), allow decimal quantities (e.g., 1.5 meters of fabric), and more.
- Apply conditional logic. For instance, you can show different quantity rules based on user role (e.g., wholesale customers see a minimum order of 10, while retail customers see 1), set category-specific or product-specific quantity limits, use dynamic pricing rules tied to quantity inputs (e.g., buy 10+, get a discount), and more.
Why customize the WooCommerce quantity input field?
Here’s a brief rundown of the top reasons and benefits for customizing the WooCommerce quantity input style and type.
Why change the WooCommerce quantity input field style?
Changing the quantity input field in WooCommerce is much more than aesthetics; it’s enables you to optimize your store’s usability, enforce order rules, and increase revenue.
Here are some of the top reasons why admins prefer to change the WooCommerce quantity input field style:
- To improve the user experience (UX). A clunky quantity selector button can frustrate shoppers. Small touch targets, confusing inputs, or manual typing can cause a high number of abandoned carts. Changing the quantity input field to something more intuitive, like a dropdown menu, large plus/minus buttons, or pre-set packs, can make the shopping experience in your online store much easier. Not to mention, better UX often means higher conversions.
- To support the sale of decimal quantities. Not all products are sold in whole numbers. Common examples are businesses that sell fabric, flooring, or raw materials in decimal quantities (e.g., 1.5 meters, 2.25 kg). The default WooCommerce quantity field only supports whole numbers unless you modify it. So customizing the input allows fractional ordering, which expands your store’s product offerings so you can meet customers’ needs.
- To boost average order value (AOV). Depending on your business model and strategy, customizing the quantity input field can nudge shoppers to place larger orders in your store. Here are a few examples:
- Step values (think: increments of 5) can encourage bulk buying.
- Pre-set quantity options tied to discounts (think: Buy 10+ and save 15%) can push customers to order more per transaction.
- Dynamic quantity selectors can integrate with pricing rules to create natural upsell and cross-sell opportunities.
- To match your store’s design. Depending on your business’s brand and store’s theme, a misaligned quantity input box can look out of place on modern, well-designed product detail pages. Customizing the WooCommerce quantity field makes certain that it matches seamlessly with your theme and brand’s visual style.
- To seamlessly enforce minimum and maximum purchase rules. Some products have order restrictions for certain products or across their entire store. Considering that WooCommerce’s default quantity input field lets customers enter any value, using the default settings can lead to cart errors and an increase in customer support requests. Many store admins find that it’s better to customize the WooCommerce quantity field to make certain customers can only select from valid product quantities. For instance, some businesses sell items that only make sense in certain quantities:
- A wholesale supplier might require a minimum order of 10 units per product.
- A limited-edition product might be capped at 2 units per customer to prevent stock hoarding.
- A bulk item like bottled water or cans of non-alcoholic beer might only be sold in multiples of 6.
Why change the WooCommerce quantity input field type?
Here are some common benefits of adapting quantity input options in your WooCommerce store.
- It may be required for custom products. Stores that offer custom-built or personalized products tend to require strict quantity controls. For example, a store that sells customized wedding invitations might only accept orders of at least 50 units to account for production costs. Defining a minimum quantity guarantees that all orders meet this requirement from the get-go and without unnecessary back-and-forth communication.
- It can help boost your average order value. Setting the minimum order quantity and/or step quantity increment higher than “1” subtly nudges shoppers to spend more on each order. You can even pair quantity requirements with bulk price incentives to make them even more effective.
- It can help facilitate stock management. Controlling how much of a product customers can purchase per order helps manage inventory more effectively. A good example is if you sell products in fixed quantities, such as cartons of bottled water, allowing customers to purchase only in multiples of a full case (e.g., 6, 12, 24) helps prevent issues with logistics, storage, and shipping.
- It supports bulk sales. Stores that cater to B2B customers or sell wholesale need to set higher minimum quantities, increments for bulk orders, or tiered pricing to support large transactions and keep their operations efficient.
- It enhances customers’ experience. Designing WooCommerce’s quantity input settings to match your specific store’s requirements can help reduce friction and make the buying process more intuitive. For example, if you sell building materials, customers who want to purchase floor tiles may appreciate the option to select from pre-defined quantity options that match common project sizes (e.g., packs of 10 or 20 tiles) rather than having to add them one buy one.
The best WooCommerce plugin to modify quantity input settings
Min/Max Quantity for WooCommerce is a simple-to-use plugin that enables you to customize your store’s quantity input settings. Available in both free and premium versions, it allows you to enforce minimum purchase rules, set maximum limits, allow customers to purchase in specific increments, modify the default quantity, and even change the quantity selector style.
Min/Max Quantity for WooCommerce is incredibly flexible and works great on various types of stores. With it, you can modify WooCommerce quantity input settings:
- Storewide, i.e. all the products in your online store.
- Category-wise, i.e. particular product categories in your online store.
- Per product, i.e. particular simple and/or variable product).
Key features of the Min/Max Quantity for WooCommerce plugin
- It lets you change the WooCommerce quantity input field design. You can replace the default input with a dropdown, plus/minus buttons, or styled number fields.
- It gives complete control over min/max quantities. It allows you to set both minimum and maximum purchase quantities at the product (including simple products and variations), category, or global level. After setting category-wise or storewide limits, you can exclude specific products or categories as needed.
- It lets you set step quantity rules. Enforcing step quantity rules requires customers to only purchase products in specific increments. If, for example, you sell drinks in cases of 12, it ensures customers can only select quantities like 12, 24, or 36. This avoids confusing shoppers and simplifies the ordering process for bulk or wholesale items.
- Set dynamic criteria for quantity options. You can create highly specific quantity rules based on product categories, individual products, user roles, cart totals, stock availability, and other dynamic conditions.
- You can set quantity rules based on user roles. Its role-based functionality empowers you to set different quantity rules for different customer groups so you can cater to multiple types of customers from a single store. A common example is hybrid wholesale and retail stores. For example, retail customers might have a minimum purchase quantity of 1 and a maximum of 20. Whereas, wholesale customers might have a minimum purchase quantity of a minimum of 50 and no upper limit.
- You can set cart-level rules. Together with setting rules for individual products and product categories, you can also set cart-level quantity restrictions. For example, you can require wholesale orders to meet a total cart quantity of at least 30 units. This is particularly useful for stores that need customers to meet specific order thresholds to qualify for bulk discounts or free shipping.
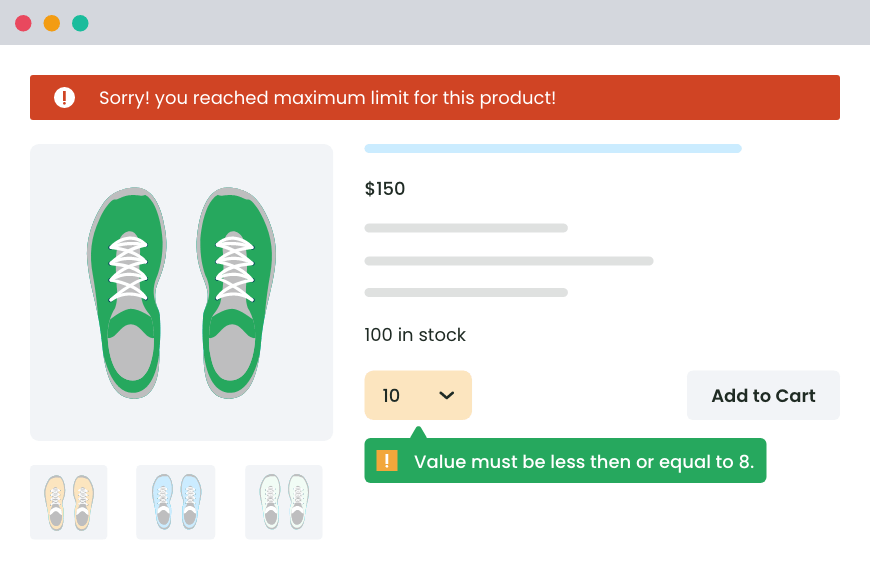
- It lets you tailor error messages. It is inevitable that some customers may not immediately meet your product quantity thresholds. For example, if you’d set a minimum quantity of 7, some customers may initially try to complete checkout with just 4 products in their carts. This plugin enables you to customize the error messages in line with your store’s tone and branding to guide customers when their selection doesn’t meet the quantity rules.
- Showcase quantity input options on product detail pages. It lets you (optionally) add text that displays quantity options upfront on individual product pages. This keeps customers informed about your store’s purchase quantity limits before they add items to their shopping carts. This can help build trust with customers and lower the probability that they later abandon their carts due to confusion.
- Schedule changes to quantity input options. This quantity management plugin lets you define start and end date ranges to modify quantity input options for a specific period, such as, during flash sales or new product launches. Once the scheduled period ends, it will automatically deactivate and return to its original options – no manual update needed.
A brief note: Min/Max Quantity for WooCommerce is a robust plugin that gives you granular control over the quantity input options in your online store. In addition, it enables you to set a 1-item per order limit, hide the proceed to checkout button for orders that don’t match your store’s set quantity requirements, and much more. Check out a full list of its features here.
How to change the WooCommerce quantity input settings
In this section, I’ll walk you through the steps to modify the quantity input options to suit your WooCommerce store’s specific requirements. To begin, get the free or pro version of the Min/Max Quantity for WooCommerce plugin.
Visual learner? Here’s a video walkthrough of how to change the style of the WooCommerce quantity input field.
How to change the WooCommerce quantity input field style
- First things first, install and activate Min/Max Quantity for WooCommerce (either the free or pro version) on your site.
- Next, navigate to your WordPress admin panel and go to Dotstore Plugins → Min/Max Quantity. Press the “Add New” button to create a new quantity rule.
- Give your rule a descriptive name (Visible to site admins only).

- Press “Add Group”, then expand the panel to access the product quantity settings.
- Under Conditions, specify the products or categories that the rule applies to. You can target simple products, variable products, specific categories, stock levels, user roles, or combinations of these criteria. For example, you might choose to apply a minimum order of 10 units only to wholesale customers in the Office Supplies category.
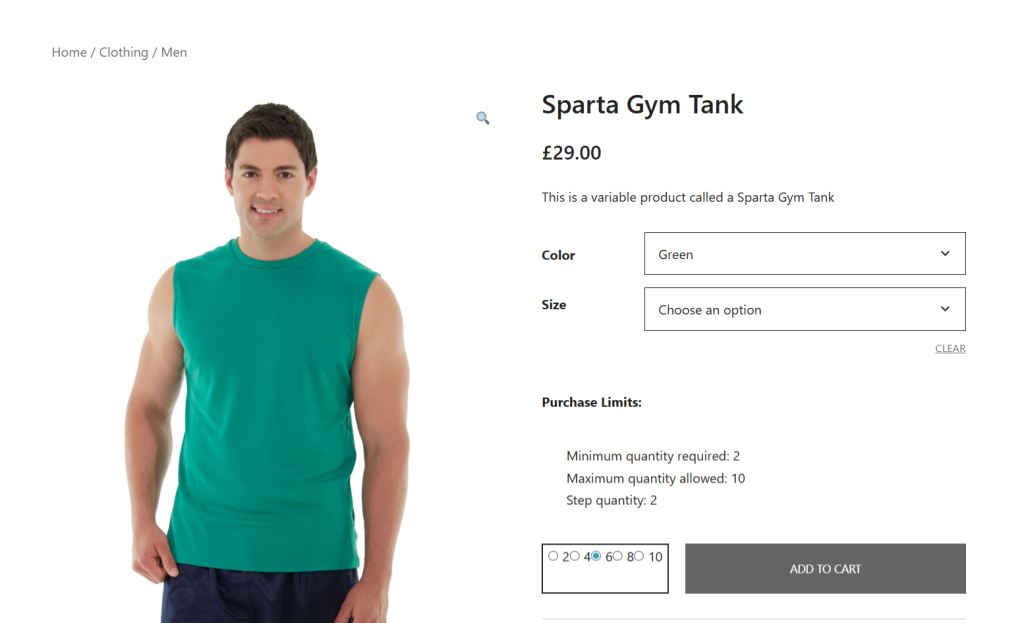
- Next, go to the Actions tab. Here, choose your preferred quantity selector style: either plus/minus buttons, a select dropdown, or radio buttons.
- You can also configure other settings in the Actions tab, including:
- Minimum quantity: the smallest number customers can order.
- Maximum quantity: the largest number allowed per product or category.
- Step increment: how much the quantity increases or decreases when adjusted.
- Default quantity: the starting value shown when the product detail page loads.
- Once you’ve defined the conditions and actions, scroll down and press “Save Changes”.
That’s it. Your new quantity rule will now be active on your WooCommerce store.
How to change the WooCommerce quantity input type settings storewide
Follow these steps to configure minimum and maximum quantity rules across all products in your entire WooCommerce store:
- Go to your WordPress admin dashboard and navigate to Dotstore Plugins → Min/Max Quantity → Settings → General.
- Here, you can define the WooCommerce minimum and maximum order quantity limits that will apply to all products in your store.
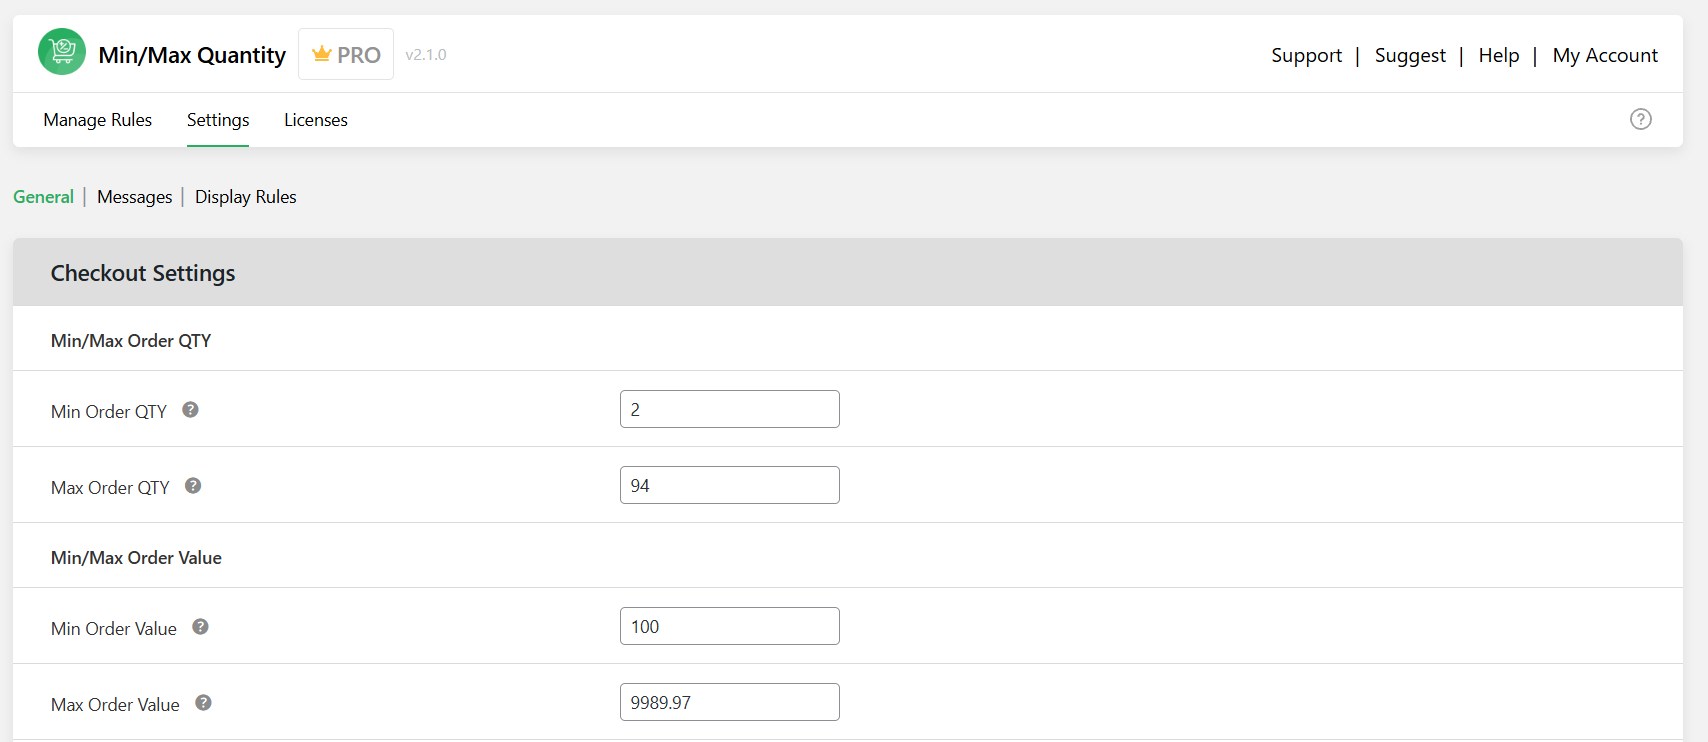
- After making your changes, click “Save Changes” at the bottom of the page.
How to change WooCommerce quantity input settings for specific products and categories
Follow these steps to set up minimum, maximum, and step quantity rules, adjust the default quantity, and customize the WooCommerce quantity input style:
- Install the free or pro version of the “Min/Max Quantity for WooCommerce” plugin on your site.
- In your WordPress admin dashboard, head directly to Dotstore Plugins → Min/Max Quantity and click on the “Add New” button.
- Give the rule a name for easy internal reference.
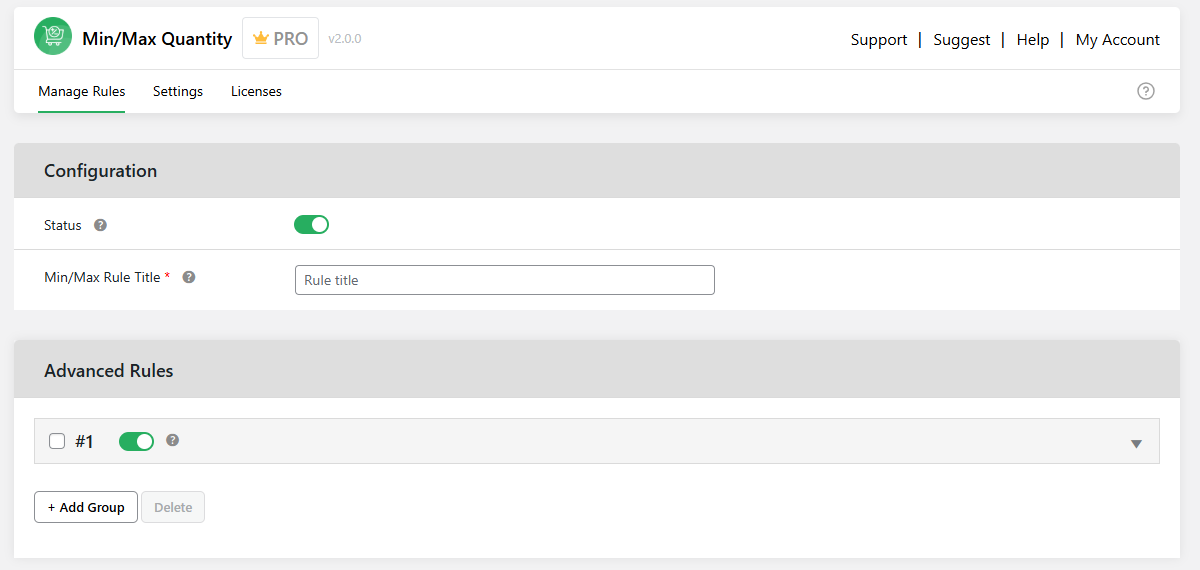
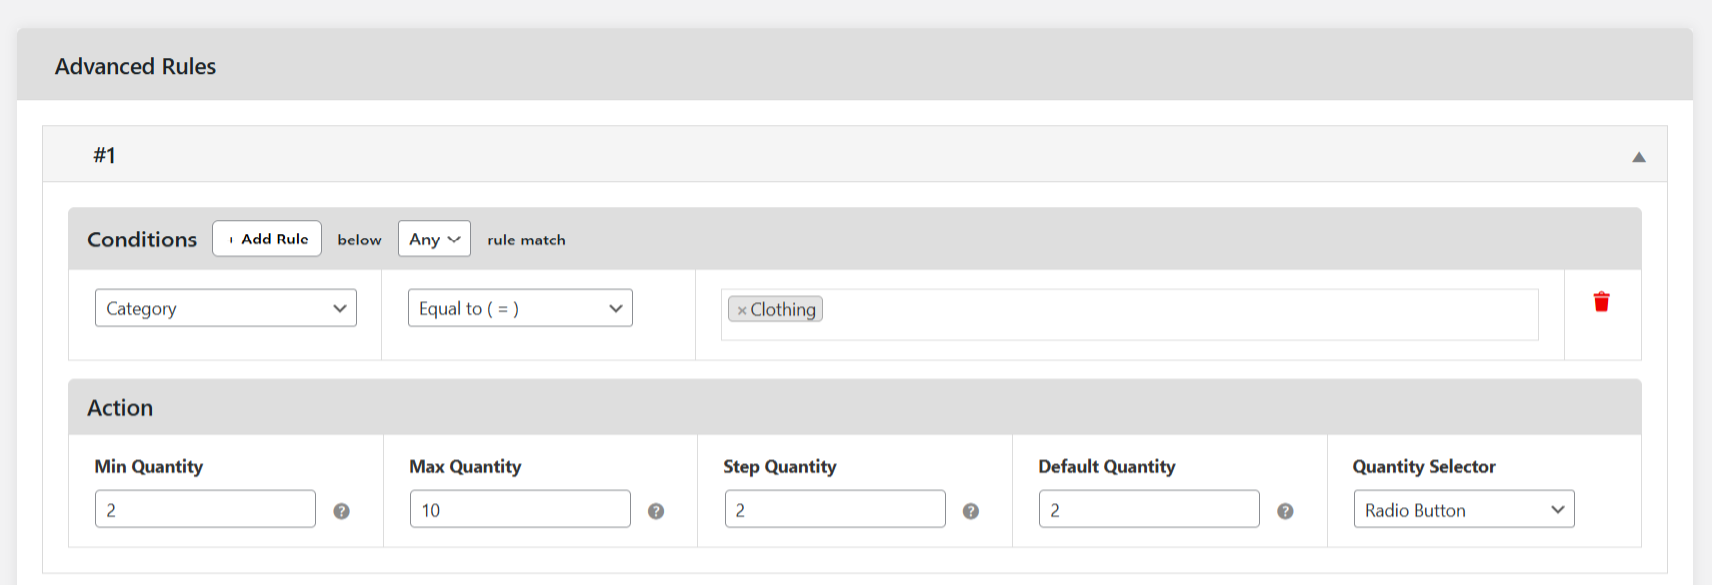
- Next, navigate to the “Advanced Rules” section within the Edit page and expand the first collapsible tray.
- To define the conditions for applying the rule:
- To apply the rule to specific products, pick “Product” from the left dropdown. Then enter the product names in the right dropdown.

- To apply the rule to product categories, pick “Category” from the left dropdown. Then enter the relevant categories in the right input field.
- To apply the rule to specific products, pick “Product” from the left dropdown. Then enter the product names in the right dropdown.
- Now, add additional conditions, such as user roles, shipping zones, shipping methods, stock levels, etc., as needed.
- In the “Actions” section, change WooCommerce quantity input settings as needed. You can modify the minimum quantity, maximum quantities, step quantities, and default values, along with your preferred WooCommerce quantity input style.
- Once all settings are configured, press the Save Changes button from the bottom of the page.
Additional settings
How to modify error messages for customers who don’t meet the updated quantity input options
- In your site’s admin panel, navigate to Dotstore Plugins → Min/Max Quantity → Settings → Messages.
- From here, you can amend the notifications shown to customers when their quantity input selections don’t align with the updated options.
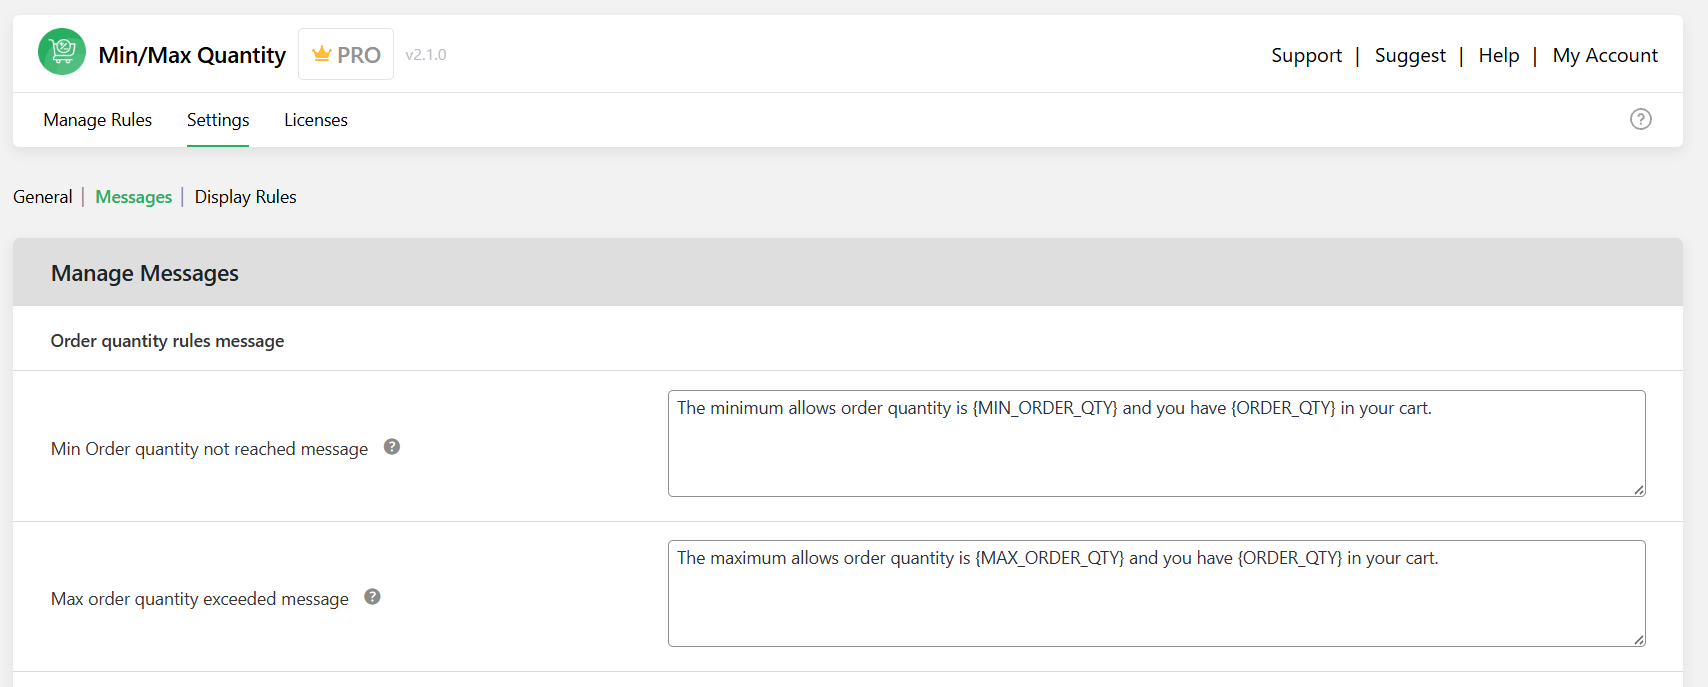
- Once you’ve amended the messages, click “Save Changes” to apply them.
How to showcase modified quantity options on the individual product and cart pages
- From your site’s admin panel, navigate to Dotstore Plugins → Min/Max Quantity → Settings → Display Rules.
- Choose whether to position the table above or below the “Add to Cart” button on product detail pages. Optionally, you can also add a custom heading or text to appear above the table.
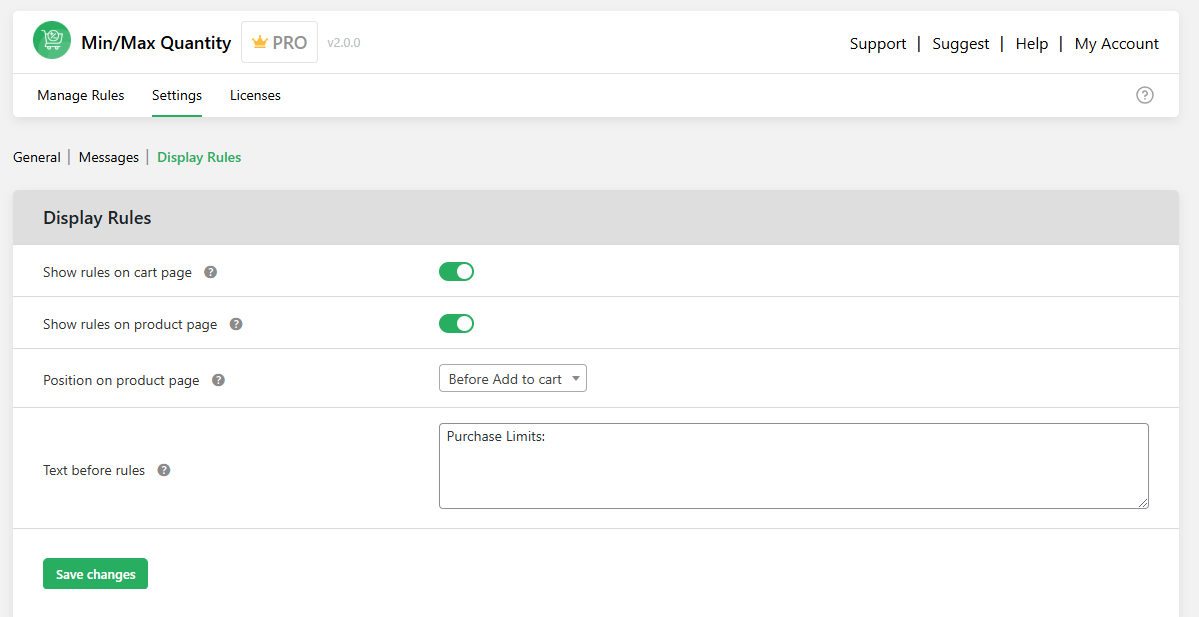
- When you’re finished, click “Save Changes” to finalize the settings.
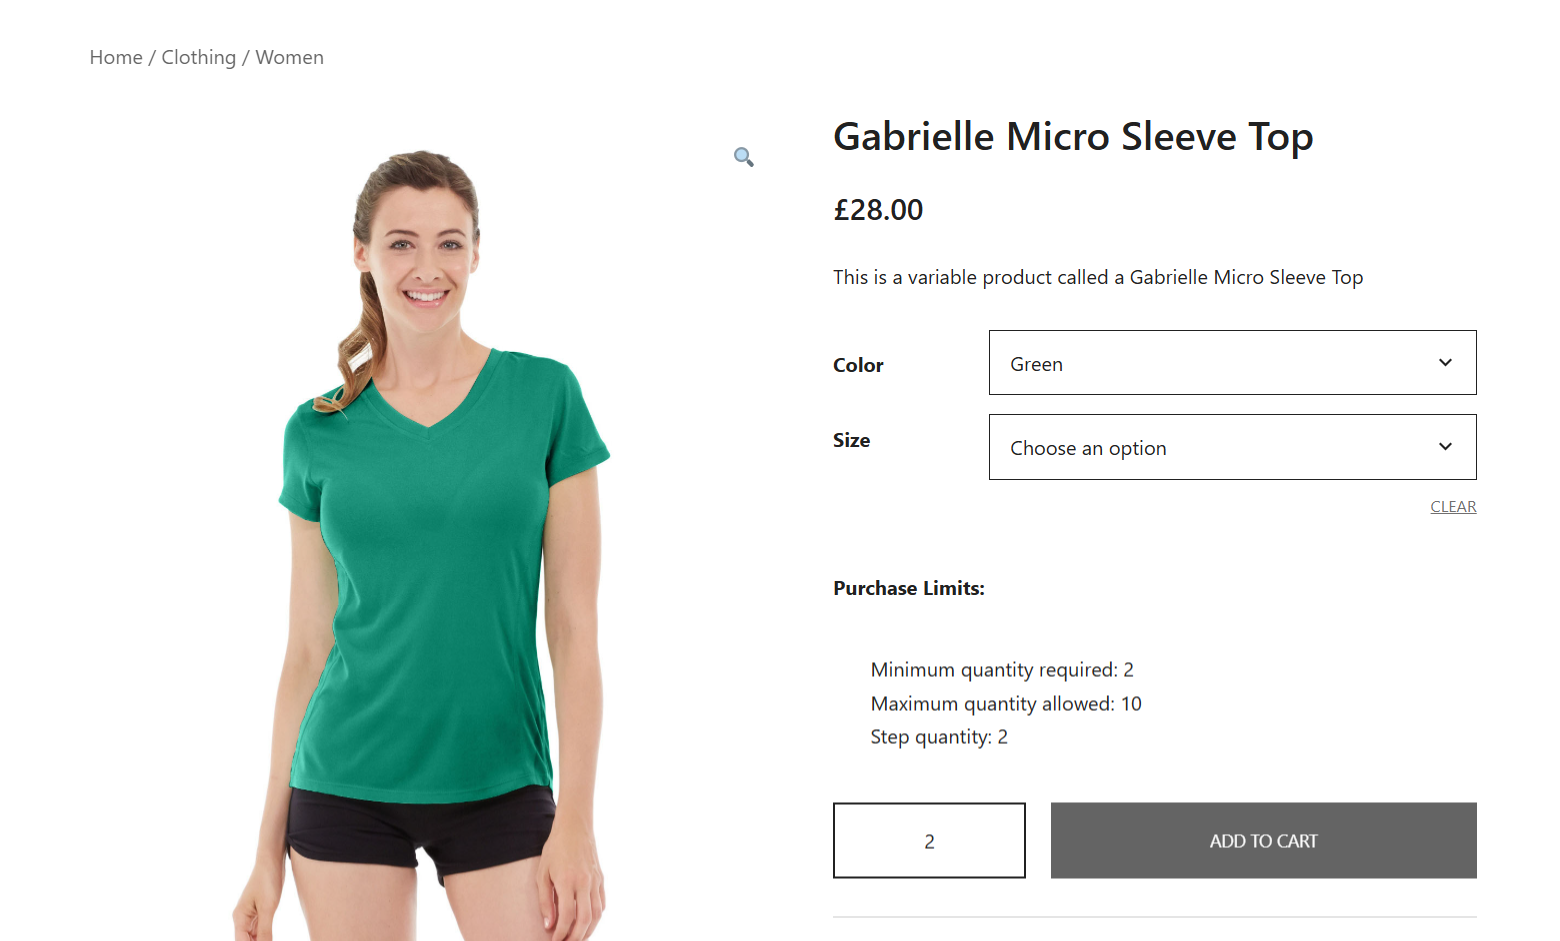
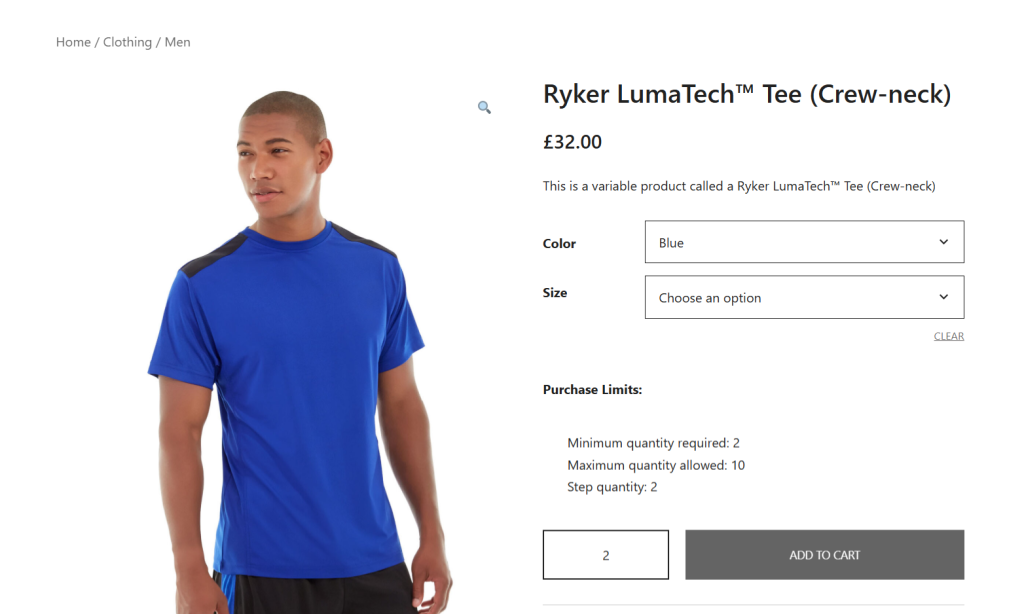
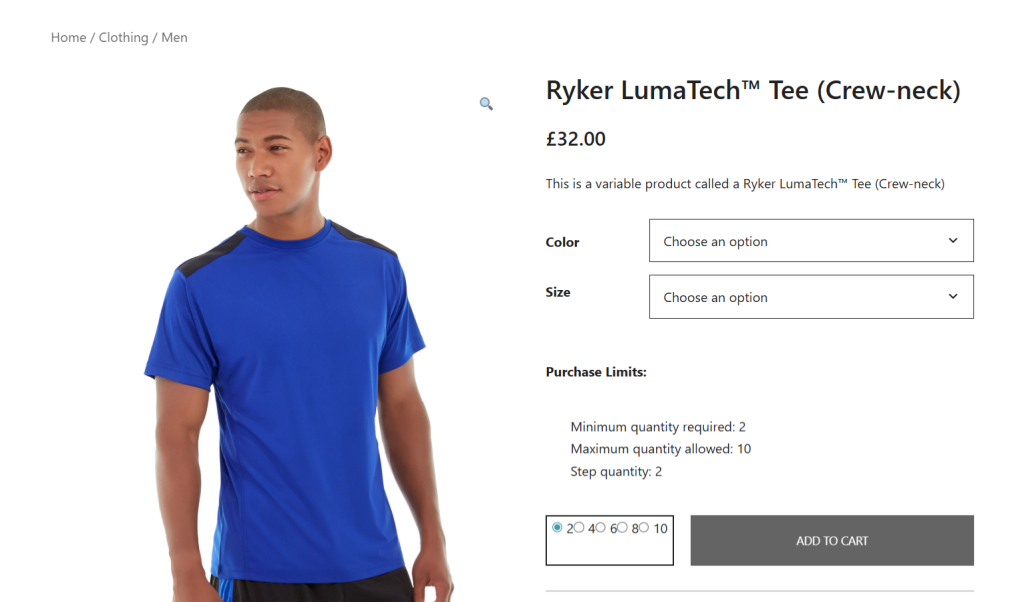
And you’re set! Here’s a quick preview of the product detail page of a demo WooCommerce store showing the updated WooCommerce quantity input options.
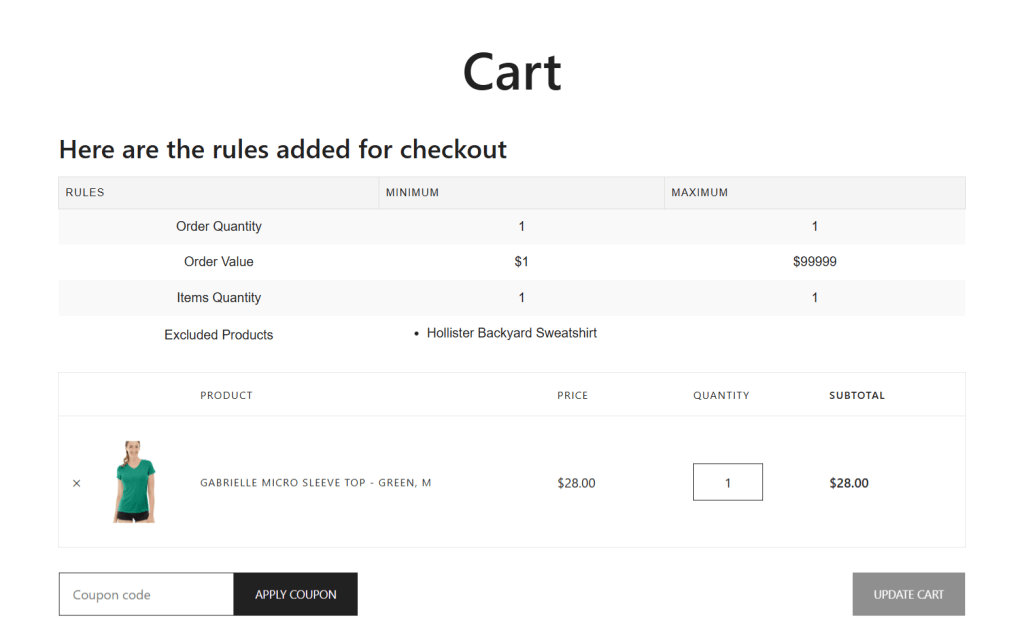
Here’s a preview of the cart page of the demo WooCommerce store showing the updated WooCommerce quantity input options.
FAQs about WooCommerce quantity input
What is the WooCommerce quantity plus minus button?
In WooCommerce, the quantity plus minus button is a user interface feature that allows customers to adjust product quantities with a simple tap or click. Instead of manually typing numbers into the default WooCommerce quantity field, customers can quickly increase or decrease product quantities using “+” and “−” buttons placed beside the input box. The field updates automatically, in line with the quantity rules set in your WooCommerce store.
Many admins believe that quantity plus minus buttons reduce input errors due to typing and make it faster and easier for customers to select their desired quantity (particularly on mobile). Plus, depending on the design of your chosen theme and product detail page, it can look modern and intuitive compared to a plain number box.
Should I use custom code to change the quantity plus minus button?
Using custom code to modify the quantity plus minus button in your WooCommerce store can be a viable option, but it may not always be the best approach for every store. The decision depends on various factors, namely (1) your technical expertise, (2) maintenance resources, and (3) how complex your store’s quantity input requirements are.
WooCommerce updates may break custom scripts and require ongoing developer support to make sure the features continue to work. Not to mention, themes, caching tools, or third-party plugins may conflict with your custom implementation.
Most stores find that it’s better to use a reliable plugin like Min/Max Quantity for WooCommerce to change the quantity plus minus button in WooCommerce and add advanced product quantity features.
Customize the WooCommerce quantity input settings today
In this tutorial, I’ve shown you step-by-step two different methods to modify the quantity input in your WooCommerce store. If you’ve followed the steps laid out, you’ll have been able to:
- Change the style of the quantity input field to customize the interface through which customers can select product quantities when shopping in your online store.
- Customize the value of the standard quantity input field to set minimum and maximum quantity limits, adjust the default quantity, and modify the step quantity increment value.
These customization options aren’t built into WooCommerce by default but you can easily set them up with the Min/Max Quantity for WooCommerce plugin. It is flexible, simple to use, and enables you to modify your store’s quantity input settings globally, per category, and on a per-product level.
Get started with the free or pro version of Min/Max Quantity for WooCommerce and modify your WooCommerce store’s quantity input settings in ten minutes or less!
Min/Max Quantity for WooCommerce
Set min/max/step quantities to manage product quantities effectively and enhance the customer experience in your WooCommerce store.
14-day, no-questions-asked money-back guarantee.

🛒 Take Control: Set Min/Max Limits and Quantity Steps!
Try the plugin 100% risk free!