Table of Contents
WooCommerce is, without a doubt, one of the most widely used WordPress plugins to create and deploy an online store. Till January 2021, the total number of WooCommerce downloads has crossed over 123 million, which includes nearly 30% of the total eCommerce websites.
The primary reason why WooCommerce is so popular is that it has a range of eCommerce features and functionalities that make it the first choice of most online store owners.
One such feature that the platform includes is its ability to customize shipping options. Where most online stores stick to a single shipping rate, WooCommerce has a feature that allows a WooStore owner to set flat or table rate shipping for products.
What is Flat Rate Shipping?
In case you have had the experience of sending items via a post rather than a courier, you would be aware of their pricing norms. If the total weight of a package falls below the threshold, you are expected to pay a fixed rate. In case, if the weight exceeds the value, the price increases by a certain factor.
Imagine it this way.
You visit a courier service, say X. They have a policy where packages below 10kg cost $5. For packages exceeding the weight, the price increases by $3 for every 5kg.
That’s how flat rate shipping plugin works. If the product purchase falls within predefined criteria, the shipping rate is kept fixed; in some cases, it can even be free. However, if the total weight, amount, or price surpasses the threshold, the shipping rate would increase as per the terms set by the store owner.
The additional amount is based on the rules set by the owner and is dependent on several factors. We will discuss this later in the article.
For now, it is clear that flat rate shipping charges are a fixed-rate price, paid by the customer for availing shipping services. The rate fixed for different conditions and slabs may differ.
When Should You Opt For Flat Rate Shipping?
When you first started with WooCommerce, you would have been accustomed with the two common shipping forms.
- Free shipping
- Standard shipping
Free shipping as the name says is offering products with zero shipping charge. On the contrary, standard shipping is one where the rate is reliant on the weight and quantities of the product. This creates ambiguity as the prices fluctuate and every time a customer reaches the checkout page, he is surprised.
It might so happen that two buyers living adjacent to each other brought similar products with one paying more than the other. While the answer to this would be pretty easy as one purchased more, it still infuses distrust as users aren’t aware of the prices.
To avoid this, it is best advised that website owners invest in the flat rate shipping method. For one, the flat rate shipping method lowers the average shipping cost and further, adheres to a single cost in a zone. Additionally, the inception of flat shipping rates eliminates all those weight-related disputes and infuses a sense of trust among buyers, attracting them to further engage with the business.
To put it this way, the flat rate shipping method is a win-win both for the buyer and the seller. The former doesn’t have to pay extra whereas the latter receives as much as needed to ship the products. At the same, a single rate shipping fee lures buyers to purchase more which alternatively increases the average revenue earned by the seller.
Advanced Flat Rate Shipping Methods
Boost your WooCommerce store’s revenue with flexible shipping options. Your business deserves the best!
14-day, no-questions-asked money-back guarantee.
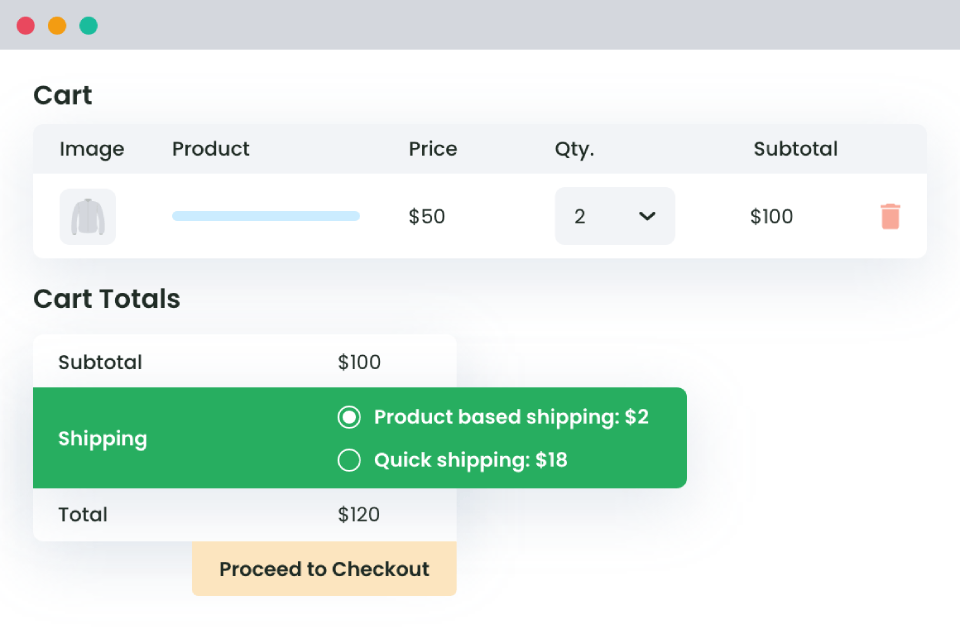
What is Table Rate Shipping?
Table rate shipping lets the store owner define complex shipping rules based on weight, destination, number of items, shipping class, and total price. This is a variable pricing method that lets you have custom pricing for every buyer, rather than a flat fixed rate increase.
How to Set up Flat Rate and Table Rate Shipping for WooCommerce?
Managing and monitoring the shipping rates can be done using the WooCommerce settings panel. However, the process is lengthy and requires you to do a lot of things manually. A better alternative is to use the Flat Rate Shipping Method plugin for WooCommerce.
Buy Now :
– Advanced Flat Rate Shipping Method plugin for WooCommerce
One of the most widely used shipping plugins designed to help website owners customize the shipping options of their store, this is simple and easy to use. Furthermore, it comes with a dozen conditional settings that enable you to set different shipping options.
Here is the complete process of how to set up and use the Advanced Flat Rate Shipping Plugin for WooCommerce.
Step 0: Pre-requisites
- Set up WordPress
- Install WooCommerce
- Purchase the Advanced Flat Rate Shipping Plugin
- Have a payment gateway setup
Step 1: Install and Activate the Flat Rate Shipping Plugin
- Download the plugin: Before we move to the configuration process, it is a must to download the plugin.
- The flat rate shipping has both a free and a premium version of the plugin. Visit the official website to download the plugin.
- Once you have downloaded the plugin, open your WooCommerce site’s admin side.
- Enter the login credentials and move to the dashboard.
- Here move down to the plugin section. Click on add new.
- On the top right, you will see an upload option.
- Click on it and add the downloaded file.
- Now install the plugin and activate the same.
Step 2: Configure Your WooCommerce Store Details
- Move to WooCommerce and click down on the settings option.
- Here, you would need to add all of the information related to the store, its address, country, zip code, etc
- Next, select the countries where you plan to ship the products
- In case, you want to sell products across all regions, you can simply select on ‘sell to all countries’, if not, you can select, sell to countries except.
- Follow a similar process for the shipping regions.
After you are done with the two, we can now move forward with the customization process.
Step 3: Adding Flat Rate Shipping Method
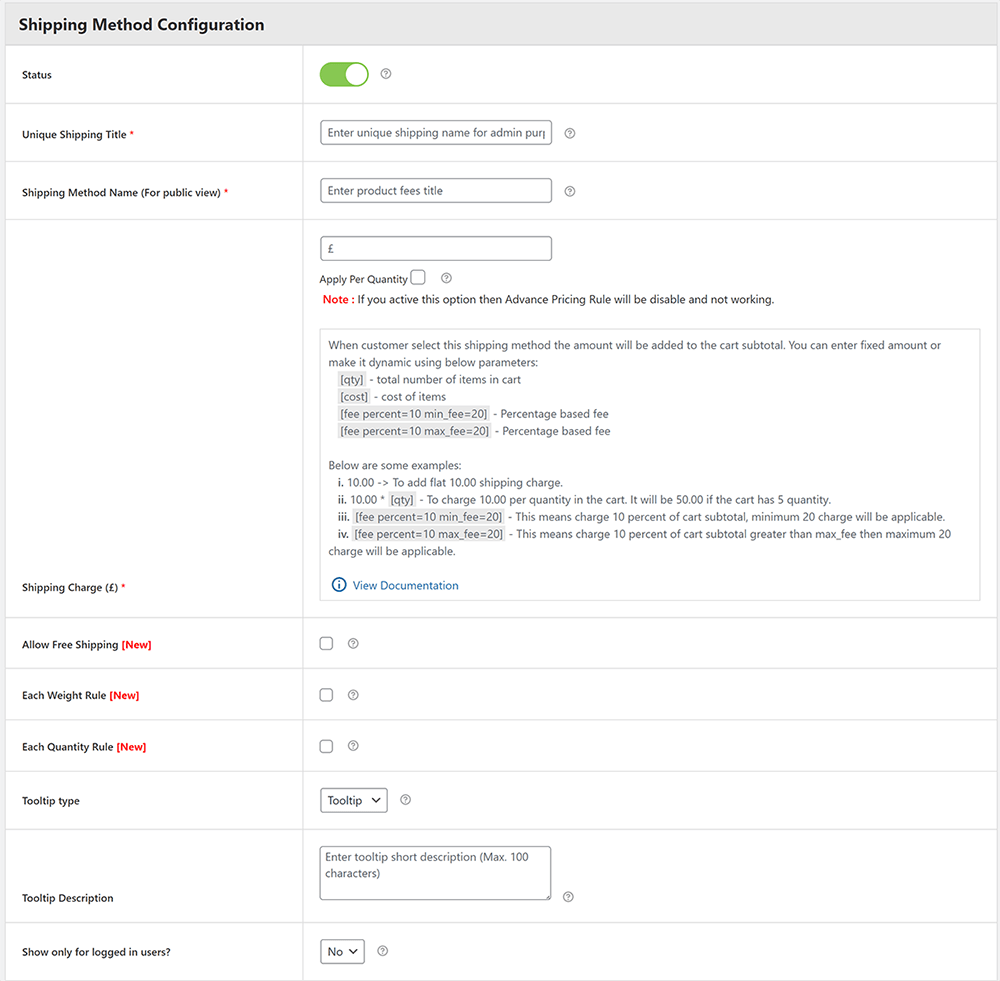
After you have activated the plugin, we will now configure it. Go to the plugin dashboard. You will find a few tags. Click on add new Shipping method.
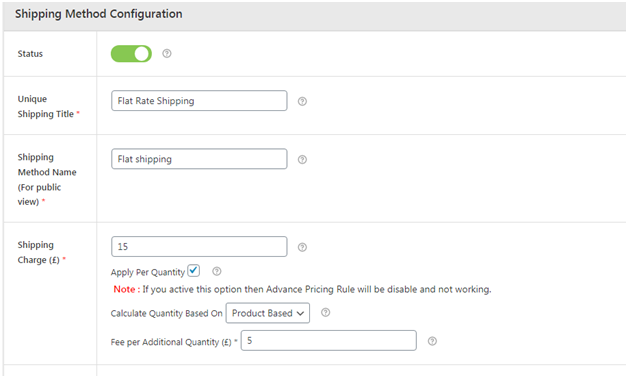
- The page with a form kind of structure with numerous fields will open up.
- The first tab is a toggle switch named status. Toggle it on to activate the shipping rule. This is an easy way to deactivate a method.
- Next, add a title method. This will help you differentiate between methods.
- Similarly, your need to add a name to the method. Remember this is visible to your buyers.
- Now based on your preferences, set a shipping fee. Either you can have a fixed rate or percentage-based figure.
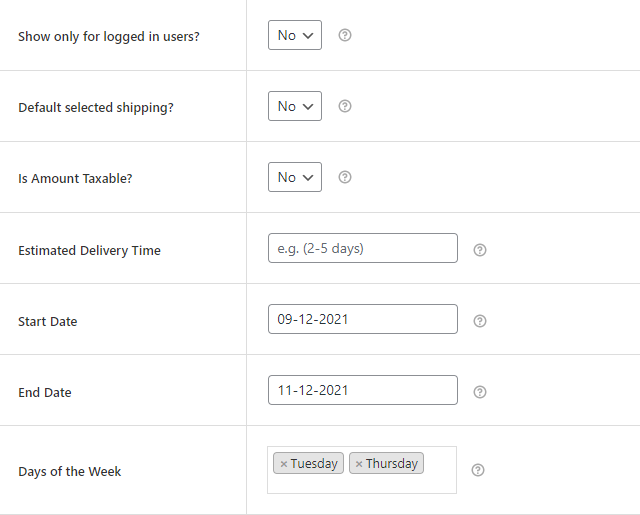
- Specify whether the value-added is subject to taxes or not.
- If the method is for a particular period, you can specify the start date and the end date.
- At times, you would run campaigns for a few hours. With the plugin, you can set a time interval between which the plugin remains active.
Step 4: Configure Flat Rate Shipping
The process of customizing the shipping method is pretty easy. All that you need to do is create a rule on which the shipping rate would be based and then apply it to get started.
A. Set Up Shipping Method Based On Country
To begin with, we see how to set up flat rate shipping based on the country –
- The first thing that we need to do is add the shipping method. On the WordPress dashboard, click on the DotStore plugin option on the left and then select an advanced flat rate shipping method.
- After this click on Add a new shipping method. This will take you to a second page.
- Here, enter the title by which you wish to designate the rule or the method and also the shipping price (say $5).

- Just below, you will see select rules. Here you need to select the country. To add countries in the shipping method, you need to select equal to and to exclude them, select not equal to.

- Do not forget to save settings.
The changes made can be viewed on the checkout page. For countries that fall within the list, the shipping charges would be $5. For others, no rate would be displayed.
B. Set Up Shipping Method Based On State
The method for this is similar to the one we just executed in the process above. You can try it by simply changing the rule from country to state.
A quick run-through at the process:
- Log in to the WordPress dashboard and more down the panel to click on the DotStore plugin option. Here, select the plugin that says advanced flat rate shipping method.
- Once you click on it, a new page opens up which is nothing but the setup page.
Advanced Flat Rate Shipping Methods
Boost your WooCommerce store’s revenue with flexible shipping options. Your business deserves the best!
14-day, no-questions-asked money-back guarantee.
- Enter the rule title, here that would be shipping based on state. Also, enter a price that you wish to charge when orders are placed from a particular state. (say $45).
- On the next page, enter the rules. To do so, you need to select the states and add equal to or not equal to based on which states you want to add in the rule.

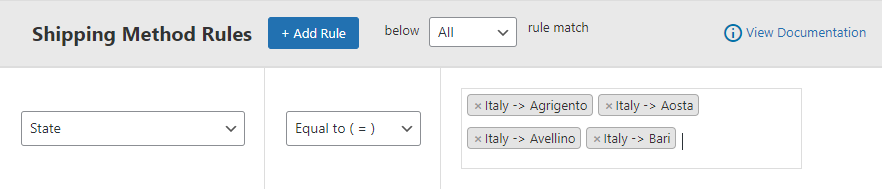
- Once you are done click on save to reflect the changes.
You can verify the changes by visiting the checkout page to see if the shipping charges have been changed based on the state. In case, a buyer enters a state that is not on the list, no shipping charges would be shown.
Rather, the user would be given a message which reads: ‘No such shipping method is available in the store for now. Please verify the entered shipping address & other details. Contact us for further resolution of the issue.’
In this situation, the buyer can select the link that says: Calculate shipping rates.
Upon doing this, the user would be given a list of available states. He can choose one from the list and then head out to the payment.
Recommended for You –
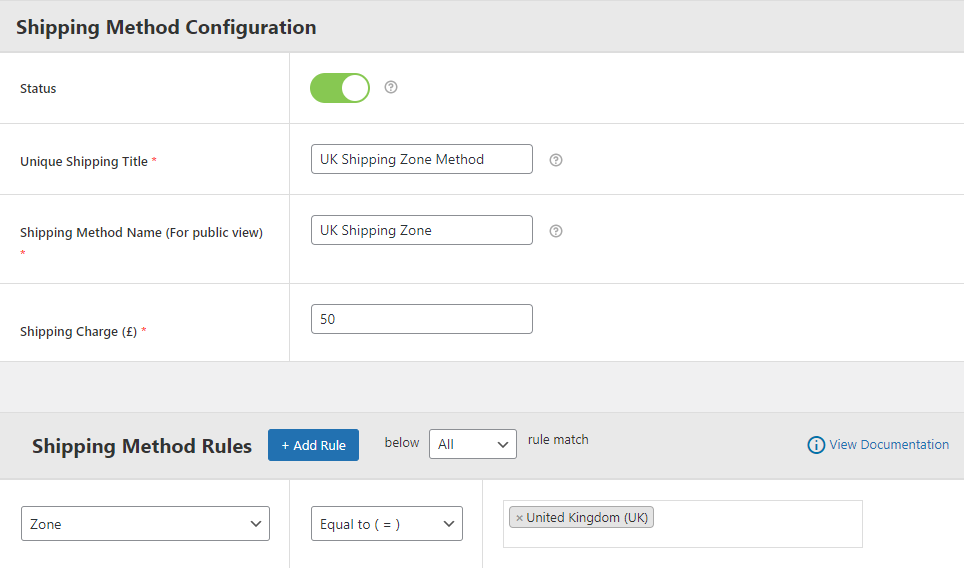
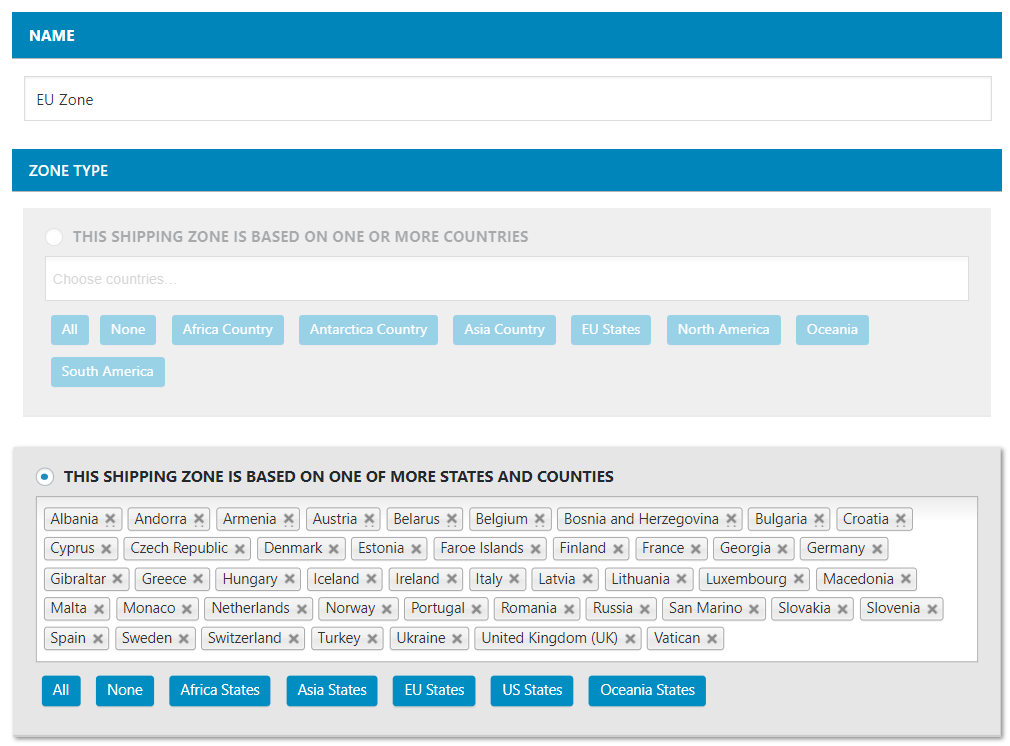
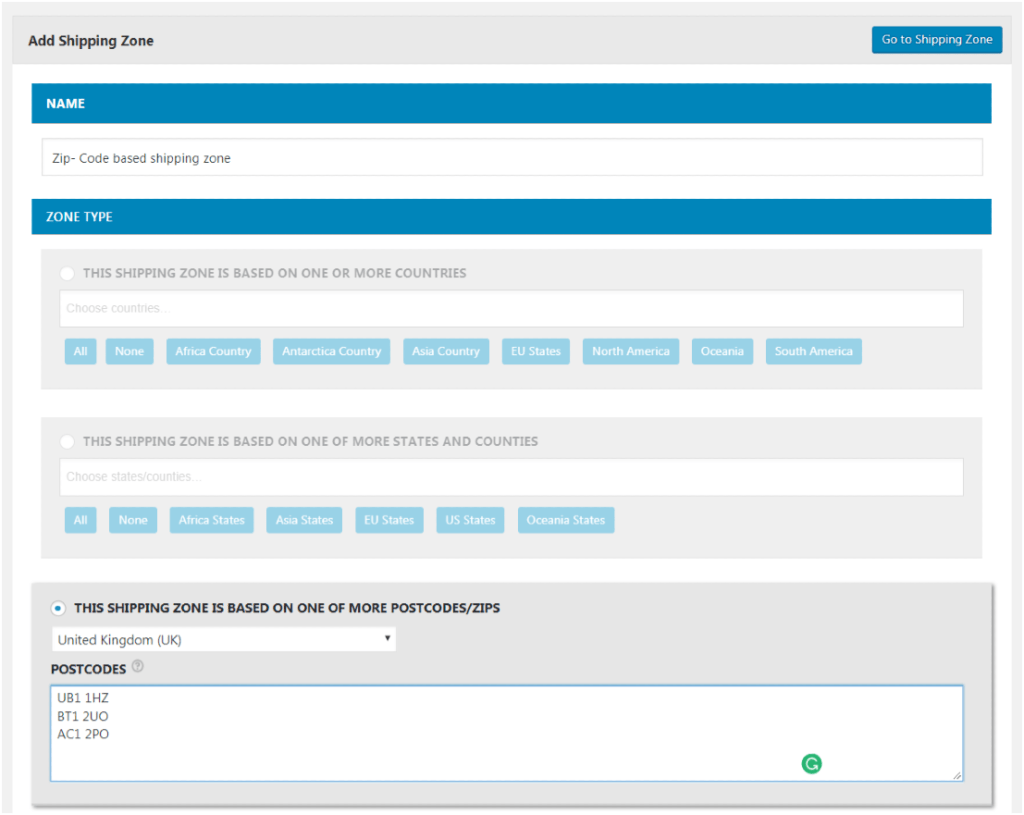
C. Set Up Shipping Method Based On Zone
- Assuming that you are already on the plugin page, click on manage shipping zones, adjacent to the ‘add a new shipping method’ tab.
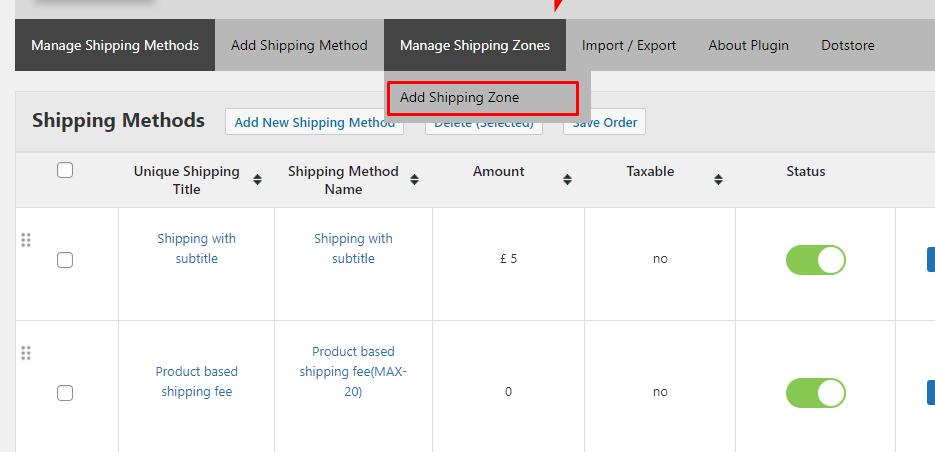
- Now, there are three types of zones that you can create.
- Based on the country: this allows you to create shipping zones based on the country
- Based on country and state: this allows you to create shipping zones based on the county and state
- Based on postal area: this allows you to create shipping zones based on the postal code.
- Here, we focus on creating the same using postal zones. Add the cities and finally click on save.
Note: there are three different ways to create a zone using the advanced flat rate shipping method.
- Set up countable codes and separate them by a comma.
- Set up codes using a series.
- Use the first three prefixes of the code for a certain region.
Now that we have created the shipping zone, we will add rules for it.
- Move to the ‘add new shipping method’ tab.
- Here, select shipping by zone
- Click on save to update the settings.
With this, we come to an end of the geographical shipping rates. You can follow a similar process to set up shipping rates based on the quantity of the items, the weight of the package, or the cart subtotal.
Recommended for You –
How to set up a WooCommerce shipping method based on a Zone?
D. Set Up Shipping Method Based on User Role
In case, you want to set a free shipping option for a certain set of users, you would need to follow a much similar process.
- Log in to the Advanced flat rate shipping plugin page.
- Here, click on add a new shipping method.
- Since we are to add free shipping, name the rule as free shipping.
- Next, select the categories for which you want to set free shipping and while you are doing so, make sure you set the shipping price as zero.
- The above suggests that users falling under a certain category are charged as little as zero dollars for the shipping. In a way, their shipping is free of cost
- You can add multiple rules to make sure that the free shipping option isn’t limited to a single rule.
E. Configure Multiple Shipping Methods To Decide Which Takes Precedence
One thing worth noting here is how to manage shipping methods. What we mean to say is that there could be a possibility where a single purchase has multiple rules.
For instance, suppose that Alex is from Norway and has made a purchase of $25000 from the store. Now, there are two rules that stand functional:
- Customers of Norway are eligible for free shipping
- For every cart value exceeding $15000, a flat shipping rate of $20 is applicable.
Under such a situation, how would you expect the plugin to behave? Of course, there is a clash that arises between the rules.
Advanced flat rate shipping method has a solution for this too.
The page that you were using to add a new shipping method has an option that says manage shipping method. There are four different options available:
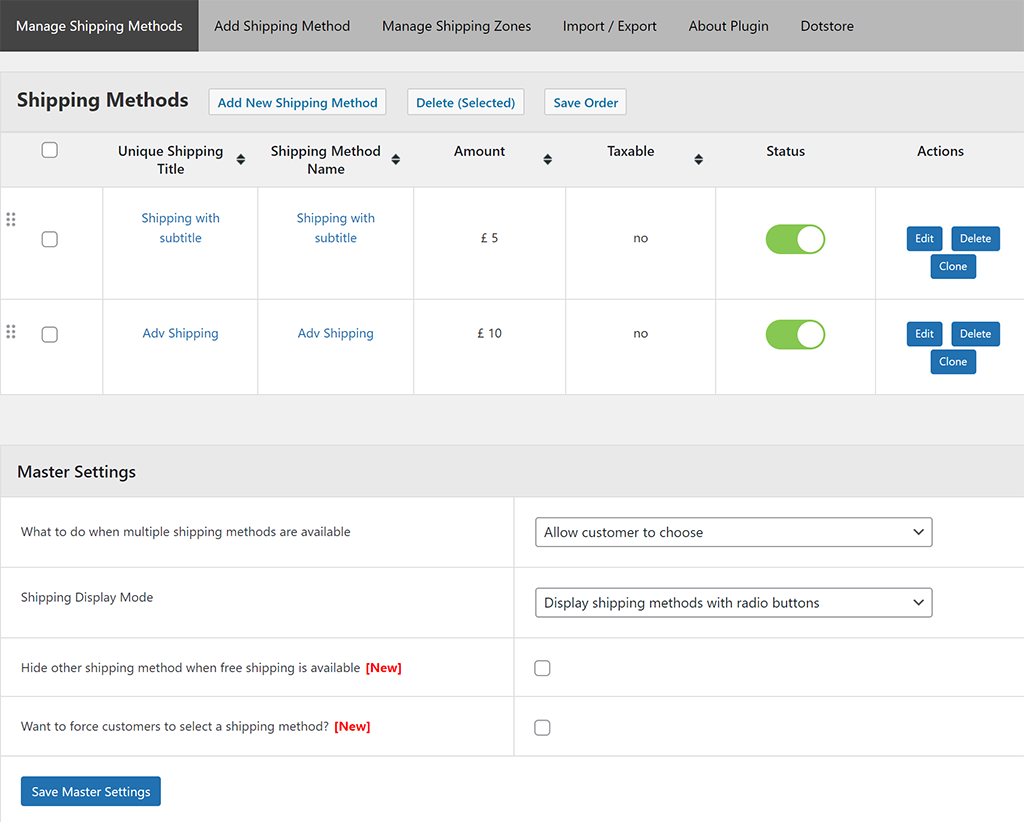
- Apply Highest – This allows the system to go with the highest shipping rates.
- Force All Shipping Methods – This embodies a situation where the plugin is forced to apply all the rules.
- Apply Smallest – Something that would please your buyers as it seeks the least fee
- Allow Customer Choose –Another one in the court of buyers and this time, it gives users the choice to select which rule they wish to go ahead with.
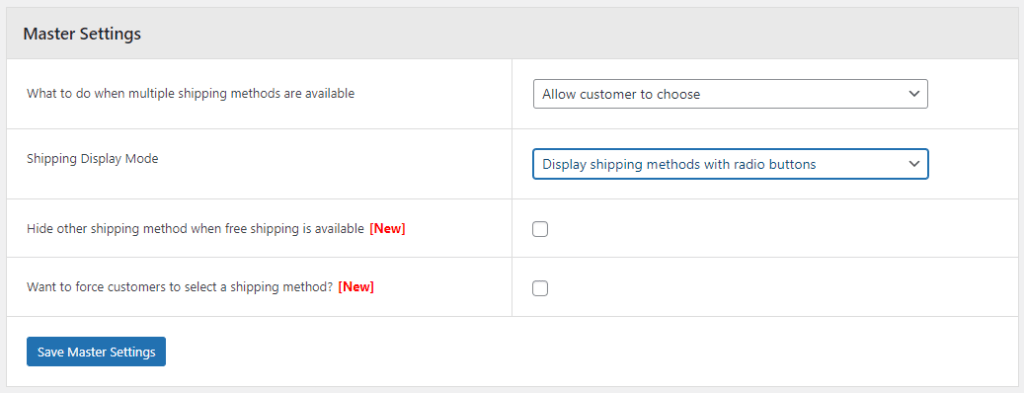
You can set one of these, save the changes. Once done, you have now successfully set up a flat rate shipping method for your WooCommerce store.
Step 5: Configure Table Rate Shipping Rules
Now that you want to create table rate shipping rules, you will have to enable advanced shipping price rules. Please keep in mind that we can create rate tables by creating multiple conditional rules too. However, the process will become complicated and time-consuming if done that way. So, utilizing the advanced price rules is better.
Once enabled, you will see the navigation panes to create shipping rate rules for different parameters. As per your requirement, you may go to the desired parameter pane and fill in the details.
Advanced flat rate shipping plugin lets you add lower limit, upper limit, parameter, and price for each rule you create.
Example Use Cases – Table Rate shipping
Let’s say you want to charge $5 when a customer purchases 1 to 10 t-shirts, $10 for 11 to 15 t-shirts, $15 for 16 to 20 t-shirts, and $20 for more than 20 t-shirts. In this case, go to Cost per product and add values as you want. It will look something like this:
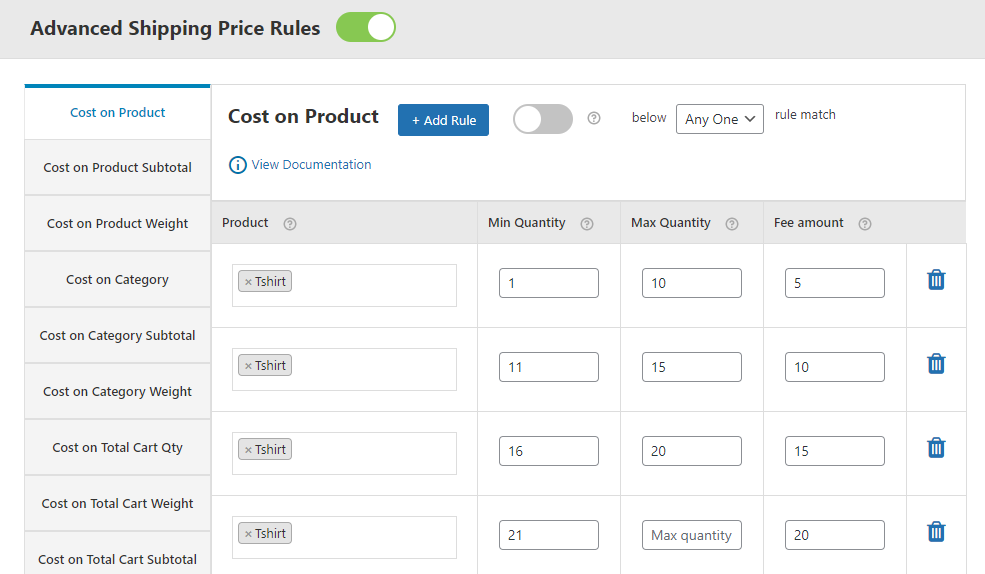
Once done, save your table rate shipping rules.
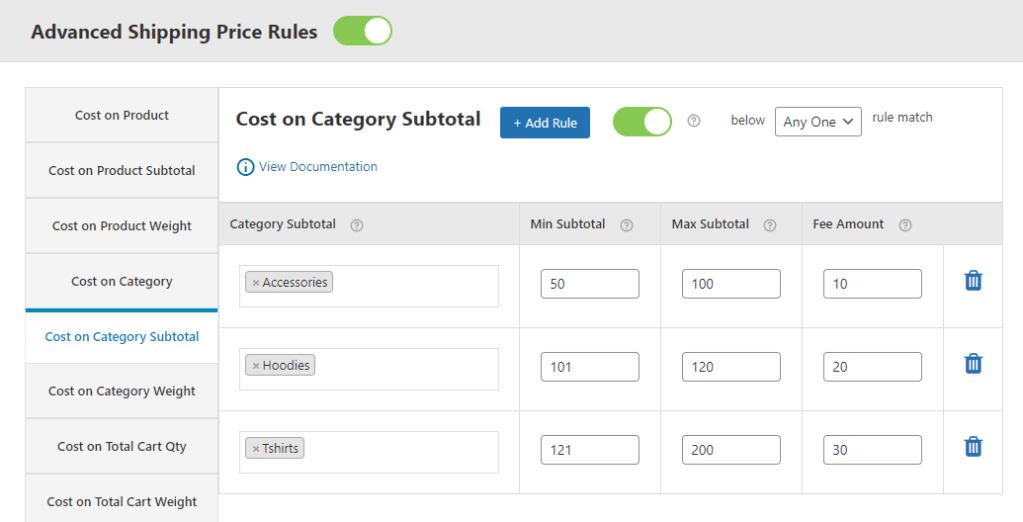
Similarly, if you want to apply shipping cost as per category subtotal. Such as, from $50 to $100 being spent in purchasing clothing, the shipping fee is $10. You can create such rules easily using the advanced shipping rate plugin. Here is an example:
Wrapping Up
Both flat rate and table rate shipping can be excellent options to add flexibility to your shipping methods on WooCommerce. It gives you the ability to charge every customer a fair shipping cost based on individual parameters, rather than overcharging or undercharging them.
Take full control of your WooStore with the Advanced Flat Rate Shipping Plugin for WooCommerce.
Have questions? Drop a comment to let us know!
Advanced Flat Rate Shipping Methods
Boost your WooCommerce store’s revenue with flexible shipping options. Your business deserves the best!
14-day, no-questions-asked money-back guarantee.